6/30/2012

Creating a Redo live CD


You can use the free, open-source Redo Backup and Recovery utility to back up (and, if necessary, restore) all software and data on your PC hard drive. This document can help you create a Redo live CD, though which you can create a full-system backup of any PC that has a single Linux or Microsoft Windows operating system.

Note: As of June, 2012, Redo does not let you back up and recover a dual-boot PC. For example, if you have set up dual-boot Linux and Windows on your PC, you cannot use Redo to back up that PC. However, the free, open-source Clonezilla does let you back up and restore any dual-boot PC.


Downloading and Burning - As I demonstrate in my video above, you can create your CD as follows:
  1. Go to the Redo website, and then, at the top of the page, click download to display the Get Redo Backup page.
  2. In the section Getting Started - 1. Download the latest live CD image, click the yellow word here to display a SourceForge Redo download page.
  3. Click Download, and wait until the ISO file has finished downloading.
  4. Place a blank, writable CD into your optical drive.
  5. Burn the Redo ISO image to your blank CD. For example, in Ubuntu, you can right-click redobackup-livecd-1.0.3.iso, click Open With Brasero Disc Burner to display the Image Burning Setup window, and then click Burn. For more information, see How to burn a bootable CD or DVD.
Backing up and restoring - The Redo live CD lets you backup and restore the main hard drive on your PC:
  • As I explain in Backing up your PC through a Redo live CD,  you can back up any single-operating-system PC.  Boot your PC through the Redo live CD, which lets you create a backup of the hard drive on that PC. Redo stores the backup on external media, such as an external hard drive.
  • Subsequently, as I explain in Restoring your PC through a Redo live CD, you can use your Redo live CD, and the backup on your external drive, to restore the backup to your PC.

6/27/2012

Installing Xubuntu

Based on Ubuntu, Xubuntu is a lean distribution of the LInux operating system that:
  • Lets you access your applications through traditional menus, providing an alternative to other operating systems that access applications differently.
  • Runs well on older or slower PCs. Why discard a PC simply because it is too slow for MS Windows?
Xubuntu has an Xfce desktop environment that requires fewer hardware resources than does Unity, which is the standard Ubuntu desktop environment. This document contains procedures that can help you create an Xubuntu bootable disc, and then use it to install Xubuntu.

Notes:


Creating an Xubuntu bootable disc - You create an Xubuntu bootable disc (live CD or DVD) by downloading and then burning an ISO file. To create an Xubuntu bootable disc, do the following:
  1. Go to the Xubuntu website, click Get Xubuntuand then click a download mirror according to your region, such as the United States. Alternatively, you can use a torrent download.
  2. Click on PC (Intel X86) desktop CD to download its ISO image. Alternatively, you can select  64-bit PC (AMD64) desktop CD.
  3. In your Downloads folder, right-click the image file, such as xubuntu-12.04-desktop-i386.iso, and then select a disc burner, such as Brasero.
  4. Place a blank, writable CD or DVD into your optical drive, and burn your Xubuntu bootable disc.

Installing Xubuntu on your PC - To install Xubuntu through its bootable disc, do the following:
  1. Place your Xubuntu bootable disc into the optical drive on your PC, and then reboot it.
  2. Click Install Xubuntu to start the installation process. Note: You can first try Xubuntu by running it from its live CD. This does not disturb your current operating system.
  3. Select an installation type, and then click Continue.
  4. When your are ready to install Xubuntu, click Install Now.
  5. Select your time zone, and then click Continue.
  6. Either accept the default keyboard layout, English (US), or select another according to your requirements, and then click Continue.
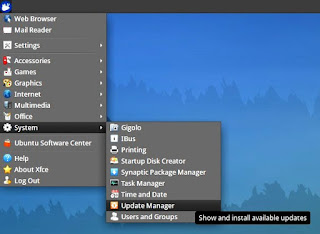
  7. Type your user name, create a password, and then click Continue.At the upper-left desktop corner, click the Applications Menu (mouse) icon, select System, click Update Manager, and then install all updates.


6/12/2012

How to install TrueType fonts in Ubuntu

Microsoft TrueType fonts facilitate creating and editing documents that you can share among MS Windows and other operating systems. If you cannot successfully install TrueType fonts graphically, you can do so by command line.


Installing Ubuntu TrueType fonts graphically - To install TrueType fonts graphically, through the Ubuntu Software Center, do the following:
  1. In the Launcher, click the icon for Ubuntu Software Center.
  2. Type installer truetype in the search field (at the upper right), select installer for Microsoft TrueType core fonts and then click More Info.
  3. Read the description of the Installer, and then click Install.
  4. Type your password and then click Authenticate.
  5. Accept the EULA licence terms, and then click Forward.
  6. Close all applications, reboot your PC and then verify you can apply TrueType fonts through an installed application, such as LibreOffice.
Installing Ubuntu TrueType fonts by command line - You might not be able to apply TrueType fonts after installing them graphically. If so, you need to remove the graphic installer for these fonts and then install them through the command line, as follows:
  1. Click the icon for Ubuntu Software Center, type installer truetype in the search field, select installer for Microsoft TrueType core fonts and then click Remove.
  2. Click the Dash icon (the Ubuntu logo at the top of the Launcher), type terminal to display its icon, and then click it to open the terminal.
  3. Type sudo apt-get install ttf-mscorefonts-installer to run the installation and then display a license-agreement window.
  4. Press Tab to select OK, and then press Enter.
  5. Press Tab (if necessary) to select Yes, and then press Enter.
  6. Close all applications, reboot your PC and then verify you can apply TrueType fonts through an installed application, such as LibreOffice.

6/09/2012

Using LanguageTool to check grammar in LibreOffice


LibreOffice is a powerful, free, open-source office-productivity suite that you can run under a Linux, Mac OS X or Microsoft Windows operating system. LibreOffice has a built-in spelling checker. You can install a grammar checker by adding a LanguageTool extension.
Though the procedures below specifically apply to the Ubuntu distribution of the Linux operating system, they also generally apply to the OS X and Windows operating systems.
Adding the LanguageTool extension - To add the LanguageTool extension to your Ubuntu Linux operating system, do the following:
  1. Go to the LibreOffice Extensions website, and then scroll to LanguageTool.
  2. Click LanguageTool to open its window.
  3. Scroll to the Current Release, such as LanguageTool 1.7, and then click Get Language Tool for all platforms to download it to your specified download folder.
  4. Open a new LibreOffice Writer document, click Tools and then click Extension Manager to display its window.
  5. Click Add to display the Add Extensions page.
  6. Select LanguageTool-stable.oxt, and then click Open to add LanguageTool to your LibreOffice extensions.
  7. Click Close to close the Extension Manager window and redisplay your LibreOffice Writer document.
Configuring LanguageTool - To configure LanguageTool, do the following:
  1. Add the LanguageTool extension according to the procedure above.
  2. In a LibreOffice Writer document, click Tools, click LanguageTool and then click Configuration to display the LanguageTool Options window.
  3. Select a language, such as English, and then click OK.
  4. Click Tools, click Options, click the arrow at the left of Language Settings, click Writing Aids, select Check grammar as you type and then click OK.
  5. Verify that LibreOffice indicates grammar errors through blue, wavy underlines, and spelling errors through red, wavy underlines.

6/05/2012

Managing partitions through GParted


Gnome Paritition Editor (GParted) is a free application that lets you manage partitions on the hard drive in your Linux PC, Windows PC, or OS X Mac. After downloading a GParted ISO file, and burning it to a live CD, you can boot it, and then run GParted to resize, add and delete partitions.
Creating a GParted live CD - To create a GParted live CD, do the following:
  1. Go to the GParted website, click Download, click Download stable releases (.iso/.zip), and then click Download gparted-live- to download its ISO file.
  2. Right-click your downloaded ISO file, and then open it with your disc burner, such as Brasero in Ubuntu.
  3. Place a writable CD in your optical drive, and then burn your ISO file as your GParted live CD.
Resizing one partition and adding another - If you have only one partition, you need to resize it to create unallocated space before you can add a new partition. For example, you might do the following:
  1. Select the partition you wish to resize, and then click Resize/Move (on the toolbar) to display its window.
  2. Drag the right arrow leftwards to reduce partition size and create unallocated space. Caution: If the partition contains an operating system, do not resize that partition by dragging its left arrow rightwards. This can make the operating system unbootable.
  3. Click Resize/Move (in the Resize window).
  4. Select the unallocated space, and then click New to display its window.
  5. Define your new partition, including its type and size, and then click Add.
  6. Click Apply (on the toolbar) to display its verification window, and then click Apply (in the verification window) to finalize both changes (resized partition and new partition). Wait patiently, applying the changes can take a long time.

Deleting a partition - To delete a partition, select it, click Delete, click Apply, verify the change and then click Apply.