10/17/2014

Using Python random functions to create new words

The Python programming language lets you randomly select syllables and then concatenate (combine) them to generate new words. This document explains how to control syllable concatenation through Python random functions.

Python is free to download, install, and use. It is easy and fun to program. Before trying the examples in this document, you need to install Python 3 on your computer. For more information, see Getting started with Python programming.

Using Python random functions

Python random functions generate random values that you can use directly or for other purposes, such as selecting list items randomly. For more information, about random functions, see see Wikibooks: Python Random Numbers. For really geeky details, see Python Library: Random Numbers.

Figure 1 shows how you can use a few fundamental Python random functions. If you want try this code, you can either type it from Figure 1 or copy it from its NwWrdsRdmBasics online example.
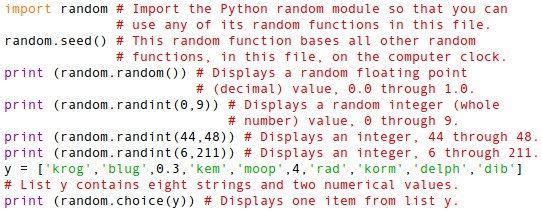
Figure 1 - This example Python code demonstrates a few random-function 
capabilities, such as basing random values on the computer clock, 
returning a random floating point value, returning a random integer value,
 and returning a random item from a list.
In Figure 1:
  • The 'import random' statement imports the Python random module so that you can use random functions in this example code.
  • The random.seed() function bases all random functions on the computer clock.
  • Each print() function displays the number or string returned by its random function.
  • The random.random() function returns a random floating point (decimal) value, 00 through 1.0.
  • Each random.randint(a,b) function returns a random integer (whole number) value, in the range a through b.
  • The random.choice(y) function randomly selects and returns one item from list y.
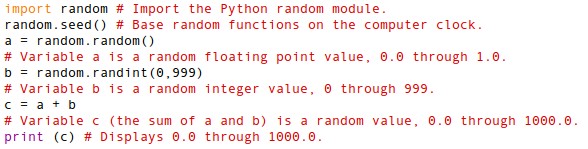
Figure 2 demonstrates how you can use two Python random functions to create a large random decimal value. If you want try this code, you can either type it from Figure 2 or copy it from its NewWrdsRdmLgFloat online example.

Figure 2 - This example Python code demonstrates
creating a large random decimal value.
In Figure 2:
  • The 'a = random.random()' statement assigns a floating point value, 0.0 through 1.0, to variable a.
  • The 'b = random.randint(0,999)' statement assigns an integer value, 0 through 999, to variable b.
  • The 'c = a + b' statement assigns the sum of a and b to variable c.
  • The print (c) function displays a large random decimal value, such as 467.33257201.

Concatenating Strings in Python

A string is a variable that consists of one or more characters. Python lets you concatenate strings by placing them in sequence with no spaces among them. In Python, plus signs let you either add numerical values or concatenate strings.

Figure 3 demonstrates adding numerical values and concatenating strings.
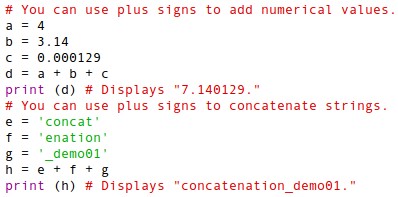
Figure 3 - This example Python code demonstrates
using plus signs to either add values or concatenate strings

In Figure 3:
  • The 'd = a + b + c' statement assigns the sum of a, b, and c to variable d. Variables a, b, and c must be numerical values; for addition, none can be strings.
  • The 'h = e + f + g' statement assigns concatenated strings e, f, and g to variable h. Variables e, f, and g must be strings; for concatenation, none can be numerical values.

Creating New Words in Python

To create a new word in Python, you need to randomly choose syllable strings from a list, and then concatenate those syllables.

Note: Beyond demonstrating Pythom random functions and concatenation, creating new words can be useful. For example, if you write science fiction, you can use a Python program to create new space-alien expletives, such as "tulktokloogkek," "garfblugtonk," and "loogblug." However, you need not write science fiction. For example, if you are expecting a baby, why not give him or her an original name, such as "Depgarf?"

Figure 4 shows how you can use Python random functions and concatenation to create a two-, three-, four-, or five-syllable new, random word.
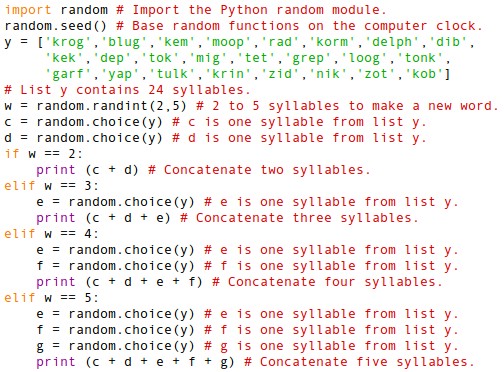
Figure 4 - This example Python code demonstrates
randomly selecting syllables from a single list of strings,
and then concatenating them to create a new word.
Syllables can repeat sequentially
In Figure 4:
  • The 'w = random.randint(2,5)' statement assigns an integer value, 2 through 5, to variable w. This determines whether the new word contains two, three, four, or five syllables.
  • The 'c = random.choice(y)' statement assigns one random syllable string, from list y, to variable c. Likewise, the 'd = random.choice(y)' statement assigns one random syllable to variable d. Note: Variables c and d apply to words that have two or more syllables. Variable e applies to words that have three, four or five syllables.  Variable f applies to words that have four or five syllables. Variable g applies to words that have five syllables.
  • The 'if w == 2:' control flow statement executes the 'print (c + d)' function, which concatenates and displays a two-syllable word, only if w is equal to 2.
  • The 'elif w == 3:' control flow statement executes the 'e = random.choice(y)' statement and the 'print (c + d +e)' function, which concatenates and displays a three-syllable word, only if w is equal to 3.
  • The 'elif w == 4:' control flow statement executes the 'e = random.choice(y)' statement, the 'f = random.choice(y)' statement, and the 'print (c + d +e +f)' function, which concatenates and displays a four-syllable word, only if w is equal to 4.
  • The 'elif w == 5:' control flow statement executes the 'e = random.choice(y)' statement, the 'f = random.choice(y)' statement, the 'g = random.choice(y)' statement, and the 'print (c + d +e +f +g)' function, which concatenates and displays a five-syllable word, only if w is equal to 5. Note: If you wish, you can edit the syllable strings in list y. You can also add or delete them.
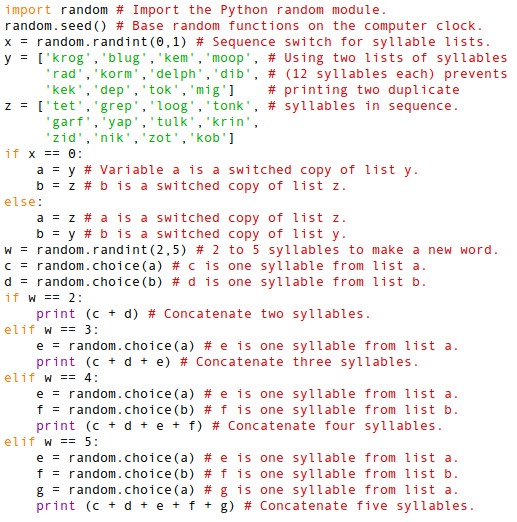
Figure 5 shows how you can modify the example code in Figure 4 so that it prevents sequential duplicate syllables. (After all, many kids might ridicule one named 'zotzot.')

Figure 5 - This example Python code demonstrates
randomly selecting syllables from two lists of strings,
and then alternately concatenating the strings to create a new word.
Syllables cannot repeat sequentially.
In Figure 5:
  • The 'x = random.randint(0,1)' statement assigns either 0 or 1 to variable x.
  • Lists y and z each contain half the syllable strings.
  • The if and else control flow statements determine which list provides the first syllable. If x is 0, list a is a switched copy of list y, and list b is a copy of list z. If x is 1, list a is a copy of list z, and list b is a copy of list y.
  • The remaining code in Figure 5 is similar to that in the Figure 4.

10/14/2014

Getting started with Python programming

Python is a powerful, high-level, object-oriented programming language. It's free to download and install because it's open-source software. In comparison with other programming languages, it has a simpler, more-intuitive syntax. Therefore, as this document shows, Python is easy to learn and fun to use. For more information, see the following Python tutorials:
You can choose either of two Python versions, 2 or 3. Python 2 is primarily a legacy version. Therefore, you should probably choose version 3 unless you specifically need Python 2. For more information, see Should I use Python 2 or Python 3?

Python is probably already installed on your computer. If not, you can install it according to information in Python Setup and Usage. Currently, in October, 2014, Python 3.4 is the newest version.

Note: Though tested on Xubuntu 14.04, the procedures in this document generally apply to Python on all PC operating systems; Linux, OS X, and Windows. Xubuntu is an XFCE-desktop distribution of the Ubuntu Linux operating system.

This document can help you:
  • Install IDLE, which is an Integrated Development Environment (IDE) for Python.
  • Write your first Python program.
  • Run your first Python program.
  • Run example Python programs that demonstrate:
    • Math operations
    • While loops
    • Nested while loops
Installing IDLE
Although you can program Python through your command-line terminal, programming through IDLE is easier. Install IDLE according to your particular operating system. For example, to install IDLE on Xubuntu 14.04, do the following:
  1. Click Applications Menu (a white-mouse icon at the upper left of the screen) to display the Applications Menu.
  2. Click Ubuntu Software Center to display its window, type python into the search field, and then select IDLE (using Python 3.4).
  3. Click Install to display the Authenticate window, type your password, and then click Authenticate.
  4. After you have installed IDLE, close the Ubuntu Software Center window.
Note: The Ubuntu Software Center has a nice feature that can display the path to a software package you have just installed. For example, after you install IDLE (using Python-3.4), you can click More info to display Applications > Programming > IDLE (using Python-3.4). Of course, this applies only to software that you can launch through the Applications Menu.

Writing your first Python program
To write your first Python program through IDLE, do the following:
  1. Install IDLE according to the section above.
  2. Create a folder in which to store your Python programs. For example, you can create a MyPython folder within your home folder.
  3. As shown in Figure 1, click the white-mouse Applications Menu, select Development, and then click IDLE (using Python 3.4) to display a Python Shell window as shown in Figure 2.
    Figure 1 - Starting IDLE
    Figure 2 - Python Shell
  4. Click File, and then click New Window to display an Untitled program window.
  5. Type a Python program, such as the Example Python Hello code shown in Figure 3. Note: To enter a comment into a Python program, type # before the comment text. Computers do not execute comments. The Python interpreter ignores all comments while converting your program statements to machine code.
    Figure 3 - Writing your first Python program
  6. Click File, click Save as, select your MyPython folder, type a file name such as hello.py, and then click Save.
  7. Close both IDLE windows, which are the Python Shell and the program window.
  8. Test your program by running it according to the section below.
Running your first Python Program
To run your first Python program through Idle, do the following:
  1. Click Applications, select Programming, and then click IDLE (using Python 3.4) as shown in Figure 1.
  2. In the Python Shell, click File, click Open, select your MyPython folder, select the program you want to run, such as hello.py, and then click Open to display the program window.
  3. Click Run, and then click Run Module to run your program. It displays its output in the Python Shell as shown in Figure 4.
    Figure 4 - Testing your first Python program
  4. Close both IDLE windows, which are the Python Shell and the program window.
Running example Python programs
After writing and running your first Python program according to the sections above, you can copy and run other example Python programs, such as those that demonstrate:
  • Math operations
  • While loops
  • Nested while loops
Running example Python math operations - The Example Python program in Figure 5 demonstrates a few Python math operations and functions:
  • Included math operations let you enter two variables for:
    • Addition
    • Subtraction
    • Multiplication
    • Division
    • Raising a value by an exponent
    • Finding the root of a value
  • Included functions are:
    • float(), which defines a decimal value function
    • input(), which lets a user enter a value
    • print(), which displays data on a computer screen
Figure 5 - Example Python math operations
To enter a value for a variable, you can use an input() function nested within a float() function. An input() function can contain text in quotes to prompt data entry. The nested float(input()) function defines its data as a decimal value. For example, if you type 3, the data is 3.0.

The print() function displays data in a window, it does not print on paper. The print() function can display text in quotes, one or more variables, or both. Additionally, the print() function can contain and display a math operation, such as x+y.

To write and run the Example Python Math Operations program, do the following:
  1. As shown in Figure 1, click the white-mouse Applications Menu, select Development, and then click IDLE (using Python 3.4) to display a Python Shell window as shown in Figure 2.
  2. Click File, and then click New Window to display an Untitled program window.
  3. Type the Example Python Math Operations code shown in Figure 5. Note: As a new programmer, you can learn more by typing all this code. However, as an alternative, you can copy the code from XmplMathOperations and then paste it into the program window.
  4. To save your program for later use, click File, click Save as, select your MyPython folder, type a file name, such as xmplmath.py, and then click Save.
  5. In the program window, click Run, and then click Run Module to run your program in the Python Shell window. While your program is running, follow its prompts to enter data and/or make selections.
  6. Run the program multiple times, experimenting with different values for the x and y variables.
Running an example Python while loop - The Example Python program in Figure 6 demonstrates the Python while and if statements.
Figure 6 - Example Python while loop
Variable t is the total. Variable m is maximum total limit. The while statement defines the start of the while loop, which loops while t<=m (the total is less than the limit). Each time the loop runs, you can add a value to the total. As soon as the total exceeds its limit, the if statement ends the loop, and stops printing the Current Total.

To write and run the Example While Loop program, do the following:
  1. As shown in Figure 1, click the white-mouse Applications Menu, select Development, and then click IDLE (using Python 3.4) to display a Python Shell window as shown in Figure 2.
  2. Click File, and then click New Window to display an Untitled program window.
  3. Type the Example Python While Loop code shown in Figure 6. Note: As an alternative, you can copy the code from XmplWhileLoop and then paste it into the program window.
  4. To save your program for later use, click File, click Save as, select your MyPython folder, type a file name, such as xmplwhile.py, and then click Save.
  5. In the program window, click Run, and then click Run Module to run your program in the Python Shell window. While your program is running, follow its prompts to enter data and/or make selections.
  6. Run the program multiple times, experimenting with different values for the t, m, and v variables.
Running example Python nested while loops - The Example Python program in Figure 7 demonstrates how to run one while loop within another. The outer while loop is new. The inner while loop is the same as the Example While Loop in the section above.
Figure 7 - Example Python nested while loops
The variable i counts how many passes the outer loop has made. The variable p defines how many passes the outer loop can make. The int() function defines p as an integer value (no decimal point). Within each outer loop pass, the inner loop runs while t<=m (the total is less than the limit). Each time the inner loop runs, you can add value to the total. As soon as the total exceeds its limit, the if statement ends the inner loop, and stops printing the Current Total. The outer loop stops running after i is equal to or greater than p.

To write and run the Example Nested While Loops program, do the following:
  1. As shown in Figure 1, click the white-mouse Applications Menu, select Development, and then click IDLE (using Python 3.4) to display a Python Shell window as shown in Figure 2.
  2. Click File, and then click New Window to display an Untitled program window.
  3. Type the Example Python While Loop code shown in Figure 7. Note: As an alternative, you can copy the code from XmplNestedWhileLoops and then paste it into the program window.
  4. To save your program for later use, click File, click Save as, select your MyPython folder, type a file name, such as xmplnestedwhile.py, and then click Save.
  5. In the program window, click Run, and then click Run Module to run your program in the Python Shell window. While your program is running, follow its prompts to enter data and/or make selections.
  6. Run the program multiple times, experimenting with different values for the i, p, t, m, and v variables.


10/12/2014

Reformatting text that you've copied into Blogger

Copying text among writing tools can interfere with various text formats. For example, if you copy word-processor text and then paste it into Google Blogger, it is not formatted the same as text that you type directly into Blogger. This document can help you work around the formatting incompatibilities among writing tools. For example, it can help you reformat text that you've copied into Blogger.

Note: Although this document specifically applies to reformatting text copied into Blogger, it generally applies to reformatting text copied among other writing tools. No two writing tools, whether online or off, are fully compatible. Online writing tools include Google Blogger, Google Docs and Wordpress. Offline writing tools include LibreOffice Writer, Microsoft Word and Appache OpenOffice Writer.

Copying text into Blogger
To copy text from a word processor into Blogger, do the following:
  1. Write the text in the word processor in any online or offline word processor, such as Google Docs in Google Drive, Writer in LibreOffice, or Word in Microsoft Office. 
  2. In your word processor, select (highlight) the text to copy, such as the example LibreOffice Writer text in Figure 1, and then press Ctrl+C to copy that text.
    Figure 1 - Selecting text within LibreOffice Writer
  3. In Blogger, place you cursor where you wish to insert the text, and the press Ctrl+V to paste the text into Blogger as shown in Figure 2.
    Figure 2 - Pasting text from LIbreOffice Writer into Blogger.
  4. Remove the formatting from the copied text according to the section below.
Removing the copied formatting
To remove all formatting from your pasted text, do the following:
  1. Add several blank lines below the text you had copied from your word processor as shown in the top portion of Figure 3.
    Figure 3 - Copying word-processed text (top portion) from within Blogger,
    and then pasting it as text-only text (bottom portion) to within Blogger.
  2. Select the copied text and then press Ctrl+C.
  3. Below your copied text, place your cursor at the start of a blank line.
  4. Press Ctrl+Shift+V to paste the text as text-only, which removes its formatting as shown in the bottom portion of Figure 3.
  5. Reformat your new text-only text according to the section below.
Reformatting your new text-only text
After you make a text-only copy for you word-processor text according the section above, you need to reformat that text. As demonstrated in the Example subsections below, separately select each item (such as word, phrase, or list) that you need to reformat, and then use the icons in the Blogger Compose toolbar (Figure 4). Tool-tip text describes each icon as you move your mouse pointer over it.
Figure 4 - The Blogger Compose toolbar consists of formatting icons.
Example italic formatting - In the first paragraph of the word-processor-text, within the top portion of Figure 3, you find an italicized sentence, "This sentence is italicized." To match that formatting within the bottom portion, you would do the following:
  1. Find the same sentence in the first paragraph of the text-only, bottom portion.
  2. Select This sentence is italicized, and then click the Italic icon.
  3. Verify the reformatted italic text as shown within the first line of Figure 5.
    Figure 5 - Text-only text reformatted to italic.
Example bold and italic formatting - In the first paragraph of the word-processor-text, within the top portion of Figure 3, you find a bold and italicized sentence, "This sentence is bold and italicized." To match that formatting within the bottom portion, you would do the following:
  1. Find the same sentence in the first paragraph of the text-only, bottom portion.
  2. Select This sentence is bold and italicized, click the Bold icon and then click the Italic icon.
  3. Verify the reformatted bold and italic text as shown within the second and third lines of Figure 6.
    Figure 6 - Text-only text reformatted to bold and italic.
Example list formatting - The word-processor-text in the top portion of Figure 3 includes both an ordered, numbered list and an unordered, bulleted list. To reformat these lists in the bottom portion of Figure 3, you would do the following:
  1. Find the text for the numbered-list items in the text-only, bottom portion.
  2. Select the numbered-list items, and then click the Numbered list icon to number and indent the items.
  3. Find the text for the bulleted-list items in the text-only, bottom portion.
  4. Select the bulleted-list items, and then click the Bullet list icon to bullet and indent the items.
  5. Verify the reformatted lists as shown in Figure 7.
    Figure 7 - Text-only lists reformatted to numbered and bulleted lists.
Deleting unwanted line spaces from lists
If the text you've copied into Blogger includes any numbered or bulleted lists, you need to delete all unwanted line spaces from those lists. For more information, see Deleting unwanted line spaces from Blogger lists.

Note: As shown in Figure 7, you cannot see the unwanted line spaces in your lists until after you have closed your post for the first time after reformatting your pasted lists. Therefore, to avoid possible future confusion, you should immediately delete your unwanted line spaces.

To delete unwanted line spaces from the lists in your pasted text, do the following:
  1. Click Save and then Close. This initial closing makes the unwanted line spaces visible.
  2. Reopen your post to edit it. You should now see unwanted line spaces similar to those in Figure 8. When there are no unwanted line spaces in each list, there is only one line space above, and one below.
    Figure 8 - Unwanted line spaces in Blogger lists.
  3. Above each list, place your cursor immediately below the preceding paragraph, and then press Backspace.
  4. Below each list, place your cursor immediately above the following paragraph, and then press Backspace.
  5. Verify that line spacing is again correct, as shown in Figure 7.
Note: After reformatting all your text-only text, such as the bottom portion of Figure 3, you can delete the text you had originally copied from your word processor, such as the top portion of Figure 3.

10/08/2014

Deleting unwanted line spaces from Blogger lists

Currently, as of October 2014, Google Blogger adds an extra, unwanted line space both above and below each new ordered (numbered) or unordered (bulleted) list. These unwanted line spaces cause confusion because they are invisible, even in Blogger preview, until you close your post for the first time after adding one or more lists.

This document explains how to create lists in a Blogger post, and then delete the unwanted line spaces before they can cause confusion.

Creating an ordered list
To create an ordered list in a Blogger post, do the following:
  1. Type the list items between two paragraphs.
  2. As shown in Figure 1, select (highlight) the items in a list to which you wish to add numbers, and then click the Numbered list icon in the Compose toolbar.
    Figure 1 - Creating a numbered list
  3. Either make additional edits, such as adding more lists, or go to the Deleting unwanted line spaces section below.
Creating an unordered list
To create an unordered list in a Blogger post, do the following:
  1. Type the list items between two paragraphs.
  2. As shown in Figure 2, select (highlight) the items in a list to which you wish to add bullets, and then click the Bullet list icon in the Compose toolbar.
    Figure 2 - Creating a bulleted list
  3. Either make additional edits, such as adding more lists, or go to the Deleting unwanted line spaces section below.
Deleting unwanted line spaces
After writing a post in which you have created one or more lists according the sections above, you need to delete the unwanted line spaces from those lists.

Note: You cannot see the unwanted line spaces in your lists until after you have closed your post for the first time after creating your lists. Therefore, to avoid possible future confusion, you should immediately delete your unwanted line spaces.

To delete unwanted line spaces from your lists, do the following:
  1. Create one or more lists according to the sections above.
  2. Click Save and then Close. This initial closing makes the unwanted line spaces visible.
  3. Reopen your post to edit it. You should now see unwanted line spaces similar to those in Figure 3. When there are no unwanted line spaces in each list, there is only one line space above, and one below.
    Figure 3 - Unwanted line spaces in two lists
  4. Above each list, place your cursor immediately below the preceding paragraph, and then press Backspace.
  5. Below each list, place your cursor immediately above the following paragraph, and then press Backspace.

8/28/2014

Bypassing animated Google doodles

Google often replaces its browser logo with a graphical variation, which it calls a Google doodle. Occasionally, Google animates a doodle. If you use a Chrome or Chromium browser, or a Chromebook, you probably enjoy most Google-browser startup doodles. However, you might not appreciate Google's animated startup doodles because you find them distracting.

This document explains how to bypass animated Google doodles easily in either Chrome or Chromebook.

Bypassing animated doodles in Chrome
If you use either a Chrome or Chromium browser, you can bypass animated Google startup doodles as follows:
  1. As shown in Figure 1, click the Customize button (three horizontal bars) to display its menu.
    Figure 1 - Clicking the Customize button.
  2. Click Settings to display its page.
  3. In the On startup section, select Open the New Tab page as shown in Figure 2.
    Figure 2 - Setting each Google-browser startup as a new tab page.
  4. Close the Settings page.
Bypassing animated doodles in Chromebook
If you use a Chromebook, you can bypass animated Google startup doodles as follows:
  1. As shown in Figure 1, click the Customize button (three horizontal bars) to display its menu.
  2. Click Settings to display its page.
  3. Scroll to the bottom of the page, and then click Show Advanced Settings.
  4. Scroll to the On startup section, and then select Open the New Tab page. as shown in Figure 2.
  5. Close the Settings page.

7/16/2014

Creating an online archive through Google Drive

If you publish articles, essays, stories or poems through an online publisher, and it shuts down its website, you lose all documents you haven't archived. While you are creating any online document, you might write text directly into a publisher's website. Although this is convenient, you risk losing your work forever if you don't make a backup copy. Therefore, you should archive all your online documents.

You can create an archive either in cloud storage, through an online productivity suite such as Google Drive, or offline on your PC drive or its external media, through an offline productivity suite such as LibreOffice. This document can help you build an archive by creating archive folders, creating portable document files (PDFs), creating archive text files, and archiving image files.

Note: This document specifically applies to creating an online archive through Google Drive, and generally to creating an online or offline archive through other software suites. Therefore, this document can serve as a guideline regardless of your particular writing tools and preferences.
Creating archive folders
Archive folders are appropriate folders and subfolders that help you organize your archive files. You can create a main folder, a subfolder for each publisher, and a sub-subfolder for each document. Here's an example hierarchy:

MyOnlineArchive (main) - contains three publisher folders:
AcmePubs (publisher)
FlyByNitePubs (publisher) - contains two document folders:
HowToWaxYourCeiling (document)
UnderstandingArcticAlligators (document)
GizmochePubs (publisher)


Figure 1 shows the above hierarchy as created in Google Drive folders.


Figure 1 - Example archive folders
Creating archive PDFs
An archive PDF is the primary backup file for your online document because a PDF preserves your original formatting. You should start creating your archive PDFs after creating your archive folders according to the section above. For each online document you wish to archive, create a PDF and then save it in that document's archive folder. Later, if necessary, you can use the archive PDF as a source for a new document that you publish on another website.

Note: You shouldn't simply copy text from your online document and paste it into a text file because this does not preserve your original formatting 

The specific procedure for creating a PDF varies according to your PC and its operating system. Generally, you can create an archive PDF as follows:

  1. Right-click anywhere in the document to display a Print menu as shown in Figure 2. 
  2. Click Print to display its window, and then select Print to file. If the window displays a Destination field, and it does not contain "Save as PDF," click Change to display a Select-a-destination window, and then click Save as PDF.
  3. According to the title of your online document, name its archive PDF appropriately, such as Understanding_Arctic_alligators.pdf.
  4. Click Save, select your target folder, such as UnderstandingArcticAlligators, click Open, and then click Save to generate your archive PDF.
  5. Verify that your archive PDF is in its appropriate folder, such as shown in Figure 3.
Figure 2 - Selecting your print menu
Figure 3 - An example archive PDF in its appropriate document folder
Creating archive text files
After creating your archive folders and archive PDFs according to the sections above, you can create archive text files. To create an archive text file, do the following:
  1. Open the archive PDF from which wish to create a new document.
  2. Create a new word-processor document, such as a new Google Docs document in Google Drive.
  3. Copy text from your PDF and then paste it into the word-processor document that is your archive text file.
  4. Rename the archive text file to match your archive PDF.
  5. Save your archive text file into its appropriate document folder, such as UnderstandingArcticAlligators, as shown in Figure 4.
Figure 4 - Adding a text file to a document folder
Archiving image files
As shown in Figure 5, you can add image files to any document folder.

Figure 5 - Adding image files to a document folder

5/03/2014

Installing Linux into a specific partition

Multibooting more than one Linux operating system (OS) can help you compare precisely how each works on your PC. While installing a Linux OS, you might wish to install it into a specific partition on your hard disk or solid-state drive (SSD). This document can help you create a new logical partition and then install a new Linux OS into it.

Author's note: In my experience, multibooting Linux operating systems works best with Ubuntu and Ubuntu-based operating systems.

Creating a new logical partition
You can add a new Linux OS to a PC on which you have already installed at least one other OS. For example, your multiboot configuration might include two partitions and an extended partition, as follows:
  • Partitions /dev/sda1 and /dev/sda2 contain an MS Windows 7 OS.
  • Extended partition /dev/sda3, contains three logical partitions for Linux. Allow at least 20 GB for each Linux OS.
  • Logical partition /dev/sda5 contains your Ubuntu Linux OS.
  • Logical partition /dev/sda6 contains the Linux swap file. Note: Regardless how many Linux operating systems you plan to install, you need only one swap partition (approximately 2 GB).
  • Logical partition /dev/sda7 contains your Linux Mint OS.
You need to create a new logical partition before you can install a third Linux OS into the above example configuration. As shown in Figure 1, you can use the Gnome Partition Editor (GParted) to create a new logical partition, such as /dev/sda8.
Figure 1 - Creating a new logical partition, /dev/sda8.

Installing Linux into a root partition
While installing Linux into a specific logical partition you must define that partition as root. To install a new Linux OS into your new logical partition, do the following:
  1. Download an ISO image file of the Linux OS that you wish to install, and then burn it to a DVD to create a live disc. Alternatively, you can use an ISO image to create a live usb drive.
  2. Boot the live disc and then begin installing your new Linux OS. When you see an Installation-type window similar to Figure 2, select Something else, which lets you install your new Linux OS into your new logical partition.
  3. Click Continue to display a window to similar to Figure 3, select (highlight) your new logical partition, and then double-click it to display an Edit-partition window as shown in Figure 4.
  4. In the Use-as dropdown menu, select Ext4 journaling file system.
  5. Checkmark the Format the partition box.
  6. In the Mount-point dropdown menu, select "/" to define your new logical partition as root.
  7. Click OK to close the Edit-partition window, and then click Install now. Note: Do not try to skip steps 4 through 7. Omitting them displays an error message, "No root file system is defined. Please select this from the partitions menu." For more information, see Ask Ubuntu.
  8. Install your new Linux OS and then reboot your PC to display a Grand Universal Boot (GRUB) menu similar to Figure 5. In this example, Zorin OS 6 is the new Linux OS. Note: If your GRUB menu does not display, you can restore it through an open-source Boot Repair CD.
Figure 2 -  On the Installation Type menu, you select "Something else" if you
wish to create a partition into which you can install your new Linux OS.
Figure 3 - Selecting (highlighting) your new logical partition.
Figure 4 - Double-clicking your new logical
partition displays an Edit-partition window.
Figure 5 - Your GRUB menu should include your new Linux OS, such as Zorin OS 6.