Pages

11/11/2013

Making and receiving phone calls through Gmail

Gmail Call Phone lets you make free calls from your computer (Linux, Mac or MS Windows) to anywhere in the United States and Canada. Google Voice lets you receive calls through Gmail on your computer. If you do not answer a call to your computer, Google Voice forwards the call to a phone that you have specified, such as your mobile phone.
This document explains how to:
  • Set up Gmail Call Phone.
  • Make calls through Gmail Call Phone.
  • Set up Google Voice.
  • Receive calls through Google Voice and Gmail.
Setting Up Gmail Call Phone
To set up Gmail Call Phone, you need to enable Gmail Chat and then install the Google Phone plugin.
Enabling Gmail Chat - Call Phone is part of the Chat feature within Gmail. Therefore, if you do not see a black Chat folder at the lower left in your Gmail window, you need to enable Chat as follows:
  1. Sign in to Gmail, and then click the Settings icon (gear) at the upper right to display its menu.
  2. Click Settings to display the General page, and then click the Chat tab to display its page.
  3. Select Chat on, scroll to the bottom of the page, and then click Save Changes.
Installing the Google Phone plugin - After enabling Chat, you need to install the Google Phone plugin as follows:
  1. In the left column of your Gmail window, click the Call Phone icon (telephone handset) to display a Call window at the lower right.
  2. Click download the voice plugin to display its web page.
  3. Click Install voice and video chat to download the plugin installer for your particular operating system.
  4. Install the Google Phone plugin, through the installer, and then restart your browser and Gmail.
Note: If you use more than one computer, you need to set up Gmail Call Phone on each computer through which you plan to make calls.
Making a call through Gmail Call Phone
To make a call through Gmail Call Phone, click the Call Phone icon to display a Call window, and then, in the Search-or-dial field, do either of the following:
  • Type a number, and then click Call to dial that number.
  • Start typing the name of a Gmail contact, and then, when you see the contact's name and number, click on the number to dial it.
Setting up Google Voice
After you set up Gmail Call Phone, you can set up Google Voice as follows:
  1. Go to Google.com/voice, and then sign in to your Google account.
  2. Accept the the terms and privacy policy of Google Voice, and then click Proceed.
  3. Click I want a new number to display the Add-a-forwarding-phone window.
  4. In the Phone Number field, type your current number; in the Phone Type drop-down box, select Mobile, Home or Work; and then click Continue.
  5. Click Call me now to verify your phone, and then enter the displayed code into your phone.
  6. Type an area code, select a Google Voice number and write it down, click Continue, and then click Finish.
  7. Give your friends and associates your Google Voice number so they can use it to call you on both your computer and your forwarding phone.
Note: You need to set up Google Voice through only one computer. You can then receive calls through Gmail on any of your computers.
Receiving calls through Google Voice and Gmail
To receive calls to your Google Voice number while using your computer, keep Gmail open and don't minimize its window. The exact process for receiving a Google Voice call varies according to how you are using your computer and Gmail:
  • If someone calls your Google Voice number while you are running Gmail, Google Voice plays a ringtone through your computer speakers. Also, if your Gmail window is open (not minimized), even in the background behind other windows, Google Voice displays a dialog with an Answer button. Click Answer to speak with the caller.
  • If someone calls your Google Voice number while you do not have your Gmail window open, Google Voice plays a ringtone but does not display an Answer dialog. You must open the Gmail window and then click Answer.
  • If someone calls your Google Voice number while you are not using your computer, Google Voice forwards the call to your forwarding phone. If you do not answer, the caller is prompted to leave voicemail, which Google Voice sends to your Gmail inbox.

6/11/2013

Adjusting your Linux Mint display resolution

Linux Mint is a popular distribution of the Linux operating system. Linux Mint has a relatively-high default resolution, such as 1400 X 1050, at which many people over 30 find text hard to read. This document explains how to select the recommended display driver for your Linux Mint PC, and then adjust the resolution of your Linux Mint display to a lower value, such as 1152 X 864, to make screen text easier to read.

Note: The procedures below apply specifically to Linux Mint 15, Cinnamon, and generally to all other recent editions of the Linux Mint distribution.

Selecting the Recommended Display Driver
To select the recommended display driver for your Linux Mint PC, do the following:
  1. Click Menu (at lower-left corner of its screen) to display the menu.
  2. Click the System Settings icon (third down at left) to display the System Settings window as shown in Figure 1.
  3. As shown in Figure 2, scroll to the Hardware section, click Device Drivers, type your password and then click OK to display the Driver Manager window.
  4. If you are not already using the recommended driver, select it and then click Apply Change.
  5. Reboot your PC, and then adjust your display resolution according to the procedure below.

Figure 1 - The System Settings icon in the Linux Mint
menu lets you display the System Settings menu.
Figure 2 - The Device Drivers icon lets you display the Driver Manager window.
Adjusting Your Display Resolution
To adjust the display resolution of your Linux Mint PC, do the following:

  1. Select the recommended display driver according to the procedure above.
  2. Click Menu (at lower-left corner of the screen) to display the menu.
  3. Click the System Settings icon (third down at left) to display the System Settings window.
  4. Click Switch to Advanced Mode (at lower left), scroll to the Hardware section and then click Display to display its window as shown in Figure 3.
  5. In the Resolution field, click the drop-down arrow to display all available resolutions.
  6. Click a resolution to select it, and then click Apply to momentarily blank the screen and then display your selected resolution for 30 seconds. If you like your new resolution, click Keep this Configuration. Otherwise, Linux Mint restores your original resolution at the end of the 30 seconds.
Figure 3 - The Display window lets you adjust the resolution of your display.

4/13/2013

MICR code helps protect your business checks

This document briefly defines magnetic ink character recognition (MICR) code, and summarizes how you can use it to protect the checks you write for your small business. For your accounts-payable and/or payroll accounts, you can order either standard or blank MICR checks. Each standard MICR check includes your preprinted MICR code. Each blank MICR check includes an open line into which you print your own MICR code, using MICR toner.
What is MICR code?
MICR code facilitates processing checks throughout the entire banking system. Both humans and specific check-processing machines can read MICR code. Criminals have trouble erasing or altering MICR code. Therefore, it helps protect against check fraud. The bottom line on every check contains MICR code in three or four fields (left to right):
  • Auxiliary ON-US - The payee's check number. This field field exists only if the check is a business check, which is typically wider than 6.5 inches.
  • Transit - Issuing bank or institution number.
  • ON-US - The payee's account number.
  • Amount - This field is empty until a processing authority, such as a bank, fills it in.
Standard MICR check
Each standard MICR check includes a preprinted MICR line that contains a sequential check number, your bank's transit number and your account number. You specify a new starting number when you order each batch of checks. As you you print your checks, you must load them in correct sequence, according to check number. For example the first check you print must have the same number as indicated by your accounting software.
You can print standard MICR checks on any printer. You need neither an MICR printer nor MICR toner cartridges. However, if you make a major change, such as closing an account, you must destroy your remaining stock of standard MICR checks for that account.
Blank MICR Checks
Each blank MICR check includes a space into which you can print your own MICR code. You need either an MICR printer or any standard laser printer for which you can obtain MICR toner cartridges.
MICR Printer - An MICR printer is a laser printer that has been designed to print onto only blank MICR checks. It uses MICR toner cartridges. It can have optional security features, such as lockable drawers, a removable hard drive to store authorized signatures, and watermarking capability.
Standard Laser Printer - You can use almost any standard laser printer to print onto blank MICR checks. For example, if an MICR toner cartridge is available for your printer, you can use it.
Regardless which type printer you select (MICR or Standard), you should use it to print only onto blank MICR checks, and keep it in a locked room or cabinet so that only authorized personnel can access it. You must also install check-printing software that supports your printer, is compatible with your accounting software, and includes MICR fonts.

3/17/2013

Alternatives to Skype for Linux

This document describes several alternative applications to Skype for Linux:
  • Brosix Personal
  • Ekiga
  • Google Hangouts
  • Linphone
Each application above implements its own technology to enable unlimited, free communication with your friends and family, provided they share your network. Additionally, Ekiga and Linphone enable setting up paid accounts for non-network calls.
Brosix Personal
Brosix Personal, for individuals, is a client application that enables free communication with anyone on the Brosix secure, public, worldwide network. Brosix Enterprise, for businesses and organizations, enables setting up and managing a private network for a business or organization. To install Brosix on your particular distribution of the Linux operating system, go the Brosix Linux Download web page. Your PC must have an Intel processor. You can download an Ubuntu package, a Fedora package, or a Linux portable archive (for other Linux distributions).
Ekiga
Ekiga is a client application that enables free communication with other Ekiga users. To make calls outside of the Ekiga network, you need to set up a Diamondcard Voice Over Internet Protocol account. To install Ekiga on your Linux distribution, go to the Installing Ekiga on Linux web page. Alternatively, you might be able to install Ekiga directly through the software repository for your Linux Distribution. For example, if you are running Ubuntu Linux on your PC, you can install Ekiga directly through the Ubuntu Software Center.
Google Hangouts
Google Hangouts is a free, Internet application that enables communication among friends and/or family members. If you have any Google account, such as Gmail, you can set up Google+, set up Friends and Family Google Circles, and then download a Google Hangouts plugin (See Getting started with Google+ Hangouts). You can set up a video conference with as many as nine people.
Linphone
Linphone is a free client application that enables Internet communication with anyone through any Session Initiation Protocol (SIP) paid subscription VOIP service. If you choose the Linphone Free SIP service, you can make free calls to anyone on the Linphone network. You can download the Linphone for Linux source files as a TAR.GZ archive file. Alternatively, depending on your Linux distribution, you might be able install Linphone directly through its software repository, such as the Ubuntu Software Center.

1/28/2013

Changing the default word processor in Xubuntu 12.10


Writer is the word-processing application in the LibreOffice productivity suite. AbiWord is the default word processor in Xubuntu 12.10. This document explains how to set LibreOffice Writer as the default word processor on your Xubuntu PC. You need to install LibreOffice, and then uninstall AbiWord.

Installing LibreOffice
To install LibreOffice on your Xubuntu PC, do the following:

1 - Click Applications Menu (white mouse, upper left), and then click Ubuntu Software Center to open it.
2 - Type libreoffice into the search field to display icons for all available LibreOffice items, including its entire office-productivity suite.
3 - Select the LibreOffice (productivity suite) icon, and then click Install.
4 - Type your password, click Authenticate and then wait for the installation to finish.
5 - Close the Ubuntu Software Center window.

Note: For more information, see:


Uninstalling AbiWord
Normally, as shown in Figure 1, you can set Writer as default by right-clicking any odt (open document text) file, clicking Properties and then selecting LibreOffice Writer in the Open With field. However, this is not currently working in Xubuntu 12.10; you cannot directly reset any application as default. Therefore, to set LibreOffice Writer as your default word processor, you need to uninstall AbiWord.

Figure 1 - Currently, directly setting the default does not work.

Note: After you uninstall Abiword, you can use LibreOffice Writer to edit any document you have created through Abiword.

To uninstall AbiWord, do the following:

1 - Click Applications Menu (white mouse), and then click Ubuntu Software Center to open it.
2 - Type abiword into the search field to display the AbiWord icon as shown in Figure 2.

Figure 2 - Removing (uninstalling) AbiWord.

3 - Select AbiWord, click Remove, and then click Remove All.
4 - Type your password, click Authenticate and then wait for the removal to finish.
5 - Close the Ubuntu Software Center window.

1/26/2013

Removing Netflix Desktop from Xubuntu 12.10

Due to recent updates to Xubuntu 12.10, the Netflix Desktop application might no longer work on your Xubuntu 12.10 PC. If so, you might wish to uninstall Netflix Desktop completely because its old files might interfere with a possible future version. This document explains how to install Synaptic Package Manager, and then use it to uninstall Netflix Desktop completely.

Installing Synaptic Package Manager
In my experience, for uninstalling software, the Synaptic Package Manager works better than the Ubuntu Software Center. To install Synaptic on Xubuntu 12.10, do the following:

1 - Click Applications Manager (white mouse, upper left), and then click Ubuntu Software Center to open its window.
2 - Type synaptic in the search field.
3 - Select Synaptic Package Manager, click Install and then type your password.
4 - Click Authenticate, and then wait for the installation to complete.
5 - Close the Ubunutu Software Center.

Uninstalling Netflix Desktop
To uninstall Netflix Desktop completely, do the following:

1 - As shown in Figure 1, click Applications Manager (white mouse), select System and then click Synaptic Package Manager to open it.

Figure 1 - Opening Synaptic Package Manager.

2 - As shown in Figure 2, type netflix into the Quick-filter field.

Figure 2 - Preparing to remove Netflix Desktop packages.

3 - Right-click netflix-desktop, and then click Mark for Complete Removal.
4 - Right-click wine-compholio, and then click Mark for Complete Removal.
5 - Click Apply, wait for the Change-applied window and then click Close.
6 - Close the Synaptic Package Manager window, and then reboot your Xubuntu 12.10 PC.

1/25/2013

Viewing Help in Xubuntu 12.10


Light but powerful, Xubuntu 12.10 is a community-developed, Ubuntu-based distribution of the Linux operating system. Before you can view Xubuntu offline Help, you might need to set it up. This document explains how to set up Xubuntu Help according to your preferred web browser, such as Chromium or Firefox.

Note: This document specifically applies to Xubuntu 12.10, and generally to other Xubuntu releases.

Choosing Chromium for viewing Help
To set up Xubuntu so that you can view its offline Help through Chromium, do the following:

1 - Open Chromium, set it as your default browser and then close it.
2 - Click Applications Menu (white mouse at upper left) to display its menu.
3 - Click Help to display the Choose Preferred Application window as shown in Figure 1.

Figure 1 - Selecting Debian Sensible Browser

4 - Select Debian Sensible Browser and then Click OK to display the Xubuntu Welcome window for the first time through ChromiumNote: Selecting the Debian Sensible Browser indirectly enables viewing Xubuntu offline Help through Chromium. Selecting Chromium directly does not enable it.
5 - Reboot your Xubuntu PC, Click Applications Menu (white mouse), and then click Help to redisplay the Xubuntu Welcome window as shown in Figure 2.

Figure 2 - Welcome window in Xubuntu Help

6 - Click don't ask again to close the default-browser notice. Note: Do not set Chromium as your default browser.
7 - Close the Xubuntu Welcome window, and then continue according to the Viewing Help section below.

Choosing Firefox for viewing Help
To set up Xubuntu so that you can view its offline Help through Firefox, do the following:

1 - Click Applications Menu (white mouse at upper left) to display its menu. 
2 - Click Settings Manager to display the Settings window.
3 - Click Preferred Applications to open its window, click Internet and then select Mozilla Firefox

4 - Close the Preferred Applications window, and then continue according to the Viewing Help section below.

Viewing Help
After setting up Xubuntu for viewing its help through Chromium or Firefox according to either section above, you can view Xubuntu offline Help through the browser you have chosen. To view Xubuntu offline Help, do the following:

1 - Click Applications Menu (white mouse), and then click Help to display the Xubuntu Welcome window.
2 - In the Get Help and Support Section,  click Xubuntu Offline Documentation to display its window.
3 - A shown in Figure 3, scroll to the Table of Contents, and then select any Help item you need.

Figure 3 - Table of Contents in Xubuntu Help

1/07/2013

Creating a simple flowchart in Microsoft Word


Flowcharts can help you communicate technical information more clearly through your MS Word documents. How you create a flowchart varies according to its complexity. For example:
  • If you wish to create a detailed, complex flowchart, you can use a separate graphics tool, such as  Visio or Dia, to create a flowchart and then import it into your MS word document.
  • If you wish to create a simple flowchart, you can use the Shapes menu, as explained below, to create your flowchart within MS Word.
This document explains how to create a simple flowchart by displaying the Shapes menu, adding flowchart shapes, adding Lines to interconnect the shapes and then adding flowchart labels.

Note: This document applies to creating simple flowcharts specifically in MS Word 2007, and generally in newer versions of MS Word.

Displaying the Shapes menu
To display the Shapes menu in an MS Word document do the following:
  1. Open a new or existing MS Word document.
  2. As shown in Figure 1 below, add several blank paragraphs where you wish to create a flowchart.
  3. Place the text-insertion point (blinking cursor) at any blank paragraph and then click Insert to display its ribbon as shown in Figure 2 below.
  4. Click Shapes to display its menu as shown Figure 3 below.
Figure 1 - Making space for your flowchart.
Figure 2 - The Insert ribbon includes a Shapes icon.
Figure 3 - The Shapes menu includes a Flowchart section and a LInes section.
Adding flowchart shapes
To add flowchart shapes to your MS word flowchart, do the following:
  1. Display the Shapes menu according the procedure above.
  2. Under Flowchart, select a shape, such as Process, to change your mouse pointer to cross-hairs.
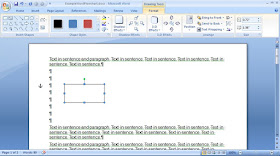
  3. Click and hold the left mouse key, drag the cross-hairs to create and size the shape, and then release the key to place the shape on the page as shown in Figure 4 below.
  4. Move and resize the shape as necessary. Note: Selecting a shape causes Word to display its Drawing Tools - Format ribbon.
  5. Repeat steps 1 through 4 for each shape you wish to add to your flowchart. For example, you might add a Decision shape and two Terminator shapes as shown in Figure 5 below. Note: If you need to duplicate a shape, you can copy and paste it.
Figure 4 - Adding a Process shape.
Figure 5 - Adding a Decision shape and two Terminator shapes.
Adding Lines to interconnect shapes
To add interconnecting lines among the shapes in your MS word flowchart, do the following:
  1. Add two or more flowchart shapes according to the procedure above.
  2. Click Insert, and then click Shapes to display its menu.
  3. Under Lines, select a line, such as Elbow Arrow Connector, to change your mouse pointer to cross-hairs.
  4. Click and hold the left mouse key, drag the cross-hairs to create and size the line, and then release the key to place the line on the page as shown in Figure 6 below. Note: You can drag the yellow diamond to reshape the line.
  5. Drag the green end points of the line so that its arrow interconnects the Process and Decision shapes as shown in Figure 7 below. Note: The line is straight if you place its green end points at the same level.
  6. Copy and paste the line, and then use the new line to interconnect the top of the Decision shape with the top Terminator shape.
  7. Repeat step 6 to interconnect the bottom of the Decision shape with the bottom Terminator shape as shown in Figure 8 below.
Figure 6 - Adding a new Elbow Arrow Connector line. 
Figure 7 - Connecting the Process shape to the Decision shape.
Figure 8 - Connection the Decision shape to the Terminator shapes.
Adding labels to your flowchart
You can add text labels to your flowchart shapes. To add text to a shape, right-click the shape and then select Add Text. For more information, please see: Add text to drawings in Microsoft Office Word 2007.

Note: You can also add shapes, such as small Process shapes, for use only as labels into which you add text. For example, you might wish to place labels near certain lines.