1/13/2015

How to use the Free Online Photo Editor

You can use the Free Online Photo Editor to edit your photos and other graphics images quickly and easily. You need only upload an image file, edit it, and then download it.

Uploading an image file

Before you can edit an image through the Free Online Photo Editor, you need to upload an image file into the editor as follows:
  1. Go to FreeOnlinePhotoEditor.com.
  2. Select an image file: from either your computer or the internet:
    • To select an image from your computer, click Browse to find an image file and display its name in the Choose file field.
    • To select an image from the internet, type the URL of the image file in the Enter URL field.  
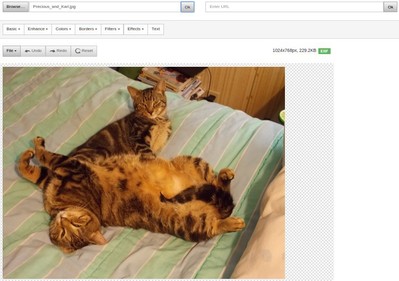
  3. Click OK to upload your selected image file into the Free Online Photo Editor as shown in Figure 1.
  4. Edit your image file according the Editing an image file section below.
Figure 1 - An image file uploaded into the Free Online Photo Editor

Editing your image file

After uploading your image file, you can edit it in the Free Online Photo Editor. Its toolbar has six menus (Basic, Enhance, Colors, Borders, Filters, and Effects) and a Text utility. To edit an image file, use the following general procedure.
  1. Click a toolbar item, such as Basic, to display its menu.
  2. Click a menu item, such as Crop, and then follow its instructions.
  3. Repeat steps 1 and 2 to make adjustments to your image until you are satisfied with your edits.
  4. Download your edited image file according the Downloading your edited image file section below.
Note: To create Figure 2, I used the Basic menu to make Resize, Crop, and Brightness/Contrast adjustments; and the Borders menu to add a Colored border.

Figure 2 - An edited image file

Downloading your edited image file

After editing your image file through the Free Online Photo Editor, you need to download it into your Downloads folder on your computer as follows:
  1. In the Free Online Photo Editor, click File to display its menu.
  2. Click Save as (file type) to download your image file. For example, you could click Save as JPG.
  3. Go to your Downloads folder, and then open your edited image file to verify it downloaded correctly.

1/07/2015

Taking and uploading Chromebook screenshots

This document can help you take, inspect, and then upload Chromebook screenshots. When you take a screenshot, Chromebook automatically saves it as a Portable Network Graphics (PNG) file in your Downloads folder. After inspecting the screenshot, you can make it more accessible by uploading it to Google Drive.

Taking a screenshot

To record content displayed on a Chromebook screen, you can take either a full or partial screenshot.

Taking a full screenshot

To take a screenshot of a full Chromebook screen, do the following:
  1. Display the screen that you wish to record.
  2. As shown in Figure 1, press Ctrl+[switch windows] to take the screenshot and display a brief 'screenshot-taken' message.
    Figure 1 - Full screenshot keys
  3. Inspect your screenshot according to the Inspecting your screenshot section below.

Taking a partial screenshot

To take a screenshot of only part of a Chromebook screen, do the following:
  1. Connect a mouse to your Chromebook. Note: Though you can use the touchpad for this procedure, I recommend a mouse because it makes drag-and-drop tasks much easier. 
  2. Display the screen that you wish to record.
  3. As shown in Figure 2, press Ctrl+Shift+[switch windows] to replace your mouse pointer with a small cross symbol.
    Figure 2 - Partial screenshot keys
  4. Select the area of your partial screenshot as follows:
    1. Move the cross to any corner of the area you wish to record.
    2. Click and hold the left mouse button
    3. Drag the cross until the selection box encloses the screenshot area precisely.
    4. Release the left mouse button to take the screenshot and display a brief 'screenshot-taken' message.
  5. Inspect your screenshot according to the Inspecting your screenshot section below.

Inspecting your screenshot

Inspecting your screenshot immediately helps save time; reconstructing your project's current conditions later might be difficult. To inspect your screenshot, do the following:
  1. Take a screenshot according to the Taking a screenshot section above.
  2. As shown in Figure 3, click the Apps launcher (at lower left of the desktop) to display your apps.
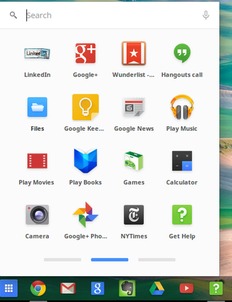
    Figure 3 - App icons on Chromebook
  3. As shown in Figure 4, click the Files app icon to display its window.
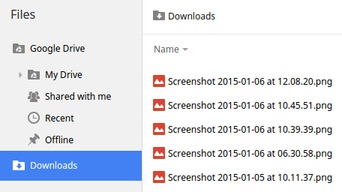
    Figure 4 - Downloads folder with screenshots
  4. Within your Downloads folder, double-click your screenshot to view it in Chromebook's built-in photo editor:
    • If the screenshot appears as you had intended, close the editor, and then take whatever other screenshots you need for your current project.
    • If the screenshot does not appear as you had intended, close the editor, delete the screenshot file from the your Downloads folder, and then take that screenshot again.
  5. Continue according to the Uploading screenshots to Google Drive section below. 

Uploading screenshots to Google Drive

You can use any computer to access your Google Drive applications and files through your Google account. Therefore, uploading your Chromebook screenshots to Google Drive makes them easily available for use in your various projects, such as word-processor documents and web sites. To upload your screenshots to Google Drive, do the following:
  1. Click the Apps launcher to display your apps, and then click the Drive app to open it.
  2. Click New, and then click File upload to display its window.
  3. Select the Downloads folder, and then select one or more screenshot PNG files that you wish to upload.
  4. Click Open to upload your screenshot(s).

1/02/2015

Working offline through your Chromebook

You can work offline to perform various tasks through your Chromebook. For example, you can create and edit Google Drive documents offline. This document can help you practice using Chromebook to edit a document offline. To demonstrate offline editing, you can concurrently edit the same document through both Chromebook and any other computer.

Temporarily taking Chromebook offline

To test working offline through your Chromebook, you can temporarily disconnect its Wi-Fi.  To take your Chromebook offline, do the following:
  1. Click your user icon at the lower-right corner of the Chromebook screen to display a window similar to Figure 1.
    Figure 1 - Click your active network to start disconnecting it.
  2. Click Connected to (your_network_name) to display a window similar to Figure 2.
    Figure 2 - Click your network name to continue 
    disconnecting Wi-Fi (if online), or to connect it (if offline).
  3. Click your_network_name to display a Connected window similar to Figure 3.
    Figure 3 - Click "Disconnect" to take your Chromebook offline.
  4. Verify that Automatically connect to this network has been selected (check marked). Note: This automatically reconnects Wi-Fi when you boot your Chromebook.
  5. Click Disconnect to take your Chromebook offline.
  6. Continue according to the Using Chromebook offline section below.

Placing Chromebook back online

Any time after going offline according to the Temporarily taking Chromebook offline section above, you can place your Chromebook back online as follows:
  1. Click your user icon at the lower-right corner of the Chromebook screen.
  2. Click no network to display a window similar to Figure 2.
  3. Click your_network_name to reconnect Wi-Fi and put your Chromebook back online.

Using Chromebook offline files

Even while your Chromebook is offline, you can use its Google Drive app to create and/or edit files in Google Docs, Sheets, Slides, or Drawings. You can see these files only while Google Drive is open. When you go back online, your internal (offline) Drive files sync with your external (online) files.

As shown in Figures 4 through 6, I have experimented with Chromebook writing and editing, both offline and online, and with a separate computer. To make similar experiments, try the following:
  1. Take your Chromebook offline according to the Temporarily taking Chromebook offline section above.
  2. Open the Google Drive app, and create or edit a test document, such as offline test. Because your Chromebook is still offline, you cannot yet see your offline test, or its edits, through a separate computer, such as a Linux PC.
  3. Place your Chromebook back online according to the Placing Chromebook back online section above. You should now be able to see, and edit, offline test through a separate computer.
  4. To make and observe more edits to offline test, repeat steps 1 through 3 as often as necessary.
Figure 4 - Writing through Chromebook, offline then online.
Figure 5 - Adding a third paragraph through a separate computer,
and then a fourth through the offline Chromebook.
Figure 6 - The green marker indicates that I am a separate user.

How to keep your Chromebook cool

Most Chromebooks (and other laptop computers) have underside cooling vents. If you accidentally block these vents, even partially, you risk overheating your Chromebook. This brief document can help you avoid that problem.
This is the left-front cooling vent under my Chromebook.
I am sharing this information through personal experience. Two years ago, when my Chromebook was new, I tried keeping it on a folded blanket while using it.
A soft surface, such as blanket can block
your Chromebook's vents, which causes overheating.
The soft, fluffy surface blocked the vents and overheated my Chromebook. When it failed suddenly and completely, I wondered whether I had ruined it. Fortunately, I was able to recover it according to the instructions in Google's Use the Chromebook Recovery Utility.

To avoid blocking your Chromebook's cooling vents, use it only a solid surface, such as a table or any other flat surface. For example, I found an inexpensive cutting board on which to place my Chromebook.
A plastic cutting board, or similar flat
surface can keep your Chromebook cool.

12/28/2014

Making a headers template for Google Blogger

Section headers can help make your Google Blogger posts (documents or articles) more readable and clear. This document shows how you can create section headers, and then use them in any document that you think requires them.

Although you need not use headers in every post, they can enhance any document in which you wish to highlight its organization. For example, in this document, I am using section headers to present two topics:
  • Creating your headers template
  • Using your template headers
Creating your headers template
You use this procedure to create a headers template similar to Figure 1.
Figure 1 - Example headers template
These are only example header styles; modify them as you wish. To create your headers template, do the following:
  1. If you haven't yet created a blog (weblog) through Blogger, go to the Blogger Getting Started Guide.
  2. Open Blogger, click Design, click New post, and then type Headers template in the Post title field.
  3. Create your level-1 section header as follows:
    1. Type your level-1 header in the default style (Normal), type some text for your new section immediately below its header, and then select (highlight for editing) the level-1 header text.
    2. Using the icons in the Blogger formatting toolbar, set Font to Ariel, set Font size to Large, click Bold, and then set Text color to dark red as shown in Figure 2.
      Figure 2 - Formatting text in level-1 template header
  4. Create your level-2 section header as follows:
    1. Type your level-2 header, type " - " (space, dash symbol, space), type some text for your new section, and then select the level-2 header text and its dash symbol.
    2. Set Font to Times, set Font size to Large, click Bold, and then set Text color to dark blue.
  5. Create your level-3 section header as follows:
    1. Type your level-3 header, type " - " (space, dash symbol, space), type some text for your new section, and then select the level-3 header text and its dash symbol.
    2. Set Font to Times, set Font size to Normal, click Bold, and then set Text color to dark green.
  6. Click Preview to verify that your headers appear correctly.
  7. Click Save and then click Close.
  8. Go to the Using your template headers section below.
Using your template headers
You never publish your headers template because you only copy its template headers and paste them into other documents that you do publish. To copy your template headers into a new document, do the following:
  1. Open Blogger, click Design, click Posts, click Draft, and then click Headers template to open it
  2. Select all three headers, press Ctrl+C to copy them, and then click Close.
  3. Click New post, type a document name in the Post title field, and then press Ctrl+V to paste the template headers into your new document.
  4. If you need headers while writing your document, copy each header, paste it where you need it, and then type over its header text. Start with at least two level-1 headers. Likewise, if you need any subheaders, use at least two level-2 subheaders under any level-1 header; and at least two level-3 subheaders under any level-2 subheader.
  5. When you finish writing your document, remove the template headers.

12/23/2014

Creating a Google Sites website

Google Sites lets you create and manage a free, simple, thoughtful, and elegant website. You need not write or edit any XHTML code. You can instead focus on creating website contents. This document contains procedures that explain how to:
  • Create website pages
  • Set up page hierarchy
  • Add a logo
  • Change font colors
  • Add images
  • Add internal links
  • Add external links
Although this short document cannot cover all features available in Google Sites, it can help you create a powerful website that you can later modify, and add as many features as you need. For more information, see Google Sites Help.

Creating website pages
You begin building your Google Sites website by creating its pages. To create your website pages, do the following:
  1. Log into Google Sites through your Google Account, such as your Gmail account, and then click Create new site to display its page as shown in Figure 1.
    Figure 1 - Create-new-site web page
  2. Select Blank template, and then type a name for your website, such as Luddites Online.
  3. Type a unique suffix to your new website URL, which begins with https//sites.google.com/site/- - -. Use only letters and/or numbers, such as - - - LudditesOnline57.
  4. Select a theme, such as Crystal Panel. Choose a theme according to the purpose of your website and what you think its visitors might like.
  5. Type the displayed security code, and then click Create to create your website and display its Home page. Note: As shown in Figure 2, while you are signed in to your website, each page has three icons at its top right: The pencil icon for Edit page, the page+ icon for Create page, and the gear icon for More actions.
    Figure 2 - Icons for Edit page (pencil), Create page (page+), and More actions (gear)
  6. Click Edit page, type appropriate text into your Home page, and then click Save. You can edit and reformat this text later.
  7. Click Create page (page+ icon), type a name for your new page, such as Animals, click Create Page, type text into your new page, and then click Save.
  8. Repeat step 7 for each new page you wish to add. For example, as shown in Figure 3, Dave's Example Website includes pages named Animals, Cats, Lions, Tigers, Bears, Plants, Trees, Grass, Minerals, Rocks, and Sand.
    Figure 3 - All pages are initially at level 1
  9. Click Sign out to close your Google Sites session. Optionally you can leave your session open if you wish to immediately change your website page hierarchy according to the Setting up page hierarchy section.
Setting up page hierarchy
To help your website visitors find information more easily, you should set up proper hierarchical levels for your website pages. To set up the hierarchical levels of your pages, do the following:
  1. If you are not already logged into Google Sites, log in, and then click your website name.
  2. Click More actions (gear icon), click Manage site, and then click Pages.
  3. Use drag and drop to set up the hierarchy of each subpage by moving it into the Home page or any appropriate page to which you assign greater hierarchy. A page can be a subpage that has lower-level subpages as shown in Figure 4. 
    Figure 4 - Pages at hierarchical levels 1, 2, 3, and 4
    In this instance, Dave's Example Website includes:
    • A level-1 Home page that has greater hierarchy than its level-2 Animals, Minerals, and Plants subpages, which have been dragged into Home.
      • A level-2 Animals page that has greater hierarchy than its level-3 Bears and Cats subpages, which have been dragged into Animals.
        • A level-3 Cats page that has greater hierarchy than its level-4 Lions and Tigers subpages, which have been dragged into Cats.
      • A level-2 Minerals page that has greater hierarchy than its level-3 Rocks and Sand subpages, which have been dragged into Minerals.
      • A level-2 Plants page that has greater hierarchy than its level-3 Grass and Trees subpages, which have been dragged into Plants.
  4. Click your website name to return to its Home page.
  5. Click More actions (gear icon), click Edit site layout, and then click Navigation (in the sidebar) to display the Configure navigation dialog.
  6. Set the Level of pages to show to all, click OK to close the navigation window.
  7. Click Close to save your changes and redisplay your website.
Adding a logo
A logo enhances your website. To add a logo through Google Sites, do the following:
  1. If you are not already logged into Google Sites, log in, and then click your website name.
  2. Click More actions (gear icon), click Edit site layout, place your mouse pointer within the header until it displays an Edit site header prompt, and then click the header to display a Configure site header window. 
  3. Select Custom Logo, browse for and select your logo image file (such as LuditeLogo.jpg), and then click OK to close the header window.
  4. Verify that your logo displays correctly. 
  5. Click Close to save your changes and redisplay your website.
Changing font colors
Changing certain font colors can enhance your website. Be careful to use no more than a few colors; too many can be distracting. To change font colors, do the following:
  1. If you are not already logged into Google Sites, log in, and then click your website name.
  2. Click More actions (gear icon), click Manage site, and then click Themes, Colors, and Fonts to display a window, similar to Figure 5.
    Figure 5 - Font-color dropdown pallet
     Here, you can make changes to:
    • Entire page
    • Header area
    • Content area
    • Content area gadgets
    • Sidebar gadgets
    • Horizontal navigation
  3. Select an area to change (such as Content area), select an item to alter (such as Page title) select the Color dropdown pallet, and then select a color.
  4. As needed, repeat step 3 for any other areas and items, and then click Save.
Adding images
Images can help your website visitors understand the subjects your website presents. To add images, do the following:
  1. If you are not already logged into Google Sites, log in, and then click your website name.
  2. Select a page into which you wish to add an image, such as a photo or drawing, as an image file. An image file is typically a JPEG or GIF file.
  3. Click Edit page (pencil icon), and then place your insertion point (blinking cursor) wherever you wish to add the image. For example, you might wish to place the image between two paragraphs.
  4. Click Insert, and then click Image, to display an Add an image window.
  5. Select either Uploaded Images or Web Address (URL)
  6. Select the image file you wish to add (such as 03_LudditesOnline.jpg), and then click OK to add the image.
  7. Click the image to display its menu, in which the first three icons let you align the image. For example, you would click Align center (second icon) to center the image.
  8. The next five icons let you resize the image. For example, you can click L to resize the image to large.
  9. Repeat steps 2 through 8 for each image you wish to add, and then click Save.
Adding links
You can add both internal and external links to your website:
  • An internal link lets your website visitor click on that link to display another page within your website. 
  • An external link, which is also called a hyperlink, lets your website visitor click on that link to display another website.
Note: To compare an internal link with an external link, see Sample Links.

Adding internal links - To add internal links to your website, do the following:
  1. If you are not already logged into Google Sites, log in, and then click your website name.
  2. On any page in your website, click Edit page, select (highlight) any word or phrase that you wish to link to another page within your website.
  3. Click the Add or remove link icon to display a Create Link window. 
  4. Click Sites page, type a page name or use the Site map to select a page, click OK, and then click Save.
  5. Repeat steps 2 through 4 for each internal link you wish to create.
Adding external links - To add external links to your website, do the following:
  1. If you are not already logged into Google Sites, log in, and then click your website name.
  2. On any page in your website, click Edit page, select (highlight) any word or phrase that you wish to link to another website.
  3. Open the website to which you wish to link, and copy its URL.
  4. Click the Add or remove link icon to display a Create Link window. 
  5. Click Web address, type or paste a URL, click OK, and then click Save.
  6. Repeat steps 2 through 5 for each external link you wish to create.

12/19/2014

Mouse dongles interfere with Chromebook touchpads

A dongle (USB connector) for a wireless mouse can cause intermittent problems with the touchpad on a Chromebook. Therefore, as explained in this document, you should always unplug the dongle before using the touchpad. 

Note: This document applies to all portable computers, specifically to Chromebooks and generally to laptop PCs.

While getting started with your Chromebook, you might plan using only a wireless mouse, never the touchpad. You might decide to leave the dongle plugged in at all times as shown in Figure 1. However, should you later want to use the touchpad, it will almost certainly not work properly until you unplug the dongle. Your touchpad should always work as described in Chromebook touchpad tips.

Figure 1 - While using a wireless mouse (instead of the touchpad)
with your Chromebook, connect the dongle to a USB port. 
Note: When I started using a Chromebook, I didn't want to bother with the touchpad. Therefore, I never unplugged the dongle. When I gradually started using the touchpad, and having intermittent problems, I thought I was just too clumsy for the touchpad. Recently, I wondered whether removing the dongle might let the touchpad work correctly. To my astonishment, it immediately worked properly and smoothly.

Each wireless mouse works only with its own dongle. If you lose the dongle, your mouse is useless. Therefore, while not using the dongle, you should keep it in its storage slot, which is inside the mouse as shown in Figure 2.
Figure 2 - While using the touchpad (instead of a wireless mouse) with
your Chromebook, disconnect the dongle and store it in the mouse.