4/30/2012

How to set up Ubuntu 12.04


On April 26, 2012, Canonical released its newest distribution of the free, open-source Linux operating system, Ubuntu 12.04. After you either download and install it, or upgrade to it, these simple procedures can help you enjoy an efficient Ubuntu PC.
Note: Although these basic settings specifically apply to Ubuntu 12.04, they also generally apply to other Ubuntu releases.
Setting up Ubuntu 2D graphics - Ubuntu 3D graphics provide visual effects, but slow the information display on your PC. Therefore, if you do not have a new, ultra-fast PC, setting up Ubuntu 2D graphics should display information much faster. To set up Ubuntu 2D graphics, do the following:
  1. Boot or reboot your Ubuntu 12.04 PC.
  2. At the login dialog, click the "gear" icon.

  3. Click Ubuntu 2D, type your password and then press Enter.
Setting up your mouse - Setting up your mouse first makes other system settings easier to adjust. To set up your mouse, do the following:
  1. Click the System Settings icon (in the Launcher at the left).

  2. Click the Mouse and Touchpad icon.

  3. As you prefer, adjust Pointer Speed, Drag and Drop, and Double-Click Timeout. Note: A low Pointer Speed Sensitivity facilitates adjusting window sizes.

  4. Click All Settings (at the top) to redisplay the System Settings window.
Setting up your screen timeout - To set up your screen timeout, do the following:
  1. Click the System Settings icon.
  2. Click the Brightness and Lock icon.
  3. As you prefer, adjust the screen-timeout and Lock settings. Note: For a home PC, you usually need no Lock.
Setting up your system sound - To set up your system sound, do the following:
  1. Click the System Settings icon.
  2. Click the Sound icon.
  3. As you prefer, adjust your system sound input and output settings. Note: Make sure all Mute selectors are unchecked.
Installing additional drivers - To install additional drivers, do the following:
  1. Click the System Settings icon .
  2. Click the Additional Drivers icon
  3. Select any "Recommended" driver.

  4. Click Activate, type your password, and then click Authenticate.
  5. To activate the driver, close all windows and restart your PC.
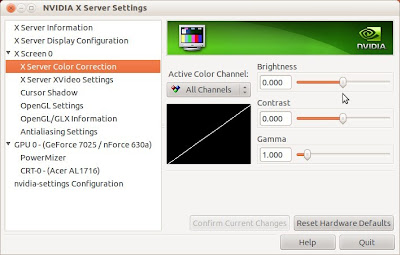
  6. Set up the driver. For example, if your PC has NVIDIA graphics, click the Ubuntu logo (at the top of the launcher) to open Dash, select the applications icon (second at the bottom), type nv (nvidia) in the search field, click NVIDIA X Server Settings, adjust settings such as Color Correction: Brightness, Contrast and Gamma.

4/22/2012

Sharing photos online through SlickPic lite


SlickPic lite is one several free, cloud-software applications that let you store, share and back up photos online. For more information, see the 2012 BestPhoto Sharing Service Comparisons and Reviews by TopTenReviews.

Signing up for SlickPic lite - To sign up for a SlickPic lite account, do the following:
  1. Go to SlickPic and click Create Free Account.
  2. Type your name, email address, and password. Agree to SlickPic's terms, and then click Get Started.
  3. Close the Welcome window, and then check your email for your account-activation notice.
  4. Open your account-activation notice, and then click its link to finish your registration process.
  5. Type your password, and the click Sign In to display your dashboard.
  6. Under Start Here! 3 Easy Steps, click Upload your first album to display the Upload Photos window. Note: You create your SlickPIck lite albums while you upload your photos.
  7. Upload your photos according to the section below.

Uploading photos to SlickPic lite - To upload your photos to SlickPic lite, do the following:
  1. Log in to SlickPic, and and then click Upload Photos to display its window. Alternatively, you can log in and then click Upload your first album according to the section above.
  2. Type an Album Title and then click Choose Photos.
  3. Navigate to your photos, select one or more, and then click Open.
  4. Wait for your photo(s) to upload, and then click Go to Uploaded Album.
  5. Click Share Album to display its window. Either post your album to a social network or copy a URL link to the album or its slideshow. Note: To copy a link, select it (highlight it) and then press Ctrl+C.

4/15/2012

How to repair GRUB 2 for Ubuntu dual boot


The GRand UnifiedBootloader (GRUB 2) in Ubuntu lets you dual boot Ubuntu and another operating system. For example, you might install Ubuntu "alongside" either Microsoft Windows or Linux Mint. If you cannot dual boot, you might correct the problem by repairing GRUB 2.
Somehow, by default, the GRUB 2 graphics mode (GFXMODE) has been disabled and set to a low resolution that is invalid for most PCs. Therefore, you need to enable GRUB_GFXMODE and set it to a valid resolution. To repair GRUB 2 in Ubuntu, do the following:
  1. Reboot your PC to make sure it boots to Ubuntu without first displaying the GNU GRUB screen.
  2. Click the icon at the top of the Launcher to open the Dash window, type terminal in the Search field, and then click the Terminal application to open it.

  3. Type gksu gedit, press Enter, type your password, and then click OK.
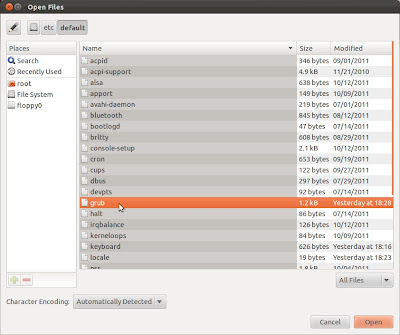
  4. Click Open, click File System, double click etc, scroll to and double-click default, and then double-click grub.

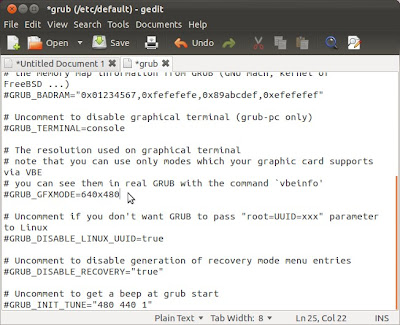
  5. Scroll to #GRUB_GFXMODE=640x480, and then edit it to GRUB_GFXMODE=1024x768. Important: You need also enable GRUB_GFXMODE by removing its preceding # symbol.

  6. Save grub, close gedit and then, for the Untitled Document, click Close without saving.
  7. In the Terminal, type sudo update-grub, press Enter, wait until the Terminal indicates that the update is "done," and then close the Terminal.
  8. Reboot Ubuntu to display the GNU GRUB menu, which lets you boot to either Ubuntu or your other operating system.

4/11/2012

How to install Ubuntu

The free, open-source Ubuntu is a popular distribution of the Linux operating system. An Ubuntu live disc lets you try Ubuntu without affecting your current operating system. If you decide you like Ubuntu after you have evaluated it through its live disc, you can install it on your hard drive.

Creating a bootable Ubuntu discA bootable Ubuntu disc is a live CD or DVD. To create your Ubuntu live disc, do the following:
  1. Go to Download Ubuntu and select either 32-bit or 64-bit according to the processor in your PC.
  2. Click Start download and then wait for your Ubuntu ISO file to finish downloading.
  3. Create your bootable disc by burning your ISO file to a writable CD or DVD.

Evaluating Ubuntu - Before installing Ubuntu, you should evaluate it through its live disc. To evaluate Ubuntu, do the following:
  1. Create your bootable Ubuntu disc according to the section above.
  2. Place your bootable Ubuntu live disc into your optical drive, reboot your PC and then, at the Welcome window, click Try Ubuntu to run the live disc.
  3. Experiment with Ubuntu to decide whether your wish to install it in your PC.
  4. If you decide to install Ubuntu, continue according to the section below. Note: To exit the live disc without installing Ubuntu, click the gear icon in the upper right corner, click Shut Down, click Restart, remove the disc and then press Enter.

Installing Ubuntu - To install Ubuntu on your PC, do the following:
  1. Evalulate Ubuntu according to the section above, and then click Install Ubuntu.
  2. As prompted, select your language, and verify that your PC meets minimum requirements.
  3. Select how you wish to install Ubuntu. For example, if you have replaced the motherboard in your PC, you need to select Erase disk and install Ubuntu.
  4. In the Where are you? window, select your time zone; in the Keyboard layout window, select your keyboard; and then in the Who are you? window, type your name and password (its other fields fill automatically).
  5. After the installation completes, click Restart Now to boot the Ubuntu operating system you have installed.
  6. Use Update Manager to install the newest software changes to Ubuntu.

4/09/2012

How to install drivers on a new motherboard


You can install a new motherboard while either building or rebuilding a desktop PC. If you plan to run your PC under Microsoft Windows, you also need to install motherboard drivers. For Windows, no motherboard is a "plug and play" device: a Windows PC cannot run correctly until you install its motherboard drivers.
If you plan to run your new PC only under a LInux distribution, such as Ubuntu or LInux MInt, you do not need to install motherboard drivers. Of course, if you plan to dual boot Windows and Linux, you do need to install motherboard drivers for Windows.
Each new motherboard ships with a driver-installation disc (CD or DVD). I developed and tested the below procedure on my rebuilt PC; your actual procedure will vary according your specific motherboard. Therefore, to install your motherboard drivers, do approximately the following:
  1. Install MS Windows. Note: Do not expect your Windows PC to run correctly until after you install its motherboard drivers.
  2. Insert the driver-installation disc, and then navigate to its contents.
  3. Click Setup.exe to display a dialog window.
  4. Click the Driver icon to list the drivers to install, such as Chipset, Display, USB2, Network Chip and HD Audio.
  5. Select (checkmark) all drivers, click Install and then observe the installation progress.
  6. After the drivers have installed, click Exit and then reboot your PC.
  7. If your PC is not running correctly, repeat steps 3 through 6. (My PC required this.)

4/04/2012

How to install Linux Mint


Linux Mint is a popular distribution of the free, open-source Linux operating system. Before deciding whether to install it, you can evaluate it through its "live disc," which runs independently of any operating system previously installed on your hard drive.
Creating a bootable Linux Mint disc - A bootable Linux Mint disc is a live disc. To create your Linux Mint disc, do the following:
  1. Go to Download Linux Mint and choose a version to download.

  2. According to the processor in your PC, click either 32-bit or 64-bit to display a page that lists Primary download mirrors.
  3. According to your location, select a nearby mirror, click on it, and then wait for your Linux Mint ISO file to download.
  4. Create your bootable disc by burning your ISO file to a writable CD or DVD.

Evaluating Linux Mint - Before installing Linux Mint, you should evaluate it through its live disc To evaluate Linux Mint, do the following:
  1. Create a bootable Linux Mint disc according to the section above.
  2. Place your bootable Linux Mint live disc into your optical drive, and then reboot your PC to run through the "live disc."
  3. Experiment with Linux Mint to determine whether you wish to install it on your hard drive. For more information, see the Linux Mint official user guide.
  4. If you decide to install Linux Mint, continue according to the section below. Note: To exit the live disc without installing Linux Mint, click Live session user, (upper right corner), click Shut Down, click Restart, remove the disc and then press Enter.

Installing Linux Mint - To install Linux Mint on your PC, do the following:
  1. Evaluate Linux Mint according to the section above, and then Click Install Linux Mint.
  2. Select your language, and (as prompted) verify the your PC meets minimum requirements.
  3. Select how you wish to install Linux Mint. For example, if you have replaced the motherboard in your PC, you need to select Erase everything.

  4. In the Where are you? window, select your time zone.
  5. In the Keyboard layout window, select your keyboard.
  6. In the Who are you? window, type your name and password. The other fields are automatic.

  7. After the installation completes, click Finished to close the installation program, and then click Restart to boot your PC through its installed LInux Mint.
  8. Use the Update Manager to install the newest software changes to Linux Mint.

4/01/2012

Reviewing Tech Smiths in New Paltz, New York


If you live within driving distance of New Palz, New York, a small college town in the Hudson Valley, and you need computer repair or service, I highly recommend Tech Smiths. Whether you own a PC or a Mac, I am sure you will find their technicians helpful and their fees reasonable.

In February, 2012, my partner's iMac computer failed completely. Despite carefully trying everything recommended in her iMac documentation, she could not boot her system. It would only beep sadly. After borrowing my standby Linux PC to search for "iMac repair," she found Tech Smiths, which is "Hudson Valley's only Apple Authorized Service Provider." She also found a big store nearby that could repair her iMac, but only if she had bought it there.
As we walked into Tech Smiths for our first visit, we braced ourselves for what usually passes as "service" (meaning not so much). To our delight, all three technicians were knowledgeable and cordial. After a technician greeted us politely, I asked, "How soon can you look at her iMac?" To our astonishment, he smiled and answered, "Is right now soon enough?." Grinning, I answered, "Probably." It only went uphill from there. After determining her iMac needed a new RAM-memory module, the Tech Smiths replaced it quickly and inexpensively.
We will not hesitate to visit Tech Smiths when we again need computer service. If only every business could be run in such a calm, gentle way, which succeeds by treating employees and customers fairly.