Excel is the
spreadsheet application in the Microsoft Office productivity suite.
You can use Excel to generate daily activity (task) logs. This
document explains how to:
- Create your base log,
which is a simple Excel spreadsheet that serves as a template for
your daily activity logs.
- Create and use daily
activity logs, each of which starts as a copy of your base log. For
each activity or task that you log, you need enter only a category, a
brief description and an ending time. The spreadsheet automatically
calculates starting time, activity interval, and total daily time.
- Create your PDF daily activity log.
- Cover your assets (CYA).
Note: Although this document applies
specifically to creating daily activity-log spreadsheets through MS Excel, it applies
generally to creating activity logs through other spreadsheet applications, such as LibreOffice Calc and
Google Drive Spreadsheet.
Creating your base log
To create your base
log, you need to format it and then add its formulas.
Formatting your base
log - Your base log requires six columns (A through F) and four rows
(1 through 4). To format your base log, do the following:
- Open a new MS Excel
file, rename its worksheet as DailyLog, and then save the spreadsheet
as BaseLog.xls.
- Select cells A1 through
C1, select HOME (in the toolbar) to display its ribbon, and then
click the Merge & Center icon (at the right in the Alignment
frame).
- Adjust the width of
column D, making it wider so you can type activity descriptions.
- Merge cells E1 and F1.
- Select cells A1 through
F2 and then format them as Ariel, 12 points and bold.
- In rows 1 through 4,
type text as shown in Figure 1 below.
- Select cells A3 through
B4, select HOME, click the
arrow at the right of Number, select Time, select 1:30 PM, and then
click OK to format cells A3 through B4 for 12-hour time. Note: If you prefer
24-hour time, select 13:30.
- Select cells E3 through
F4, select HOME, click the arrow at the right of Number, select Time,
select 13:30, and then click OK to format cells E3 through F4 for hours and minutes (no AM or PM).
 |
Figure 1 - Formatting your base-log
spreadsheet.
|
Note: Click any image to enlarge it.
Adding base-log
formulas - To add formulas to your base log, do the following:
- Format you base log
according to the procedure above.
- Select merged cells E1
and F1, type =today() into the function (fx) bar, and then press
Enter.
- Select cell A3, type
your typical first-activity start time, such as 8:00 am.
- Select cell B3, type
your typical first-activity end time, such as 8:15 am.
- Select cell A4, type
=b3 into the function bar, and then press Enter.
- Select cell E3, type
=b3-a3 into the function bar, and then press Enter.
- Select cell F3, type
=e3 into the function bar, and then press Enter.
- Select cell E3, copy it
and paste it into cell E4.
- Select cell F4, type
=sum($e$3:e4) into the function bar, and then press Enter. Your base
log should now display as shown in Figure 2 below.
 |
Figure 2 - Adding
formulas to your base log.
|
- Save your BaseLog.xls,
and make at least one backup copy.
Creating and using your
daily logs
To create and use your
daily activity logs, you need to create a new log at the start of
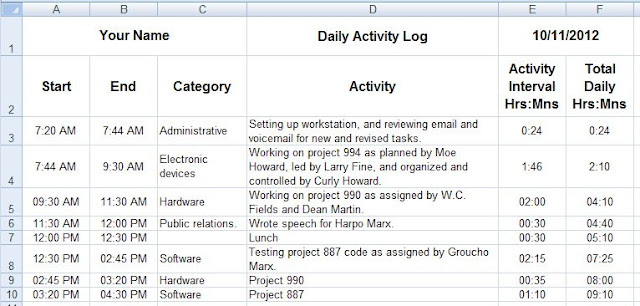
each day. For an example daily activity log, see Figure 3 below. To create each
daily log, do the following:
- Open your BaseLog.xls
Excel spreadsheet file, and then save it with a file name that
includes the current date and your name, such as
2012-10-11_Your_Name_Log.xls.
- Modify cells A3 through
D3 to log the your first daily activity.
- Describe your next
activity in cells C4 and D4, and then, when done, record its end time
in cell B4.
- Copy row 4, paste it
into row 5, and then modify cells B5 through D5 to log your next
activity. Note: Modify cells only in columns B through D; spreadsheet formulas
update other cells automatically.
- For each subsequent
activity, copy your last row, paste it into the next, and then modify
its cells in columns B through D.
 |
Figure 3 - Example
daily activity log.
|
- At the end of the day,
make at least one backup copy of your daily activity log.
Creating your PDF daily activity log
To create your PDF daily activity log, do the
following:
- Open your Excel daily
activity log, such as 2012-10-11_Your_Name_Log.xls.
- Click the Office Button
(at the upper left), to display its menu.
- Select Save As, click
PDF or XPS, and select the PDF file type.
- Click Publish to
generate your PDF daily activity log, such as
2012-10-11_Your_Name_Log.pdf.
Covering your assets
(CYA)
Your daily activity logs can help you practice prudent
CYA. For example, at the end of each day, you can:
- Create a PDF daily activity log according to the section above.
- Create a PDF status report according to Creating a cumulative status report through MS Word.
- Send an email to all
your managers, and attach both PDFs.
- Make personal backup
copies of both PDFs, and file them in private storage.


