5/28/2012

Reinstalling dual-booted Ubuntu to enable Clonezilla backup


If your PC dual-boots Ubuntu and Windows 7, and you have upgraded from Ubuntu 11.10 to 12.04, you might not be able to make a backup image your PC hard drive through Clonezilla. As shown in Ask Ubuntu, when Clonezilla tries to back up the Ubuntu partition, it halts and displays "Something went wrong!" You can correct this problem by reinstalling Ubuntu 12.04 completely.
Creating bootable discs - Before you can reinstall Ubuntu 12.04 completely, you need to create three bootable discs:
  • An Ubuntu 12.04 live DVD. Go to the Ubuntu website, download an Ubuntu 12.04 ISO file, and then burn it to a rewritable DVD.
  • A Gparted (Gnome Partition Editor) live CD. Go to the Gparted website, download its ISO file, and then burn it to a writable CD.
  • A Windows 7 system repair CD. Boot Windows, click Start, click Control Panel, click Backup and Restore, click Create a system repair disc, insert a writable CD into the optical drive, and then click Create disc.


Reinstalling Ubuntu 12.04 completely - To reinstall Ubuntu 12.04 completely, do the following:
  1. Back up all data on your PC. For example, you can copy your documents, photos, and video and music files to an external hard drive.
  2. Boot your Gparted live CD. Delete your Ubuntu partition, which is typically sda5.
  3. Boot your Windows 7 system repair CD, open its Command Prompt, type bootrec.exe /FixMbr, and then press Enter.
  4. Boot your PC. It should boot directly to Windows.
  5. Boot your Ubuntu 12.04 live DVD, click Install Ubuntu, and then install it alongside Windows 7.
  6. Boot your PC. It should display GRUB (GRand Unified Bootloader), which lets you choose either Ubuntu or Windows. Note: If your PC boots directly to Ubuntu without first displaying GRUB, go to How to repair GRUB 2 for Ubuntu dual boot.

5/19/2012

Using Unity workspaces in Ubuntu


In the Ubuntu distribution of the Linux operating system, you can use Unity workspaces as virtual desktops. Multiple workspaces simplify complex projects because you need overlap and/or minimize fewer windows.
Adding windows to Unity workspaces - You can add windows to two or more Unity workspaces. To add windows to workspaces, do the following:
  1. In the Launcher, click the Workspaces icon to display all four workspaces.

  2. Select a workspace by moving your mouse pointer over it. For example, you can place your pointer over the lower-right workspace.
  3. Expand your selected workspace to full size by clicking it. Continuing this example, you click the lower-right workspace to expand it.
  4. Open a window in your expanded workspace. Continuing this example, you can open a browser and go to an educational website.


  5. Repeat steps 1 through 4 for other workspaces. Continuing this example, you might open two new LibreOffice documents, such as a Writer text document in the upper-left workspace, and a Calc spreadsheet in the upper-right workspace.

Note: You need not use all four workspaces. In this example, the lower-left workspace contains no windows.
Moving windows among Unity workspaces - You can move any window to any other workspace. To move a window from one workspace to another, do the following:
  1. Click the Workspaces icon, click a workspace to open it, and then select the window you want to move to another workspace. For example, you can select the LibreOffice Writer document in the upper-left workspace.
  2. Press Ctrl+Alt+Shift and press an arrow key to move the window. Continuing this example, you can press ↓ to move the Writer document the to lower-left workspace.
  3. Click the Workspaces icon to verify that you have moved the window as intended.

  4. Repeat steps 1 through 3 for any other window you wish to move to another workspace.
Note: As on any desktop, you can add more than one window to any workspace.
Removing windows from Unity workspaces - After you finish using your workspaces, make sure you save all documents and close each window in every workspace. This guards against losing edits when when you shut down or restart your PC.

5/15/2012

Using Ubuntu's heads-up display (HUD)

The Ubuntu 12.04 Unity interface includes a heads-up display (HUD) that gives you an alternative to navigating through menu paths. If you remember a command (or part of it) that is the path target, you can use HUD to search for that command and execute it directly.
Using HUD to execute commands - You can use HUD to search for and execute commands, which you can also access through traditional menus. To use HUD, do the following:
  1. Press Alt to display HUD as the "Type your command" search field.

  2. Start typing the command you want (or part of it) until HUD displays it as an item in a menu path.
  3. To execute a command, such as for opening a window, click on the command. Alternatively, you can scroll to it and press Enter.

Note: Executing a command closes HUD automatically. To close HUD before you execute a command, press Alt.
Example system commands - System actions you can perform through Ubuntu HUD commands include:
  • Launching the Update Manager by typing u and then clicking Device > Software Up to Date.

  • Displaying the User Accounts window by typing ac and then clicking Users > User Accounts.


Example GIMP commands - The GNU Image Manipulation Program (GIMP) is an application that lets you perform actions through its associated HUD commands.
Note: HUD works only with applications that use the Unity global menu bar, such as GIMP, Chrome, and Image Viewer.
GIMP actions you can perform through HUD commands include:
  • Displaying the Scale Image window by typing sc and then clicking Image > Scale Image.


  • Displaying the Brightness-Contrast window by typing br and then clicking Colors > Brightness-Contrast.


  • Converting an image from RGB (full color) to monochrome (black and white) by typing gra and then clicking Image > Mode > Grayscale.


5/06/2012

Disabling word-processor automatic corrections


Depending on your personal preferences and most-frequent writing tasks, the automatic corrections in your word-processor can be either curses or blessings. For example, if you find automatic corrections startling and annoying, you can disable them in LibreOffice Writer and/or MicrosoftWord.
Disabling automatic corrections in LibreOffice Writer - To disable automatic corrections in LibreOffice Writer, do the following:
  1. Open a new or existing LibreOffice Writer document.
  2. Click Tools (on the menu bar), click AutoCorrect Options and then select the Options tab.

  3. In the checkbox for each option you choose to disable, click the check mark to remove it, which disables that option. If necessary, scroll down to access all options on the page.

  4. Repeat step 3 for each of the other two tabs: Localized Options and Word Completion.


  5. Click OK to save your changes and close the AutoCorrect Options window.
Disabling automatic corrections in MS Word - To disable automatic corrections in MS Office 2007 Word, do the following:
  1. Open a new or existing MS Word document.
  2. Click the Office Button, and then click Word Options at the bottom of the window.
  3. Click Proofing, click AutoCorrect Options and then select the AutoCorrect tab.

  4. In the checkbox for each option that you choose to disable, click the check mark to remove it, which disables that option.
  5. Repeat step 4 for each of the other four tabs: AutoFormat, Smart Tags, Math AutoCorrect and AutoFormat As You Type.
  6. Click OK to save your changes and close the AutoCorrect window, and then click OK to close the Word Options window.

4/30/2012

How to set up Ubuntu 12.04


On April 26, 2012, Canonical released its newest distribution of the free, open-source Linux operating system, Ubuntu 12.04. After you either download and install it, or upgrade to it, these simple procedures can help you enjoy an efficient Ubuntu PC.
Note: Although these basic settings specifically apply to Ubuntu 12.04, they also generally apply to other Ubuntu releases.
Setting up Ubuntu 2D graphics - Ubuntu 3D graphics provide visual effects, but slow the information display on your PC. Therefore, if you do not have a new, ultra-fast PC, setting up Ubuntu 2D graphics should display information much faster. To set up Ubuntu 2D graphics, do the following:
  1. Boot or reboot your Ubuntu 12.04 PC.
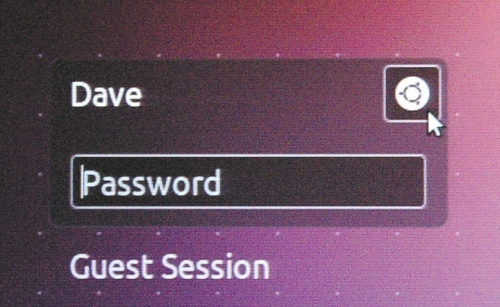
  2. At the login dialog, click the "gear" icon.

  3. Click Ubuntu 2D, type your password and then press Enter.
Setting up your mouse - Setting up your mouse first makes other system settings easier to adjust. To set up your mouse, do the following:
  1. Click the System Settings icon (in the Launcher at the left).

  2. Click the Mouse and Touchpad icon.

  3. As you prefer, adjust Pointer Speed, Drag and Drop, and Double-Click Timeout. Note: A low Pointer Speed Sensitivity facilitates adjusting window sizes.

  4. Click All Settings (at the top) to redisplay the System Settings window.
Setting up your screen timeout - To set up your screen timeout, do the following:
  1. Click the System Settings icon.
  2. Click the Brightness and Lock icon.
  3. As you prefer, adjust the screen-timeout and Lock settings. Note: For a home PC, you usually need no Lock.
Setting up your system sound - To set up your system sound, do the following:
  1. Click the System Settings icon.
  2. Click the Sound icon.
  3. As you prefer, adjust your system sound input and output settings. Note: Make sure all Mute selectors are unchecked.
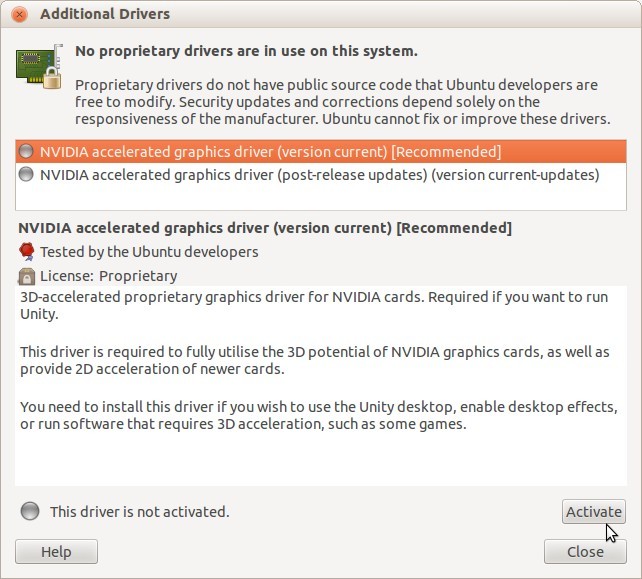
Installing additional drivers - To install additional drivers, do the following:
  1. Click the System Settings icon .
  2. Click the Additional Drivers icon
  3. Select any "Recommended" driver.

  4. Click Activate, type your password, and then click Authenticate.
  5. To activate the driver, close all windows and restart your PC.
  6. Set up the driver. For example, if your PC has NVIDIA graphics, click the Ubuntu logo (at the top of the launcher) to open Dash, select the applications icon (second at the bottom), type nv (nvidia) in the search field, click NVIDIA X Server Settings, adjust settings such as Color Correction: Brightness, Contrast and Gamma.

4/22/2012

Sharing photos online through SlickPic lite


SlickPic lite is one several free, cloud-software applications that let you store, share and back up photos online. For more information, see the 2012 BestPhoto Sharing Service Comparisons and Reviews by TopTenReviews.

Signing up for SlickPic lite - To sign up for a SlickPic lite account, do the following:
  1. Go to SlickPic and click Create Free Account.
  2. Type your name, email address, and password. Agree to SlickPic's terms, and then click Get Started.
  3. Close the Welcome window, and then check your email for your account-activation notice.
  4. Open your account-activation notice, and then click its link to finish your registration process.
  5. Type your password, and the click Sign In to display your dashboard.
  6. Under Start Here! 3 Easy Steps, click Upload your first album to display the Upload Photos window. Note: You create your SlickPIck lite albums while you upload your photos.
  7. Upload your photos according to the section below.

Uploading photos to SlickPic lite - To upload your photos to SlickPic lite, do the following:
  1. Log in to SlickPic, and and then click Upload Photos to display its window. Alternatively, you can log in and then click Upload your first album according to the section above.
  2. Type an Album Title and then click Choose Photos.
  3. Navigate to your photos, select one or more, and then click Open.
  4. Wait for your photo(s) to upload, and then click Go to Uploaded Album.
  5. Click Share Album to display its window. Either post your album to a social network or copy a URL link to the album or its slideshow. Note: To copy a link, select it (highlight it) and then press Ctrl+C.

4/15/2012

How to repair GRUB 2 for Ubuntu dual boot


The GRand UnifiedBootloader (GRUB 2) in Ubuntu lets you dual boot Ubuntu and another operating system. For example, you might install Ubuntu "alongside" either Microsoft Windows or Linux Mint. If you cannot dual boot, you might correct the problem by repairing GRUB 2.
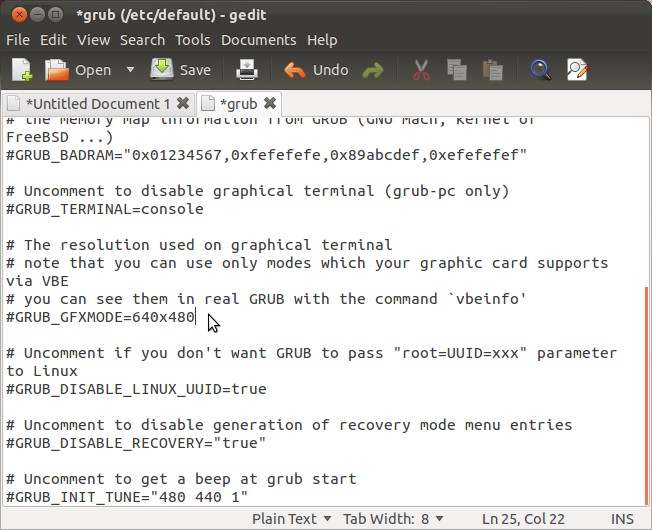
Somehow, by default, the GRUB 2 graphics mode (GFXMODE) has been disabled and set to a low resolution that is invalid for most PCs. Therefore, you need to enable GRUB_GFXMODE and set it to a valid resolution. To repair GRUB 2 in Ubuntu, do the following:
  1. Reboot your PC to make sure it boots to Ubuntu without first displaying the GNU GRUB screen.
  2. Click the icon at the top of the Launcher to open the Dash window, type terminal in the Search field, and then click the Terminal application to open it.

  3. Type gksu gedit, press Enter, type your password, and then click OK.
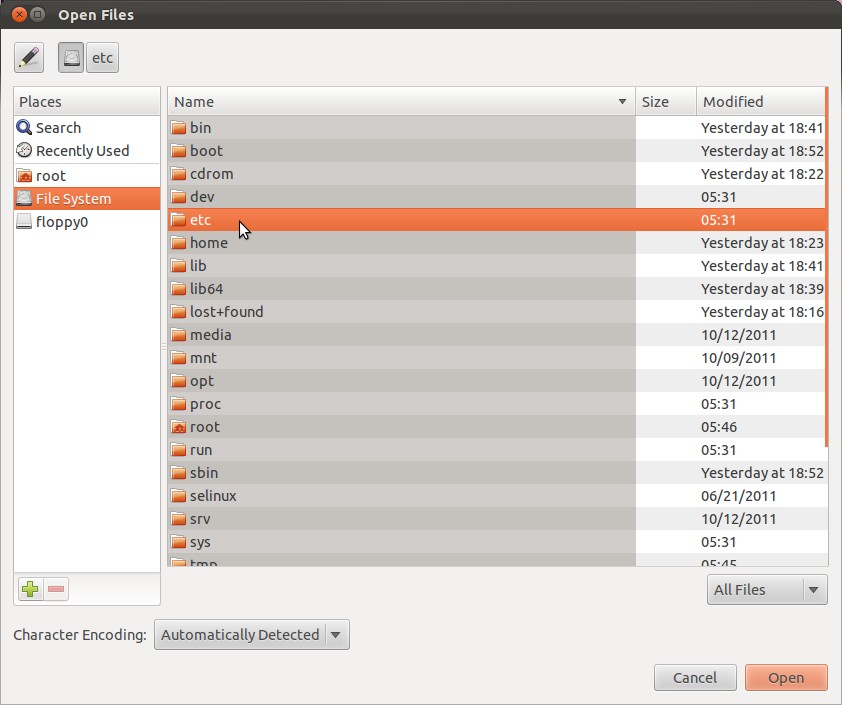
  4. Click Open, click File System, double click etc, scroll to and double-click default, and then double-click grub.

  5. Scroll to #GRUB_GFXMODE=640x480, and then edit it to GRUB_GFXMODE=1024x768. Important: You need also enable GRUB_GFXMODE by removing its preceding # symbol.

  6. Save grub, close gedit and then, for the Untitled Document, click Close without saving.
  7. In the Terminal, type sudo update-grub, press Enter, wait until the Terminal indicates that the update is "done," and then close the Terminal.
  8. Reboot Ubuntu to display the GNU GRUB menu, which lets you boot to either Ubuntu or your other operating system.