Pages

4/14/2015

How to print from your Chromebook

You cannot directly print from your Chromebook because you cannot directly connect it to any printer. However, you can print indirectly through Google Cloud Print, which is an online service that lets you print through the internet. This document can help you set up your printer so that you can print through Google Cloud Print. For more information, please see Connect your printer to Google Cloud Print.

Google Cloud Print lets you print from your Chromebook (or any computer and your Google account) to two printer types:
  • A classic printer connects to a Linux, Mac, or Windows computer through either USB or WiFi.
  • Google Cloud Ready printer needs no connection to any computer.
This document:
  • Explains how to set up a classic printer.
  • Outlines how to set up a Google Cloud Ready printer.
  • Explains how to test Chromebook printing.

Setting up a classic printer

You can print from your Chromebook to a classic printer only after you set it up through a Linux, Mac, or Windows PC. This section explains how to set up your classic printer by connecting it to a PC, and then registering it to Google Cloud Print, which makes your printer available to your Chromebook (and your other computers) through the internet. For more information, see Connect your classic printers with Google Cloud Print.

Note: I developed and tested this classic-printer setup procedure by using:
  • A Samsung model ML-2525 printer, which is a classic printer
  • A USB cable
  • A Linux Mint PC
To set up your classic printer, do the following:
  1. Turn on your classic printer, and make sure it's connected to its Linux, Mac, or Windows computer through either a USB cable or a home WiFi network.
  2. Open a Chrome (or Chromium) browser on the connected computer.
  3. As shown in Figure 1, click the Customize button (three horizontal bars) to display its menu.
    Figure 1 - Clicking the Customize button.
  4. Click Settings to open its page in a new tab, scroll to and click Show advanced settings, scroll to the Google Cloud Print section, and then click Manage to display a Devices page.
  5. Click Add printers to display a Google Cloud Print - Printers to register page similar to Figure 2.
    Figure 2 - Adding your classic printer to register it.
  6. Select your classic printer, such as Samsung-ML-191x-252x, and then click Add printer(s) to register it with Google Cloud Print.
  7. Close the Google Cloud Print tab, and then test your classic printer according to the TESTING CHROMEBOOK PRINTING section below.

Setting up a Cloud Ready printer

You can print from your Chromebook to a Google Cloud Ready printer only after you set it up through either a Mac or Windows PC. Currently (April, 2015), you cannot yet set up a Cloud Ready printer through a Linux PC.
Note: This section provides general Cloud Ready Printer information and example procedures because detailed information and specific procedures vary according to printer manufacturers and models. For details, please see Cloud Ready Printers.

This section outlines setting up your Cloud Ready printer by performing setup tasks in the following sequence:
  1. Configuring your WiFi network correctly for your Cloud Ready printer.
  2. Updating your printer's firmware.
  3. Registering your printer.
Note: I developed and tested the example procedures in this section by using:
  • An Epson model WP-4020 Series printer, which is a Google Cloud Ready printer
  • A TP-Link WiFi router, model TL-WA901ND
  • A Windows 7 PC

Configuring your WiFi network

Before you can use a Google Cloud Ready printer, you might need to configure your WiFi network for that printer. Here's an example procedure:
  1. Turn on your printer and your Windows PC.
  2. Press the QSS button on your router, and then within two minutes, press and hold the WiFi button on your printer for three seconds.
  3. On your Windows 7 PC, click Start to display its menu, click Control Panel (all items).
  4. In the Control Panel, Click Network and Sharing, and then click Network Map to display a window similar to Figure 4.
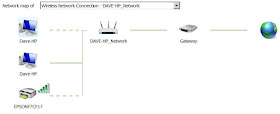
  5. Click See full map to display a window similar to Figure 5. Note: if you have configured your WiFi network correctly for your Cloud Ready printer, it appears in the full map; in this example, its printer name is EPSONFCF17.
  6. According to the procedure below, update the firmware in your Cloud Ready printer.

Updating your printer firmware

Before you can use a Google Cloud Ready printer, you might need to update its firmware. Here's an example procedure:
  1. According to the procedure above, configure you WiFi network for your Cloud Ready printer.
  2. On your Windows 7 PC, click Start, click Control Panel (all items), Click Network and Sharing, and then click Network Map to display a window similar to Figure 3.
    Figure 3 - Displaying the basic network map.
  3. Click See full map to display a window similar to Figure 4.
    Figure 4 - Displaying the full map.
  4. Right-click EPSONF7CF17 to display Management URL, and then click Management URL to display an EPSON WP-4020 Series setup web page similar to Figure 5.
    Figure 5 - Display the Epson WP-4020 Series setup web page.
  5. Click Firmware Update to start the update (if necessary). Note: Be patient; the update takes considerable time. When the update completes, it turns the printer off and then on.
  6. According to the procedure below, register your Cloud Ready printer to Google Cloud Print.

Registering your Cloud Ready printer

Before you can use a Google Cloud Ready printer, you need to register it to Google Cloud Print. Here's an example procedure:
  1. According to the procedure above, update the firmware for your Cloud Ready printer.
  2. On your Windows 7 PC, click Start, click Control Panel (all items), Click Network and Sharing, and then click Network Map to display a window similar to Figure 3.
  3. Click See full map to display a window similar to Figure 4.
  4. Right-click EPSONF7CF17 to display Management URL, and then click Management URL to display an EPSON WP-4020 Series setup web page similar to Figure 5.
  5. Click Google Cloud Print Setup to display its page as shown in Figure 6.
    Figure 6 - Starting the registration process for a Cloud Ready printer.
  6. Click Register, and then follow the prompts to register your Cloud Ready printer with Google Cloud Print.
  7. Test your Cloud Ready printer according to the TESTING CHROMEBOOK PRINTING section below.

Testing Chromebook printing

To test whether your classic or Cloud Ready printer lets you print from your Chromebook, or any other computer, do the following:
  1. According to the sections above, set up either a classic or Cloud Ready printer.
  2. Turn on your printer. Note: For a classic printer, also turn on the computer to which you have connected it.
  3. Turn on your Chromebook and log in to your Google account.
  4. According to the procedures below, print either a file or a web page.

Printing a file

To test whether you can print a file, such as a document or a photo, from your Chromebook, do the following:
  1. In the 'shelf' toolbar, at the bottom of the screen, click the Apps icon to display your Chromebook apps.
  2. Click the Files app icon to display your Google Drive and Download folders.
  3. Double click a file to open it, and then find and click the Print icon to display a Google Cloud Print window.
  4. If the Destination field displays the printer through which you wish to print a test page, set the Pages field to one page to print, such as 1-1, and then click Print to print a test page. Note: If the Destination field does not display the correct printer, click Change and then select the printer you wish to test.

Printing a web page

To test whether you can print a web page from your Chromebook, do the following:
  1. In the 'shelf' toolbar, at the bottom of the screen, click the Google Chrome icon to open its browser.
  2. Open any website, and then right-click (two-finger click) to display a menu.
  3. Click Print to display a Google Cloud Print window.
  4. If the Destination field displays the printer through which you wish to print a test page, set the Pages field to one page to print, such as 1-1, and then click Print to print a test page. Note: If the Destination field does not display the correct printer, click Change and then select the printer you wish to test.

3/29/2015

Getting started with Google Drive

Google Drive is a free, online productivity suite that includes 15 GB of cloud storage. The apps in Google Drive let you create text documents, spreadsheets, presentations, forms and drawings. You need not purchase expensive productivity software; for most people, Google apps are powerful enough for almost all personal and business computing tasks. For more information, please see The new Google Drive.

To help you get started with Google Drive, this document explains how to:
  • Access Google Drive so that you can use its online apps and storage.
  • Create folders in which you can store files and other folders.
  • Create files through Google apps. Note: If you use the Google Chrome browser, you can view and edit Google-apps files offline. For details, see Access your files offline.
  • Upload files and folders from your computer.
  • Download files and folders to your computer.
  • Move (relocate) files and folders.
  • Name files and folders so that you can easily find them.

Accessing Google Drive

Before you can access (open) Google Drive online, you need a Google account. If you don't already have one, go to Create your Google account. You can access Google Drive by doing either of the following:
  • Clicking the Google Drive icon in the Chrome App Launcher if you use Google Chrome as your web browser on a PC, Mac, or Chromebook.
  • Going to drive.google.com through Chrome or any other browser.

Creating Google Drive folders

Google Drive lets you store files within online folders that are similar to the offline folders on your computer.

Creating folders

A folder can contain files and/or other folders (subfolders). To create a new folder in Google Drive, do the following:
  1. Open Google Drive through to display its existing folders (if any) in the My Drive column (the second column in the Google Drive window) as shown in Figure 1. Note: the My Drive column always displays its folders above (ahead of) its files. Also, within any folder, it displays its subfolders above its files.
    Figure 1 - Typical Google Drive folders.
    1. Click New, click Folder, and then type the name of your new folder, such as "001Examples."
    2. Click Create to add your new folder, 001Examples, to the My Drive column as shown Figure 2.
    3. Repeat steps 2 and 3 for each new folder you wish to add to My Drive.
      Figure 2 - Adding a new folder, 001Examples.

    Creating subfolders

    A subfolder is a folder within any other folder; any folder or subfolder can contain multiple subfolders. To create a new subfolder in Google Drive, do the following:
    1. Double-click the target folder within which you wish to create a subfolder. For example, you might double-click the 001Examples folder to select it as shown in Figure 3.
      Figure 3 - Selecting your 001Examples folder, which is initially empty.
    2. Click New, click Folder, and then type the name of your new subfolder, such as a school subject, "Biology."
    3. Click Create to add your new subfolder, Biology, within your 001Examples folder as shown Figure 4. Note: Immediately above its listing, the My Drive column displays the path to your currently-selected subfolder and its contents.
      Figure 4 - Adding a Biology subfolder within your 001Examples folder.
    4. Repeat steps 2 and 3 for each subfolder you wish to add within your 001Examples folder. For example, as shown in Figure 5, you might add new subfolders for other school subjects, such as Chemistry, Physics, and Astronomy.
      Figure 5 - Adding Chemistry, Physics, and Astronomy
      subfolders within your 001Examples folder.

    Creating files through Google apps

    Google Drive lets you create files directly through the following Google apps:
    • Docs (text documents)
    • Sheets (spreadsheets)
    • Slides (presentations)
    • Forms
    • Drawings
    To create files in Google Drive, do the following:
    1. Double-click the folder, or subfolder, in which you wish to create one or more files. For example, you can double-click the 001Examples folder to select it and display its subfolders, and then double-click the Biology subfolder to select it for new files.
    2. As shown in Figure 6, click New, and then click the Docs, Sheets, or Slides app icon to open that app. Note: Clicking New, and then More, displays additional apps: FormsDrawings, and My Maps.
      Figure 6 - Creating files through Google apps.
    3. Use the app to create a new file (document, spreadsheet, presentation, form, drawing, or map). For example, you might use the Google Docs app to create a new document file, such as Frogs.
    4. Repeat steps 2 and 3 for each new file you wish to create within your Biology subfolder. For example, as shown in Figure 7, you might: 
      • Use the Google Sheets app to create a new spreadsheet file, such as Frog expense calculations.
      • Use the Google Docs app to create a new document file, such as Trees.
    Figure 7 - Creating new Google app files in the Biology folder.

    Uploading files and folders

    You can upload files and folders from your computer into Google Drive.

    Uploading files

    To upload one or more files, do the following:
    1. Open Google Drive to display its folders as shown above in Figure 1.
    2. Select the folder or subfolder into which you wish to upload a file.
    3. As shown above in Figure 6, click New and then click File upload to display an Open files window. the folders and files stored on your computer hard drive.
    4. Select the file you wish to upload. Note: You can select more than one file for upload.
    5. Click Open to upload your selected file(s). 

    Uploading folders

    The procedure for uploading files is similar to that for uploading files. To upload a folder, do the following:
    1. Open Google Drive.
    2. Select the folder or subfolder into which you wish to upload a file.
    3. Click New and then click Folder upload to display a Select Folder to Upload window.
    4. Select the folder you wish to upload. Note: You can select only one folder for upload.
    5. Click Upload to upload your selected folder.

    Downloading files and folders

    You can download files and folders from Google Drive to your computer. To download a file, folder, or subfolder, right-click it to display its menu, and then click Download.

    Google app files download as MS Office files. For example, the Docs file named Frogs downloads as an MS word file named Frogs.docx. Note: If you prefer, you can use LibreOffice Writer to open a docx file and then save it as an odt file.

    Folders and subfolders download as compressed folders. For example, the folder named 001Examples downloads as a compressed folder, 001Examples-2015-03-28.zip.

    Moving files and folders

    If you accidentally place a file or folder in the wrong folder or subfolder, you can easily relocate it. For example, assume that you've uploaded a Snakes.docx MS-word file into your Chemistry subfolder. You would need to move Snakes.docx from your Chemistry subfolder into your Biology subfolder as follows:
    1. Open Google Drive to display its folders as shown above in Figure 1.
    2. Double-click your 001Examples folder to display its contents in the My Drive column, and then double-click your Chemistry subfolder to display its contents.
    3. Right click Snakes.docx to display its menu, and then click the Move to icon to display its menu.
    4. Within the Move to menu, double-click your 001Examples folder to display its contents.
    5. As shown in Figure 8, select your Biology subfolder, and then click Move.
      Figure 8 - Moving a file into the Biology subfolder.

    Naming files and folders

    The names you give your files and folders can make them easier to organize and find within Google Drive. To sort files and folders by Name in the My Drive column, you can click the Sort-options icon (AZ), and then click Name. In an alphanumeric listing, item names prefaced with numerals appear ahead of names with only letters (alpha characters).

    If you create many files for multiple projects, consider using numbers to preface the names of your most important files and folders. Two examples:
    • Use a simple number, such as 001, to place items ahead of others. For example, see the listing in Figure 2, which includes several folders prefaced with 001.
    • Use numeric dates. For example, if you write a document about tigers on September 8, 2017, you might name its file 2017-09-08_Tigers. Note: Sorting files by date facilitates creating archive folders. You could quickly find any "Tiger" file in an archive folder named 2017Tigers.

    2/09/2015

    Using Python to help write villanelle poems

    Python can help you write a villanelle, which is a 19-line poem that contains five tercets (three-line stanzas) and one quatrain (four-line stanza). After you start your villanelle by writing two rhyming refrains, Python generates the correct pattern for writing the remainder of your villanelle, its other rhyming lines.

    Starting your villanelle

    Start your villanelle by typing two rhyming refrains (repeating lines) into your Villanelle Helper Python program, which generates the correct pattern for your entire villanelle. As shown in Figure 1, it places all refrains correctly and indicates how the other lines should rhyme.
    Figure 1 - After you type two rhyming refrains into the Villanelle Helper window,
    Python generates the pattern for your villanelle poem, automatically populating
    all refrains, and indicating where it will place other rhyming lines.
    Note: Figure 1 is part of my villanelle:Fix the seasons.
    I took this screenshot while still writing the villanelle.

    To start writing your villanelle, do the following:
    1. Install Python 3 and IDLE for Python 3. For details, see Getting Started with Python Programming. You also need the Tkinter (ttk) graphical user interface. Note: IDLE is the Python integrated development environment (IDE).  
    2. Start Python 3 to display it Shell window, click File, and then click New Window.
    3. Click File, click Save As, type VillanelleHelper into the File-name field, select a convenient location, such as Desktop, and then click Save.
    4. Copy VillanelleHelper, paste it into your VillanelleHelper.py window, and then click Save. For more information, see RunningPython Examples.
    5. Click Run, and then click Run Module to display a Villanelle Helper window similar to that at the top of Figure 1.
    6. Type your first refrain (refrain01), press Tab, type your second refrain (refrain02), and then click Display Refrains to generate Python Shell text similar to that in Figure 2. Note: This generated text is the pattern for your villanelle, which has two portions. The top portion is the reference area; the bottom portion is the working area, which contains upper-case lines that you replace by typing over them. Do not type over the top portion; use it as a reference. Type only in the working area.
    7. Finish writing your villanelle according to the procedure below.
      Figure 2 - After you copy the pattern of your villanelle poem to
      your word processor, you can type in the other rhyming lines.

    Finishing your villanelle

    To finish your villanelle, do the following:
    1. Copy all text, the pattern of your villanelle, from the Python Shell into your word processor.
    2. Scroll to the working area that begins with COMPLETE YOUR VILLANELLE BY TYPING OVER THE INDICATED LINES.
    3. As shown in Figure 2, type a line into stanza 1, line 2, and type a line into stanza 2, line 1.
    4. Type a line into stanza 2, line 1, and type a line into stanza 2, line 2 that rhymes with stanza 1, line 2.
    5. Type a line into stanza 3, line 1 that rhymes with stanza 2, line 1, and type a line into stanza 3, line 2 that rhymes with stanza 1, line 2.
    6. Similarly type over the indicated lines for stanzas 4, 5 and 6.
    7. Add a title to your villanelle poem, and then publish it.

    1/31/2015

    Using LibreOffice Calc to create pivot tables

    A pivot table lets you provide various data viewpoints for analyses and reports. You can create pivot tables through a spreadsheet application, such as Calc in the LibreOffice productivity suite. This document can help you use Calc to:
    1. Create a practice spreadsheet
    2. Create practice pivot tables
    3. Refresh pivot tables
    For more information, please see Pivot Table in LibreOffice help.

    Creating a practice spreadsheet

    A practice spreadsheet can help you learn to create pivot tables. To create your practice spreadsheet, do either of the following:
    • Click Stooge Computers potential profit, click File, click Download as, and then click OpenDocument format (.ods).
    • Open a LibreOffice Calc spreadsheet, and then type a source-data worksheet similar to Figure 1.
      Figure 1 - The main (SourceData) worksheet in your practice spreadsheet.
      You can analyze this information through pivot tables.

    Creating practice pivot tables

    After you create your practice spreadsheet according to the section above, you can create one or more practice pivot tables as worksheets within your spreadsheet. For example, to view potential profits, you might create two pivot tables:
    • Potential-profit data in Warehouse rows and Product columns
    • Potential-profit data in Product rows and Warehouse columns

    Example Warehouse rows and Product columns

    To create a practice pivot table that displays potential-profit data in Warehouse rows and Product columns, do the following:
    1. As shown in Figure 2, your SourceData worksheet, select the rows and columns that you wish to make available to your pivot table. In this example, I selected rows 2 through 14 and columns A through H.
      Figure 2 - Starting a pivot table.
    2. Click Data, click Pivot Table, click Start, select Current selection, and then click OK to display a Pivot Table window.
    3. As shown in Figure 3, drag Warehouse into the Row Fields frame, drag Product into the Column Fields frame, and then drag Potential Profit into the Data Fields frame.
      Figure 3 - Defining a pivot table through a Warehouse row field,
      a Product column field, and a Potential Profit data field.
    4. Click OK to display a pivot table similar to Figure 4. This pivot table contains Warehouse rows, Product columns, and Total Results for both.
      Figure 4 - A pivot table that displays potential profits
      through Warehouse rows and Product columns.
    5. As necessary, adjust column widths so you can see all data correctly.
    6. Rename the pivot-table worksheet according to its content, such as PotentialByWarehouse.
    7. Create a second example pivot table according to the procedure below.

    Example Product rows and Warehouse columns

    To create a practice pivot table that displays potential-profit data in Warehouse rows and Product columns, do the following:
    1. As shown in Figure 2,  your SourceData worksheet, select the rows and columns that you wish to make available to your pivot table. In this example, I selected rows 2 through 14 and columns A through H.
    2. Click Data, click DataPilot, click Start, select Current selection, and then click OK to display a DataPilot window.
    3. As shown in Figure 5, drag Product into the Row Fields frame, drag Warehouse into the Column Fields frame, and then drag Potential Profit into the Data Fields frame.
      Figure 5 - Defining a pivot table through a Product row field,
      a Warehouse column field and a Potential Profit data field.
    4. Click OK to display a pivot table similar to Figure 6. This pivot table contains Product rows, Warehouse columns, and Total Results for both. Note: Figure 6 shows information that is 'pivoted' from that in Figure 4.
      Figure 6 - A pivot table that displays potential profits
      through Product rows and Warehouse columns.
    5. As necessary, adjust column widths so you can see all data correctly.
    6. Rename the pivot-table worksheet according to its content, such as PotentialByProduct.

    Refreshing pivot tables

    When you create a pivot table, it contains only information that is current at that moment. Therefore, you need to refresh a pivot table after you update its source data. To refresh a pivot table, do the following:
    1. Select the worksheet of the pivot table you wish to refresh. For example, you might select your PotentialByProduct worksheet as shown in Figure 6.
    2. Right-click Filter to display its menu.
    3. Click Refresh to update pivot-table information.

    1/27/2015

    Promoting Blogger posts through LinkedIn

    If you use Google Blogger, you might wish to promote your work through LinkedIn. This document explains how to:
    1. Promote a Blogger post through a LinkedIn post.
    2. Copy a Blogger-post image to a LinkedIn post.

    Promoting a Blogger post through LinkedIn

    To promote a Google Blogger post through your LinkedIn account, do the following:
    1. In your Chrome web browser, open the Blogger post you wish to promote. Note: Open only a single post. For example, if you are promoting your newest post, open your blog and then click on the most recent post title.
    2. In a new, separate tab, open your LinkedIn Home page.
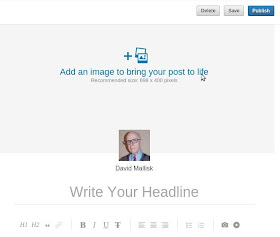
    3. In the Share an update field, click Create a Post (the pencil icon) to display a Your Posts page similar to Figure 1.
      Figure 1 - Creating a new LinkedIn post.
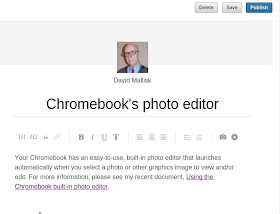
    4. Type over the Write Your Headline text to create a headline that differs from your Blogger post title. These should only be similar because your LinkedIn post will contain a link to your Blogger post. For example, my LinkedIn post, Chromebook's photo editor applies to my LinkedIn post that includes a link to my Blogger post, Using the Chromebook built-in photo editor.
    5. As shown in Figure 2, type some text that briefly describes your Blogger post.
      Figure 2 - Describing and linking to your Blogger post.
    6. Click your Blogger-post tab, copy its URL (web link). 
    7. Click your LinkedIn-post tab, and then create a link as follows:
      1. Type some link text, such as Please see my recent document, Using the Chromebook built-in photo editor.
      2. Select that link text.
      3. Click Add link (chain icon) to display its dialog.
      4. Paste Your Blogger-post URL into the dialog, and then click Add.
    8. If you wish to add an image from your Blogger post, copy that image according to the section below, click Add image (camera icon), click Upload Image, and then click Open.

    Copying a Blogger-post image

    If you wish to copy a Blogger-post image to a LinkedIn post, you should first copy that image to your desktop, as follows:
    1. In your Chrome web browser, open the Blogger post from which you wish to copy an image.
    2. Right-click the image you wish to copy.
    3. Click Save image as to display a Save File window.
    4. Select your desktop folder, and then click Save to download the image to your desktop.

    1/25/2015

    Using LibreOffice Calc to create an idea matrix

    An idea matrix, also called a verb-noun matrix, can help you organize your initial thoughts about almost any unfamiliar subject. This document explains how to:
    1. Create an idea matrix through Calc, the spreadsheet application within the LibreOffice productivity suite. 
    2. Generate new and unexpected ideas through your idea matrix.
    Although you can use pencil and paper to create an idea matrix, using a spreadsheet application is easier and faster.

    Note: Procedures in this document specifically apply to LibreOffice Calc, and generally apply to other spreadsheet applications, including Google Drive Sheets and MS Office Excel.

    Creating an idea matrix

    To create an idea matrix through LibreOffice Calc, you need to format matrix cells and then set up matrix concatenation.

    Formatting matrix cells

    Formatting matrix cells make them easier to use. To format your matrix cells, do the following:
    1. Open a new Calc spreadsheet. 
    2. As shown in Figure 1, select cells A1 through F6, and then:
      1. Click Format, click Cells, and then click the Alignment tab.
      2. Under Properties, select Wrap text automatically.
      3. In the Horizontal dropdown menu, select Left, in the Vertical dropdown menu, select Middle, and then click OK.
      4. Click Format, click Cells, and then click the Borders tab.
      5. Under Spacing to contents, set all four sides to 4.0pt, which makes the cells easier to read.
        Figure 1 - Selecting cells A1 through F6.
    3. Select cells A2 through A6, click Format, click Cells, click the Alignment tab, and then, in the Horizontal dropdown menu, select Center, and then click OK
    4. Select cells B1 through F1, click Format, click Cells, click the Alignment tab, and then, in the Horizontal dropdown menu, select Center, and then click OK

    Setting up matrix concatenation

    An idea matrix generates each possible idea by using the CONCATENATE() function to combine a verb, a blank space, and a noun into a phrase. To set up matrix concatenation, do the following:
    1. Format matrix cells according to the section above. 
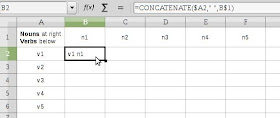
    2. As shown in Figure 2, select cell A1, type Nouns at right and Verbs below, and then adjust the width of column A.
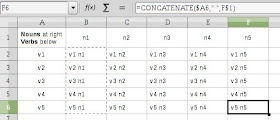
      Figure 2 - Typing the CONCATENATE() function into cell B2.
    3. In cells A2 through A6, type five placeholders for verbs, v1 through v5; and in cells B1 through F1, type five placeholders for nouns, n1 through n5.
    4. Select cell B2, and then type =CONCATENATE($A2," ",B$1) to display "v1 n1" in cell B2. Note: This cell is displaying the placeholder verb from A2, a blank space, and then the placeholder noun from B1.
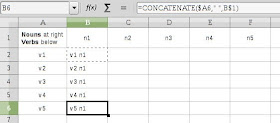
    5. As shown in Figure 3, copy cell B2 and then paste it into cells B3 through B6.
      Figure 3 - Copying the CONCATENATE() function into cells B3 through B6.
    6. As shown in Figure 4, copy cells B2 through B6 and then paste them into cells C2 through F6.
      Figure 4 - Copying the CONCATENATE() function into cells C2 through F6.
    7. Rename the worksheet to Base 5 by 5 and then copy it one or more other sheets, such as Idea 1, Idea 2, and Idea 3. Note: You can make a larger idea matrix by simply copying and pasting new rows and/or columns.

    Generating ideas through your matrix

    Assume that a professor has asked you to write an essay about steam-locomotive maintenance. Unless you have recently worked on a steam locomotive, you can use your idea matrix to generate new or unexpected ideas that help you start your research. You might use a procedure similar to the following:
    1. Create an idea matrix according to the sections above.
    2. As shown in Figure 5, type as many as five verbs (or verb phrases) into cells A2 through A6, overtyping the placeholders for verbs.
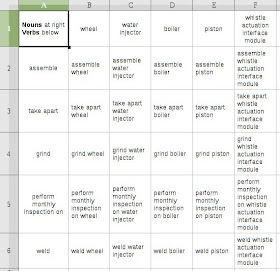
      Figure 5 - An example idea matrix for 'steam-locomotive maintenance.'
    3. Type as many as many as five nouns (or noun phrases) into cells B1 through F1, overtyping the placeholders for nouns.
    4. Examine the idea matrix to see whether any of its generated ideas are worth keeping. If so, either write down those ideas or print the idea matrix and then circle its best ideas. If not, repeat steps 2 through 4 until you see one or more useful ideas.

    1/16/2015

    Using the Chromebook built-in photo editor


    Your Chromebook has an easy-to-use, built-in photo editor that launches automatically when you select a photo or other graphics image to view and/or edit. This document can help you learn to use your Chromebook photo editor.

    The Chromebook photo editor lets you make basic edits. For more advanced editing, such as converting image file types, you will also need to use a separate editor such as the GNU Image Manipulation Program (GIMP). Please also see How to use the Free Online Photo Editor.

    Selecting an image

    To select an image, do the following:
    1. Log onto Chromebook.
    2. Click the Apps launcher, at the lower left, to display its window.
    3. Click the Files app to display its window and your Downloads folder.
    4. Find an image file you wish to select for viewing or editing. Note: The file need not be in Downloads; it can be in any folder.
    5. Double click the image file to launch the photo editor and simultaneously display your selected image as shown in Figure 1. Note: You can use the forward and backward arrows to display other images within the same folder.
    Figure 1 - Viewing an image file

    Editing an image

    To edit an image, do the following:
    1. According to the procedure above, select an image you wish to edit.
    2. Click the pencil icon to display seven editing tools centered under the image as shown in Figure 2.
      Figure 2 - Editing-tool icons
      Left to right, these editing-tool icons are:
      • Auto-fix (lightning bolt)
      • Crop
      • Brightness (also lets you adjust Contrast)
      • Left (rotate)
      • Right
      • Undo
      • Redo
    3. Click an editing-tool icon to make a change to your image.  For example, you can click Crop, press Enter, and then select a rectangular image segment as shown in Figure 3.
      Figure 3 - Cropping an image
    4. Close the Chromebook photo editor to save your edited image, such as Figure 4, in the same folder in which you have been working.
      Figure 4 - Cropped image

    1/13/2015

    How to use the Free Online Photo Editor

    You can use the Free Online Photo Editor to edit your photos and other graphics images quickly and easily. You need only upload an image file, edit it, and then download it.

    Uploading an image file

    Before you can edit an image through the Free Online Photo Editor, you need to upload an image file into the editor as follows:
    1. Go to FreeOnlinePhotoEditor.com.
    2. Select an image file: from either your computer or the internet:
      • To select an image from your computer, click Browse to find an image file and display its name in the Choose file field.
      • To select an image from the internet, type the URL of the image file in the Enter URL field.  
    3. Click OK to upload your selected image file into the Free Online Photo Editor as shown in Figure 1.
    4. Edit your image file according the Editing an image file section below.
    Figure 1 - An image file uploaded into the Free Online Photo Editor

    Editing your image file

    After uploading your image file, you can edit it in the Free Online Photo Editor. Its toolbar has six menus (Basic, Enhance, Colors, Borders, Filters, and Effects) and a Text utility. To edit an image file, use the following general procedure.
    1. Click a toolbar item, such as Basic, to display its menu.
    2. Click a menu item, such as Crop, and then follow its instructions.
    3. Repeat steps 1 and 2 to make adjustments to your image until you are satisfied with your edits.
    4. Download your edited image file according the Downloading your edited image file section below.
    Note: To create Figure 2, I used the Basic menu to make Resize, Crop, and Brightness/Contrast adjustments; and the Borders menu to add a Colored border.

    Figure 2 - An edited image file

    Downloading your edited image file

    After editing your image file through the Free Online Photo Editor, you need to download it into your Downloads folder on your computer as follows:
    1. In the Free Online Photo Editor, click File to display its menu.
    2. Click Save as (file type) to download your image file. For example, you could click Save as JPG.
    3. Go to your Downloads folder, and then open your edited image file to verify it downloaded correctly.

    1/07/2015

    Taking and uploading Chromebook screenshots

    This document can help you take, inspect, and then upload Chromebook screenshots. When you take a screenshot, Chromebook automatically saves it as a Portable Network Graphics (PNG) file in your Downloads folder. After inspecting the screenshot, you can make it more accessible by uploading it to Google Drive.

    Taking a screenshot

    To record content displayed on a Chromebook screen, you can take either a full or partial screenshot.

    Taking a full screenshot

    To take a screenshot of a full Chromebook screen, do the following:
    1. Display the screen that you wish to record.
    2. As shown in Figure 1, press Ctrl+[switch windows] to take the screenshot and display a brief 'screenshot-taken' message.
      Figure 1 - Full screenshot keys
    3. Inspect your screenshot according to the Inspecting your screenshot section below.

    Taking a partial screenshot

    To take a screenshot of only part of a Chromebook screen, do the following:
    1. Connect a mouse to your Chromebook. Note: Though you can use the touchpad for this procedure, I recommend a mouse because it makes drag-and-drop tasks much easier. 
    2. Display the screen that you wish to record.
    3. As shown in Figure 2, press Ctrl+Shift+[switch windows] to replace your mouse pointer with a small cross symbol.
      Figure 2 - Partial screenshot keys
    4. Select the area of your partial screenshot as follows:
      1. Move the cross to any corner of the area you wish to record.
      2. Click and hold the left mouse button
      3. Drag the cross until the selection box encloses the screenshot area precisely.
      4. Release the left mouse button to take the screenshot and display a brief 'screenshot-taken' message.
    5. Inspect your screenshot according to the Inspecting your screenshot section below.

    Inspecting your screenshot

    Inspecting your screenshot immediately helps save time; reconstructing your project's current conditions later might be difficult. To inspect your screenshot, do the following:
    1. Take a screenshot according to the Taking a screenshot section above.
    2. As shown in Figure 3, click the Apps launcher (at lower left of the desktop) to display your apps.
      Figure 3 - App icons on Chromebook
    3. As shown in Figure 4, click the Files app icon to display its window.
      Figure 4 - Downloads folder with screenshots
    4. Within your Downloads folder, double-click your screenshot to view it in Chromebook's built-in photo editor:
      • If the screenshot appears as you had intended, close the editor, and then take whatever other screenshots you need for your current project.
      • If the screenshot does not appear as you had intended, close the editor, delete the screenshot file from the your Downloads folder, and then take that screenshot again.
    5. Continue according to the Uploading screenshots to Google Drive section below. 

    Uploading screenshots to Google Drive

    You can use any computer to access your Google Drive applications and files through your Google account. Therefore, uploading your Chromebook screenshots to Google Drive makes them easily available for use in your various projects, such as word-processor documents and web sites. To upload your screenshots to Google Drive, do the following:
    1. Click the Apps launcher to display your apps, and then click the Drive app to open it.
    2. Click New, and then click File upload to display its window.
    3. Select the Downloads folder, and then select one or more screenshot PNG files that you wish to upload.
    4. Click Open to upload your screenshot(s).

    1/02/2015

    Working offline through your Chromebook

    You can work offline to perform various tasks through your Chromebook. For example, you can create and edit Google Drive documents offline. This document can help you practice using Chromebook to edit a document offline. To demonstrate offline editing, you can concurrently edit the same document through both Chromebook and any other computer.

    Temporarily taking Chromebook offline

    To test working offline through your Chromebook, you can temporarily disconnect its Wi-Fi.  To take your Chromebook offline, do the following:
    1. Click your user icon at the lower-right corner of the Chromebook screen to display a window similar to Figure 1.
      Figure 1 - Click your active network to start disconnecting it.
    2. Click Connected to (your_network_name) to display a window similar to Figure 2.
      Figure 2 - Click your network name to continue 
      disconnecting Wi-Fi (if online), or to connect it (if offline).
    3. Click your_network_name to display a Connected window similar to Figure 3.
      Figure 3 - Click "Disconnect" to take your Chromebook offline.
    4. Verify that Automatically connect to this network has been selected (check marked). Note: This automatically reconnects Wi-Fi when you boot your Chromebook.
    5. Click Disconnect to take your Chromebook offline.
    6. Continue according to the Using Chromebook offline section below.

    Placing Chromebook back online

    Any time after going offline according to the Temporarily taking Chromebook offline section above, you can place your Chromebook back online as follows:
    1. Click your user icon at the lower-right corner of the Chromebook screen.
    2. Click no network to display a window similar to Figure 2.
    3. Click your_network_name to reconnect Wi-Fi and put your Chromebook back online.

    Using Chromebook offline files

    Even while your Chromebook is offline, you can use its Google Drive app to create and/or edit files in Google Docs, Sheets, Slides, or Drawings. You can see these files only while Google Drive is open. When you go back online, your internal (offline) Drive files sync with your external (online) files.

    As shown in Figures 4 through 6, I have experimented with Chromebook writing and editing, both offline and online, and with a separate computer. To make similar experiments, try the following:
    1. Take your Chromebook offline according to the Temporarily taking Chromebook offline section above.
    2. Open the Google Drive app, and create or edit a test document, such as offline test. Because your Chromebook is still offline, you cannot yet see your offline test, or its edits, through a separate computer, such as a Linux PC.
    3. Place your Chromebook back online according to the Placing Chromebook back online section above. You should now be able to see, and edit, offline test through a separate computer.
    4. To make and observe more edits to offline test, repeat steps 1 through 3 as often as necessary.
    Figure 4 - Writing through Chromebook, offline then online.
    Figure 5 - Adding a third paragraph through a separate computer,
    and then a fourth through the offline Chromebook.
    Figure 6 - The green marker indicates that I am a separate user.

    How to keep your Chromebook cool

    Most Chromebooks (and other laptop computers) have underside cooling vents. If you accidentally block these vents, even partially, you risk overheating your Chromebook. This brief document can help you avoid that problem.
    This is the left-front cooling vent under my Chromebook.
    I am sharing this information through personal experience. Two years ago, when my Chromebook was new, I tried keeping it on a folded blanket while using it.
    A soft surface, such as blanket can block
    your Chromebook's vents, which causes overheating.
    The soft, fluffy surface blocked the vents and overheated my Chromebook. When it failed suddenly and completely, I wondered whether I had ruined it. Fortunately, I was able to recover it according to the instructions in Google's Use the Chromebook Recovery Utility.

    To avoid blocking your Chromebook's cooling vents, use it only a solid surface, such as a table or any other flat surface. For example, I found an inexpensive cutting board on which to place my Chromebook.
    A plastic cutting board, or similar flat
    surface can keep your Chromebook cool.