- Desktop computers are less expensive than portable devices that have comparable capabilities.
- Peripherals for desktops are easier to use. Larger displays are more readable than smaller screens. Mice are are more precise than touch pads. Full-size keyboards are much more fun than their miniature emulators.
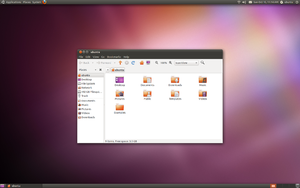
- A desktop PC can help you save additional money through open source software, such as Ubuntu (a free Linux operating system) and LibreOffice (a free alternative to M$ Office). For example, you can order a desktop PC without an operating system, and then install a Linux operating system and whatever open-source software you need.
- Desktop PCs are easier to repair than most portable devices.
- Some new desktop PCs, such as the Zotac ZBOX Mini PC occupy little space and consume little power.
This blog contains my technical documents that can help you practice thrifty computing through free, open-source software and inexpensive hardware. I always try to write brief descriptions, clear explanations, and simple, accurate procedures.
7/31/2011
Why not use a desktop computer?
I grow rather tired of almost every 'computer authority' online continually stating that "desktop computers are dead." I strongly disagree, for several reasons:
5/28/2011
Using Shutter to take screenshots in Linux
The procedures in this
document can help use the Shutter
screenshot tool for Linux. You can capture your entire desktop, an
active window, or any rectangular area you select. Shutter lets you
save your screenshots directly as JPEG image files. In contrast,
pressing PrtScn (Print Screen) to capture a desktop, or Alt+PrtScn to
capture an active window, lets you save your screenshot only as a PNG
file. If you want a JPEG, you must separately convert it from a PNG.
You can install Shutter through the software-application catalog in your Linux operating operating system. For example, for Ubuntu, you can use the Ubuntu Software Center.
Configuring Shutter
Configuring Shutter
To configure Shutter, do the following:
- Open Shutter to display its window as shown in Figure 1.
- Click the down arrow at the right of Selection, and then select Advanced selection tool. This lets you resize your selection rectangle before you take a screenshot.
- In the Shutter toolbar at the top of the desktop, click Edit, and then click Preferences to display its window as shown in Figure 2.
- Set Image-format to jpeg, Directory to Desktop, select (check mark) Include cursor when taking a screenshot and then set the capture delay to 15 seconds.
Capturing your desktop
To take a screenshot of your desktop through Shutter, do
the following:
- Start Shutter, click the down arrow at the right of Desktop, and then click Capture all Workspaces to take the screenshot and place an icon for its new JPEG on your desktop.
- In the Shutter window, close the image tab by clicking on its X, and then minimize the Shutter window.
- Double-click the new icon to display an image similar to Figure 3.
![]() |
| Figure 3 - A desktop screenshot. |
Capturing an active window
To take a screenshot of an
active window through Shutter, do the following:
- Select a window to activate it. For example, I activated the Calculator window as shown in Figure 3.
- Start Shutter, click the down arrow at the right of Window, and then click "Active Window" to take the screenshot and place an icon for its new JPEG on your desktop.
- In the Shutter window, close the image tab by clicking on its "X," and then minimize the Shutter window.
- Double-click the new icon to display an image similar to the fourth image above.
![]() |
| Figure 4 - An active-window screenshot. |
Capturing a rectangular area
To take a screenshot of a
rectangular area through Shutter, do the following:
- On your desktop, group whatever items you plan to include in your captured rectangular area.
- Start Shutter, click Selection, use your mouse to draw a rectangular area, and then press Enter to take the screenshot and place an icon for its new JPEG on your desktop.
- In the Shutter window, close the image tab by clicking on its X, and then minimize the Shutter window.
- Double-click the new icon to display an image similar to Figure 5.
![]() |
| Figure 5 - A selected-rectangular-area screenshot. |
4/17/2011
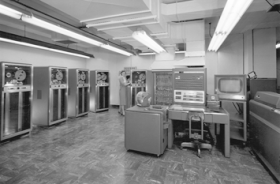
An ancient IBM vacuum-tube mainframe computer
In early 1957, I saw my
first computer during a high-school field trip to an IBM office in
Cleveland, Ohio. It was a vacuum-tube mainframe in the IBM
700 series. Though I can find no record of that particular
IBM office, its mainframe was most probably an IBM
705 Data Processing System, which had been designed to
process business data.
The office was a single, large, street-level room that combined a
reception area and a data-processing workspace. An IBM employee,
probably an office manager, gave us his 'grand tour,' which was
lecturing to us while we stood in the center of the room. The
equipment included an operator's station, a large card punch and
reader, and a few cabinets for tape drives and power supplies.
Through a glass wall, we could see multiple racks of glowing vacuum
tubes in the back room.
Each IBM 700 series mainframe included a vacuum-tube processor, a
magnetic-core memory and data-storage devices for punched cards and
magnetic tape.
Vacuum-tube processor
A vacuum-tube processor in an IBM 700 series mainframe was roughly
similar to the CPU in a modern PC. This processor executed program
instructions, performed calculations, and communicated with
magnetic-core memory and data-storage devices.
I had recently seen a classmate's transistor radio. Therefore, at the
end of our host's 'sermon,' I asked him whether IBM would ever use
transistors in its computers. He said, "No," and explained
that transistors could never work as quickly as vacuum tubes.
Magnetic core memory
A magnetic-core
memory in an IBM 700 series mainframe was roughly similar
to RAM in a modern PC. This magnetic-core memory was the working
memory through which the processor made calculations. A magnetic-core
memory consisted of ferrite rings in a wired array, with three wires
threaded through each ring. Current pulsed simultaneously through two
wires would magnetize each ring in either of two directions (states),
on or off (1 or 0). The third wire would sense a change in state.
Data-storage devices
Each IBM 705 mainframe would use data-storage devices to store data
to, and retrieve it from, punched cards or magnetic tape. A business
customer would use cards or tape to bring its payroll, or other
business-operation data, to the IBM data center. After processing
these data through its mainframe, IBM would use cards or tape to send
the results to the customer.
Sources:
- Wikipedia, "IBM 700/7000 series", Wikipedia.org
- IBM Archives, "IBM 705 Data Processing System", IBM
- National High Magnetic Field Laboratory, "Magnetic Core Memory", Florida State University
12/08/2010
Adding a logo to a Google Sites website
To add a logo to the header on your Google Sites website, you should create a logo as a GIF file that has a transparent background. As detailed in the procedure below, you can do this through Google Docs, the GNU Image Manipulation Program (GIMP), and Google Sites:
- Open Google Docs, click Create new, click Drawing to display an Untitled drawing, click File, click Rename, and then type an appropriate name, such as "TClogo." Note: While using separate components (such as rectangles, circles, and triangles) to create your logo, set the boarder lines to Transparent so that your logo later displays smooth edges.
- Download your new drawing as a JPEG file, use GIMP to crop the logo, save it as a JPEG file (such as TClogo01.jpg), click Image, click Scale Image, set image height to 100 pixels, click Scale, click File, click Save, and then click Save again.
- Click File, click Save As, click Select File Type (By Extension), select PNG image, click Save, and then click Save again.
- Click Colors, click Color to Alpha, click OK, click File, and then click Save. This makes the white background of your logo transparent.
- Click File, click Save As, click Select File Type (By Extension), select GIF image, click Save, click Export, and then click Save.
- Sign into your Google Sites website, click More actions, click Manage site, click Site layout, and then click change logo.
- Select Custom Logo, click Choose File, navigate to and select your GIF logo file (such as TClogo01.gif), click Open, click OK, click Save Changes, and and then click Return to site.
10/26/2010
Deleting Windows viruses through a Linux live CD
According to Katherine Noyes of PC World, you can Fix a Windows Infection Using Linux. You can use the live CD (or USB flash drive) for any Linux distribution. As an example, Katherine presents a procedure that lets you scan for Windows viruses through an Ubunutu 10.10 live CD.
For example, if you have a Windows PC that a virus has converted to a boat anchor, you can shut down, reboot through the live CD without installing Linux, and then use the antivirus utility on the CD. After deleting or quarantining the virus, remove the CD and reboot through Windows. Hopefully, your Windows again runs normally. If so, thank the penguin.
9/06/2010
Saving money on phone calls
You can reduce your telephone expenses by using two phone systems:
Update on 10/27/10: Recently, I was pleasantly surprised to find a Gmail Call-phone capability I did not expect. You can call any business that asks you to press phone keys to access menu items. Simply use your mouse to click the Call-phone keys.
In recent decades, phone costs have been increasing faster than inflation. While still using the Plain Old Telephone System (POTS), I had noticed my phone company adding new "fees" or "service charges'' to my bill almost every month. My usage had not increased, but my wallet had grown thinner.
In 2005, I abandoned POTS and connected my phone to a Voice over Internet Protocol (VoIP) provider. At first, they charged reasonable rates for excellent service. For unlimited domestic calls, I paid approximately $28.00 per month, including taxes. However, about two years ago, my VOIP provider also stared adding "fees" and "service charges.'' Eventually, my monthly bill approached $40.00. After I reduced my plan level, from unlimited calls to 250 minutes per month, my monthly bill dropped to about $31.00. Again, this did not last. Additional "fees" and "service charges'' continued increasing my bill so that it again approached $40.00.
A few months ago, I abandoned my VOIP provider and bought a prepaid cell phone, which usually saves money for users like me who make relatively few phone calls.
More recently, I was also able to abandon half my cellphone, figuratively. Google has added a free Call-phone feature to Gmail. Therefore, I need not pay for outgoing calls. I now pay only for incoming calls to my cell phone.
I did need to buy a microphone for my PC. However, I do not feel guilty. Under similar circumstances, I believe even Jack Benny would have spent $12.00 for a microphone.
- A prepaid cell phone for incoming calls. The cheapest is currently 10 cents per minute.
- Google's free Call-phone feature for outgoing calls.
Update on 10/27/10: Recently, I was pleasantly surprised to find a Gmail Call-phone capability I did not expect. You can call any business that asks you to press phone keys to access menu items. Simply use your mouse to click the Call-phone keys.
In recent decades, phone costs have been increasing faster than inflation. While still using the Plain Old Telephone System (POTS), I had noticed my phone company adding new "fees" or "service charges'' to my bill almost every month. My usage had not increased, but my wallet had grown thinner.
In 2005, I abandoned POTS and connected my phone to a Voice over Internet Protocol (VoIP) provider. At first, they charged reasonable rates for excellent service. For unlimited domestic calls, I paid approximately $28.00 per month, including taxes. However, about two years ago, my VOIP provider also stared adding "fees" and "service charges.'' Eventually, my monthly bill approached $40.00. After I reduced my plan level, from unlimited calls to 250 minutes per month, my monthly bill dropped to about $31.00. Again, this did not last. Additional "fees" and "service charges'' continued increasing my bill so that it again approached $40.00.
A few months ago, I abandoned my VOIP provider and bought a prepaid cell phone, which usually saves money for users like me who make relatively few phone calls.
More recently, I was also able to abandon half my cellphone, figuratively. Google has added a free Call-phone feature to Gmail. Therefore, I need not pay for outgoing calls. I now pay only for incoming calls to my cell phone.
8/21/2010
Problems with OpenOffice.org on Ubuntu 10.4
If you are experiencing problems running OpenOffice.org under Ubuntu 10.4, you might be able to solve those problems by simply installing the OpenOffice.org Office Suite over your current OpenOffice.
After recently updating my PC to Ubuntu 10.4, I discovered I could not install the LanguageTool grammar-checker extension for Writer (the OpenOffice.org word processor). Also, I could not export an ODT file as an XHTML file. I found the solution to both problems accidentally. While looking for any Ubuntu software that might help, I stumbled upon OpenOffice.org Office Suite. Installing this suite over my existing OpenOffice repaired both problems.
For more details, please see my Associated Content document, How to Repair OpenOffice.org On Ubuntu 10.4.
After recently updating my PC to Ubuntu 10.4, I discovered I could not install the LanguageTool grammar-checker extension for Writer (the OpenOffice.org word processor). Also, I could not export an ODT file as an XHTML file. I found the solution to both problems accidentally. While looking for any Ubuntu software that might help, I stumbled upon OpenOffice.org Office Suite. Installing this suite over my existing OpenOffice repaired both problems.
For more details, please see my Associated Content document, How to Repair OpenOffice.org On Ubuntu 10.4.
Subscribe to:
Posts
(
Atom
)