9/11/2012

Installing Google Chrome on Xubuntu


Firefox is the default web browser on Xubuntu. You can install an additional browser, such as Google Chrome. This document can help you download Chrome and then install it on your Xubuntu PC.

Note: The procedures in this document specifically apply to Xubuntu 12.04, and generally apply to all Xubuntu releases.

Downloading Chrome - To download Chrome for your Xubuntu PC, do the following:
  1. Click the Applications Menu (white mouse), select Internet, and then click Firefox Web Browser to display its Ubuntu Start Page.
  2. In the Google search field, type google chrome, and then press Enter to search for and display links to Google Chrome.
  3. Click Chrome Browser - Google, click Download Chrome, select 32 bit .deb (For Debian/Ubuntu), and then click Accept and Install.
  4. Select Save File, and then click OK to download Chrome.
  5. Close Firefox, and then install Chrome according to procedure below.
     
Installing Chrome - To install Chrome on your Xubuntu PC, do the following:
  1. Download Chrome according to the procedure above.
  2. Double-click your Home folder, click Download, right-click the google-chrome-stable-current file, and then click Open With Ubuntu Software Center.
  3. After the Ubuntu Software Center window displays google-chrome-stable, click Install, type your password, and then click Authenticate.
  4. Close the Ubuntu Software Center window, click Applications Menu (white mouse), select Internet, click Google Chrome, make it your default browser (optional), and then click Start Google Chrome. (If prompted to Choose password for new keyring, click Cancel).


9/07/2012

Setting up Xubuntu


Xubuntu is a community-developed Linux distribution based on Ubuntu core components and the Xfce Linux desktop environment. As I show in Getting started with Xubuntu, it works very well immediately after you install it. However, you can set up (customize, configure) Xubuntu according to your needs or preferences.


After studying and/or trying example set-up procedures for Xubuntu, you can more easily perform its other setup procedures. This document contains the following example procedures:
  • Displaying the Settings window
  • Customizing the date and time display
  • Customizing windows
  • Setting up the mouse
Notes:
  • The example procedures in this document specifically apply to Xubuntu 12.04, and generally apply to all Xubuntu releases.
  • My example settings show only how I have set up my Xubuntu PC. Of course, despite my sophisticated taste, you must set up your PC according to your preferences. :-)
Displaying the Settings window - The Settings window contains icons through which you can set up almost all Xubuntu features. To display your Settings window, do the following:
  1. Move your mouse pointer to the bottom of the screen to display its bottom panel, which contains several application icons.
  2. Place your mouse pointer over the Settings Manager icon to display its name and description.
  3. Click the Settings Manager icon to display the Settings window.


Customizing the date and time display - To customize the date and time display in the top panel on your Xubuntu screen, do the following:
  1. Display the Settings window according to the procedure above, click Panel to display its window, and then select Panel 1 (if not already selected). Note: Panel 1 is at the top of the screen, Panel 2 at the bottom.
  2. In the Measurements section, use the Size (pixels) slider to change the panel size to 35 pixels. Note: Increasing the height of Panel 1 makes your date and time easier to read.
  3. Close the Panel window.
  4. Right-click the current date and time to display the Datetime properties menu.
  5. Click Properties to display its window.
  6. In the Layout section, set Format to Date, then time.
  7. In the Date section, click the current font, set its style to Bold, set the Format to mm/dd/yy, and then click OK.
  8. In the Time section, set the font style to Bold, set the Format to 23:59:59, and then click OK.
 
Customizing windows - To customize all windows that display on your Xubuntu desktop, do the following:
  1. Display the Settings window according to the procedure in the Displaying the Settings window section above.
  2. Click Window Manager to display its window.
  3. In the Theme section, scroll to and select Wallis.
  4. In the Title font section, increase the font size to 11 pt.
  5. In the Button layout section, click and drag buttons to place Close, Maximize, and Hide buttons on the left; and the Menu button on the right.
  6. Close the Window Manager window.
 Setting up the mouse - To set up your mouse (or touchpad), do the following:
  1. Display the Settings window according to the procedure in the Displaying the Settings window section above.
  2. Click Mouse and Touchpad to display its window.
  3. Make adjustments according to your preferences. For example, in the Pointer Speed section, you can increase Acceleration to 5.0.
  4. Close the Mouse and Touchpad window.

9/05/2012

Getting started with Xubuntu


This document introduces the basic features of Xubuntu, which is a lean and fast operating system that runs well on almost all PCs, including those that are old and/or slow. Xubuntu is community-developed Linux distribution based on Ubuntu core components and the Xfce Linux desktop environment.

Every operating system differs from all others. Therefore, Xubuntu does not have the same user interface as Windows, or even Ubuntu. This can be frustrating, especially if you are new to Linux. However, be patient, Xubuntu is only different, not complex.

After you have installed Xubuntu according to Installing Xubuntu, this document can help you learn to use basic Xubuntu components, including:
  • Desktop interfaces
  • Folders and files
  • Applications

Note: The examples in this document specifically apply to Xubuntu 12.04, and generally apply to all Xubuntu releases.

Desktop interfaces
Xubuntu desktop interfaces include a top panel, desktop icons, and a bottom panel.


Top panel - The panel at top of screen contains, from left to right, icons for the following:
  • Applications Menu (the white-mouse icon)
  • Open-window shortcuts (highlighting the active window)
  • Open-application icons
  • Messaging menu
  • Volume-control menu
  • Networking menu
  • Date and time display
  • Workspace switcher (two workspaces)
  • Shutdown menu (with your user name)
Desktop icons - The initial desktop icons (at top left of screen) include Home, File System, and Trash. You can add more desktop icons as you need them. For example, while working on a project, you can place various temporary folders and files on your desktop.

Bottom panel - The panel at the bottom of the screen contains icons through which you can launch primary Xubuntu applications. To display the bottom panel, move your mouse pointer to the bottom of the screen. To add icons, copy them to the bottom panel. For example, after you install a favorite application, you can use drag and drop to copy its icon from the Application Menu to the bottom panel.

Managing Folders and Files
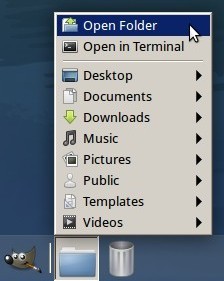
Xubuntu lets you manage your folders, subfolders, and files through its File Manager. To open the File Manager, either double-click the Home desktop icon (top left of screen) or click the blue folder in the bottom panel (at the right) and then click Open Folder.

Note: Each time you start or restart Xubuntu, and first open File Manager, it might open very slowly. This bug has been reported. (Somehow, this problem no longer occurs on my Xubuntu PC.)

Launching Applications
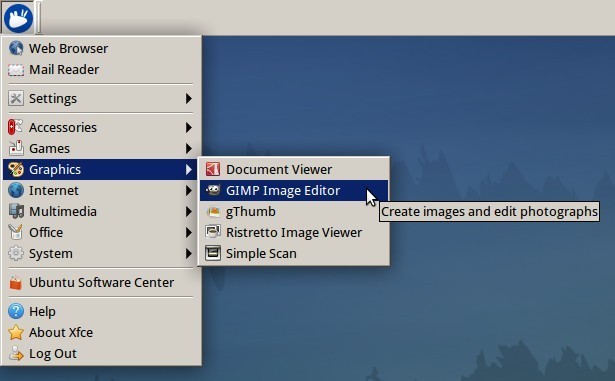
Xubuntu lets you launch applications through the Applications Menu (white-mouse icon) on the top panel, or the application icons or Application Finder icon on the bottom panel. For example, to launch the GIMP image editor, do any of the following:
  • Click the Applications Menu (white mouse) icon in the top panel, select Graphics, and then click GIMP Image Editor.
  • Click the GIMP icon in the bottom panel.
  • Click the Application Finder (magnifying glass) icon in the bottom panel, select Graphics, select GIMP Image Editor, and then click Launch. 

Installing Applications
Xubuntu lets you install new applications through either of two existing applications:
  • Ubuntu Software Center (under Applications Manager)
  • Synaptic Package Manager (under Applications Manager and System)

8/16/2012

Creating and booting a UNetbootin live USB drive

You can use a bootable, live CD to evaluate and/or install any distribution of a Linux operating system. Alternatively, you can use a bootable, live USB drive for testing and installing Linux. This document explains how to create a live USB drive through the UNetbootin utility running under either Windows 7 or Linux, and then boot that live USB drive on almost any PC. While creating your live USB drive, you can either select a Linux distribution through UNetbootin or use an ISO file that you have previously downloaded.
Note: You can use either a live CD or a live USB drive to scan for viruses in a PC that runs Windows 7, or earlier. Please see Using Linux to rescue Windows.
Creating a live USB drive through Windows - If you are running Windows on your PC, you can create a live USB drive for evaluating any Linux distribution. For example, if you are running Windows 7 on your PC, you can do the following:
  1. Connect a USB drive to a USB port on your PC. It should display UDISK in an AutoPlay window.

  2. Go to unetbootin.scourceforge.net, and then click Download (for Windows).

  3. Open your Downloads folder, double-click unetbootin-windows-578.exe, and then click Yes (in the User Account Control window) to display the UNetbootin window.

  4. Select Distribution, select a Linux distribution, such as Puppy Linux, and then click OK to download and install UNetbootin and create a live USB drive. Be patient, this takes time.


  5. After the installation completes, remove your live USB drive, and then click Reboot Now.
Creating a live USB drive through Linux - If you are already running Linux on your PC, you can create a live USB drive for evaluating any other Linux distribution. For example, to select another Linux distribution through an ISO file that you had downloaded previously, and create a live USB drive on your Linux PC, you can do the following:
  1. Connect a USB drive to a USB port on your PC.
  2. Go to unetbootin.scourceforge.net, and then click Download (for Linux).
  3. Open your Downloads folder, right-click unetbootin-linux-578, click Properties, click Permissions, click the Allow executing file as a program checkbox, and then close the Properties window.

  4. Double-click unetbootin-linux-578, type your password, and then click OK to display the UNetbootin window.
  5. Select Diskimage, and then click the Select disk image file box ( ... ) at the right.

  6. Click Computer, double-click the unlabeled folder, double-click Home, double-click your home-folder name (such as Dave), double-click Downloads, select an ISO file to install onto your live USB drive, and then click Open.
  7. On the UNetbootin window, click OK to install UNetbootin and create a live USB drive. Be patient, this takes time.


  8. After the installation completes, remove your live USB drive, and then click Reboot Now.
Booting a UNetbootin live USB drive - After creating a live USB drive according to either procedure above, you can boot that live USB drive to evaluate and/or install your previously-chosen Linux operating system. To boot a live USB drive, do the following:
  1. Connect your live USB drive to a USB port on your PC.
  2. Boot according to the boot sequence on your particular PC. (Here are two possible examples: While your PC starts to boot, press F11 to display a Please select boot device window, and then select USB: UDB DISK. While your PC starts to boot, press F9 to display a Boot Menu window, select Hard Disk, and then select USB-HDDO: UDB DISK 2.0 1.0.) Note: Write down the step-2 boot-sequence for your particular PC; you will need it each time you boot your live USB drive.
  3. Continue according to the Linux distribution that you have booted through your live USB drive.
Note: If you cannot boot your live USB drive, verify that the BIOS on your PC supports booting a live USB drive. Typically, you can access BIOS setup by pressing Delete while your PC starts to boot. Alternatively, you can test your live USB drive by trying to boot it on a separate PC.


7/22/2012

Using Linux to rescue Windows

You can use the Linux operating system to clean malware from Microsoft Windows on your PC. Even if you cannot boot Windows due to a viral infection, you can use Linux to rescue Windows. You need not install LInux, you need only create a Linux live CD, use it to boot your PC, and then install and run the ClamTk antivirus software to clean malware from the Windows partition or drive.


Xubuntu is a lean version of Ubuntu, a Linux distribution. To create an Xubuntu live CD, see the Creating an Xubuntu bootable disc procedure in Installing Xubuntu. You can then use the procedures below to install and run ClamTk through your Xubuntu live CD.

Note: You need not use Xubuntu; procedures are similar for other Linux live CDs.

Installing ClamTk - To install ClamTk, do the following:
  1. If you have not already backed up all data on you PC, do so now. Caution: You will lose your data if you accidentally install Linux over your Windows operating system.
  2. Boot your Windows PC through an Xubuntu live CD, click on Try Xubuntu. Do not install it.
  3. Click the Applications Menu (the white mouse at the upper left corner of the screen) and then click Ubuntu Software Center to display its window.
  4. In the search field, type clamtk, select ClamTk, and then click Install.
  5. After ClamTk finishes installing, close the Ubunutu Software Center window, and then run ClamTk according to procedure below.
Running ClamTk - To run ClamTk, do the following:
  1. Install ClamTk according the procedure above.
  2. Click the Applications Menu (white mouse at upper left), select Accessories, and then click ClamTk to display its Virus Scanner window.
  3. Click Preferences, select the Scanning Preferences tab, select (check mark) Scan files beginning with a dot, select Scan all files and directories within a directory, and then close the Preferences window.
  4. Click Scan, click Recursive Scan, select the partition or drive that contains your Windows operating system, and then click OK to start the scan. Be patient; the scan takes a long time.
  5. After ClamTk completes its scan, it displays any threats it has found. Quarantine all threats.
  6. Shut down Xubuntu, remove its live CD, and then boot Windows.

7/11/2012

Restoring your PC through a Redo live CD


After Creating a Redo live CD and Backing up your PC through a Redo live CD, you can restore that PC through your Redo live CD and the most-recent backup on your external drive.

Note: Redo cannot back up and restore a dual-boot PC.

To restore a full-system backup to your PC through a Redo live CD, do the following:
  1. Through one of the USB ports on your PC, connect the external drive that contains the most-recent full-system backup that you created through your Redo live CD.
  2. Boot or reboot your Redo live CD and wait for it to display its Welcome window. Be patient; booting the Redo live CD takes time.
  3. Click the Restore icon (red down arrow), select the hard disk that contains your backup, such as Drive 2 - - External Drive, and then click Next.
  4. Click the small blue box (at the right),  and then double-click the folder that contains the backup, such as StandbyPC.
  5. Select the backup, such 20120710, click Open, click Next, and then click Next again.
  6. Select your destination drive, such as Drive 1, click Next, click Yes to verify that you want to restore your backup, and then click Next to start the restoration. Be patient, the restoration takes time.
  7. After Redo completes the restoration, click OK, click Exit, and then restart your PC, which ejects the Redo live CD.

7/10/2012

Backing up your PC through a Redo live CD

After following the procedure in Creating a Redo live CD, you can use it to back up all software and data on the main hard drive in your PC. You can use the Redo live CD to back up any PC that has a single operating system, which is either Linux or Microsoft Windows.

Note: Redo cannot back up and restore a dual-boot PC.

To create a full-system backup of your PC through a Redo live CD, do the following:
  1. Connect an external drive to your PC through one of its USB ports.
  2. Boot or reboot your Redo live CD and wait for it to display its Welcome window. Be patient; booting the Redo live CD takes time.
  3. Click the Backup icon (blue up arrow), select the hard disk that you wish to back up, and then click Next.
  4. Select all drive parts (partitions), click Next, select the destination drive, such as an external hard drive, and then click Next.
  5. Click Browse, click Create Folder (at the upper right of the screen), type a folder name, such as StandbyPC, and then press Enter to create your folder and display it at the top of the screen.
  6. Click Save Here (at the lower right of the screen), click Next to display the default backup name, which is the current date, such as 20120710.
  7. Click Next to start backing up your hard drive. Be patient; backing up your PC takes time.
  8. After Redo completes the backup, click OK, click Exit, and then restart your PC, which ejects the Redo live CD.