10/29/2012

Dual booting Ubuntu and Linux Mint


Most Linux enthusiasts know how to install both Linux and Windows on the same PC, and then boot either; this is known as dual booting (or multibooting). However, dual booting two Linux distributions is not as easy as dual booting one Linux distribution with Windows.

Ubuntu and Linux Mint are both popular Linux distributions. If you wish to compare them on the same PC (such as an older, spare PC), this document can help you dual boot them.

Creating a boot-repair live CD - Before you can dual boot Ubuntu and Linux Mint, you need to create a boot-repair live CD as follows:
  1. Download the newest boot-repair-disk.iso disc-image file.
  2. Burn (write) the ISO file to a blank, writable CD.
  3. Label your CD as "Boot Repair Disc."
Installing Ubuntu and Linux Mint - To install both Ubuntu and Linux Mint on the same PC, do the following:
  1. Download a 32-bit Ubuntu live-disc ISO file, burn it to a DVD, and then use that DVD to install Ubuntu as the only operating system.
  2. Install all Ubuntu updates, and then reboot your PC.
  3. Download a 32-bit Linux Mint live-disc ISO file, burn it to a DVD, and then use that DVD to install Linux Mint, as a second operating system, alongside Ubuntu.
  4. Install all Linux Mint updates, and then reboot your PC.
Note: Until after you have run your boot-repair CD according to the section below, you can boot only Linux Mint.

Running your boot-repair CD - Your boot-repair CD lets you repair your boot process, which includes the GRand Universal Bootloader (GRUB). To run your boot-repair CD, do the following:
  1. Install both Ubuntu and Linux Mint on the same PC according to the section above.
  2. Place your boot-repair CD into the optical drive, reboot your PC. and then follow the boot-repair prompts.
  3. As explained in the section above, boot your boot-repair disc as a live disc, and then follow its prompts.
  4. When you see the Boot Repair window, click Recommended repair (repairs most frequent problems). Be patient, each boot-repair phase usually requires more than the "several minutes" that it promises.
After you have run your boot-repair CD successfully, you can boot to either Ubuntu or Linux Mint through GRUB.


10/12/2012

Creating daily activity logs through MS Excel


Excel is the spreadsheet application in the Microsoft Office productivity suite. You can use Excel to generate daily activity (task) logs. This document explains how to:
  1. Create your base log, which is a simple Excel spreadsheet that serves as a template for your daily activity logs.
  2. Create and use daily activity logs, each of which starts as a copy of your base log. For each activity or task that you log, you need enter only a category, a brief description and an ending time. The spreadsheet automatically calculates starting time, activity interval, and total daily time.
  3. Create your PDF daily activity log.
  4. Cover your assets (CYA).
Note: Although this document applies specifically to creating daily activity-log spreadsheets through MS Excel, it applies generally to creating activity logs through other spreadsheet applications, such as LibreOffice Calc and Google Drive Spreadsheet.

Creating your base log
To create your base log, you need to format it and then add its formulas.

Formatting your base log - Your base log requires six columns (A through F) and four rows (1 through 4). To format your base log, do the following:
  1. Open a new MS Excel file, rename its worksheet as DailyLog, and then save the spreadsheet as BaseLog.xls.
  2. Select cells A1 through C1, select HOME (in the toolbar) to display its ribbon, and then click the Merge & Center icon (at the right in the Alignment frame).
  3. Adjust the width of column D, making it wider so you can type activity descriptions.
  4. Merge cells E1 and F1.
  5. Select cells A1 through F2 and then format them as Ariel, 12 points and bold.
  6. In rows 1 through 4, type text as shown in Figure 1 below.
  7. Select cells A3 through B4, select HOME, click the arrow at the right of Number, select Time, select 1:30 PM, and then click OK to format cells A3 through B4 for 12-hour time. Note: If you prefer 24-hour time, select 13:30.
  8. Select cells E3 through F4, select HOME, click the arrow at the right of Number, select Time, select 13:30, and then click OK to format cells E3 through F4 for hours and minutes (no AM or PM). 
Figure 1 - Formatting your base-log spreadsheet.
Note: Click any image to enlarge it.

Adding base-log formulas - To add formulas to your base log, do the following:
  1. Format you base log according to the procedure above.
  2. Select merged cells E1 and F1, type =today() into the function (fx) bar, and then press Enter.
  3. Select cell A3, type your typical first-activity start time, such as 8:00 am.
  4. Select cell B3, type your typical first-activity end time, such as 8:15 am.
  5. Select cell A4, type =b3 into the function bar, and then press Enter.
  6. Select cell E3, type =b3-a3 into the function bar, and then press Enter.
  7. Select cell F3, type =e3 into the function bar, and then press Enter.
  8. Select cell E3, copy it and paste it into cell E4.
  9. Select cell F4, type =sum($e$3:e4) into the function bar, and then press Enter. Your base log should now display as shown in Figure 2 below.
  10. Figure 2 - Adding formulas to your base log.
  11. Save your BaseLog.xls, and make at least one backup copy.

Creating and using your daily logs
To create and use your daily activity logs, you need to create a new log at the start of each day. For an example daily activity log, see Figure 3 below. To create each daily log, do the following:
  1. Open your BaseLog.xls Excel spreadsheet file, and then save it with a file name that includes the current date and your name, such as 2012-10-11_Your_Name_Log.xls.
  2. Modify cells A3 through D3 to log the your first daily activity.
  3. Describe your next activity in cells C4 and D4, and then, when done, record its end time in cell B4.
  4. Copy row 4, paste it into row 5, and then modify cells B5 through D5 to log your next activity. Note: Modify cells only in columns B through D; spreadsheet formulas update other cells automatically.
  5. For each subsequent activity, copy your last row, paste it into the next, and then modify its cells in columns B through D.
  6. Figure 3 - Example daily activity log.
  7. At the end of the day, make at least one backup copy of your daily activity log.
Creating your PDF daily activity log
To create your PDF daily activity log, do the following:
  1. Open your Excel daily activity log, such as 2012-10-11_Your_Name_Log.xls.
  2. Click the Office Button (at the upper left), to display its menu.
  3. Select Save As, click PDF or XPS, and select the PDF file type.
  4. Click Publish to generate your PDF daily activity log, such as
    2012-10-11_Your_Name_Log.pdf.
Covering your assets (CYA)
Your daily activity logs can help you practice prudent CYA. For example, at the end of each day, you can:
  1. Create a PDF daily activity log according to the section above.
  2. Create a PDF status report according to Creating a cumulative status report through MS Word.
  3. Send an email to all your managers, and attach both PDFs.
  4. Make personal backup copies of both PDFs, and file them in private storage.


10/04/2012

Installing LibreOffice on Xubuntu


Although Xubuntu does not include the LibreOffice productivity suite by default, you can install it easily through the Ubuntu Software Center. After you have installed Xubuntu on any PC, this document can help you install LibreOffice and then configure it according to your preferences.
Intalling LibreOffice - To install LibreOffice on your Xubuntu PC, do the following:
  1. Click the Applications Menu icon (white mouse at the top-left of your screen) to display the Applications Menu.
  2. Click Ubuntu Software Center, type libreoffice into the search field, scroll down to, and click, LibreOffice, and then click Install.
  3. Type your password, click Authenticate, and then wait for the installation to finish. A progress indicator displays immediately above the Install button.
  4. Close the Ubuntu Software Center window.
  5. Click the Applications Menu icon, and then click Office to display its menu, which now includes icons for the LibreOffice suite, and its individual applications: Base, Calc, Draw, Impress and Writer.
Configuring LibreOffice - After you have installed LibreOffice, you can configure it according to your preferences. The following links can help you get started with LIbreOffice:

9/11/2012

Installing Google Chrome on Xubuntu


Firefox is the default web browser on Xubuntu. You can install an additional browser, such as Google Chrome. This document can help you download Chrome and then install it on your Xubuntu PC.

Note: The procedures in this document specifically apply to Xubuntu 12.04, and generally apply to all Xubuntu releases.

Downloading Chrome - To download Chrome for your Xubuntu PC, do the following:
  1. Click the Applications Menu (white mouse), select Internet, and then click Firefox Web Browser to display its Ubuntu Start Page.
  2. In the Google search field, type google chrome, and then press Enter to search for and display links to Google Chrome.
  3. Click Chrome Browser - Google, click Download Chrome, select 32 bit .deb (For Debian/Ubuntu), and then click Accept and Install.
  4. Select Save File, and then click OK to download Chrome.
  5. Close Firefox, and then install Chrome according to procedure below.
     
Installing Chrome - To install Chrome on your Xubuntu PC, do the following:
  1. Download Chrome according to the procedure above.
  2. Double-click your Home folder, click Download, right-click the google-chrome-stable-current file, and then click Open With Ubuntu Software Center.
  3. After the Ubuntu Software Center window displays google-chrome-stable, click Install, type your password, and then click Authenticate.
  4. Close the Ubuntu Software Center window, click Applications Menu (white mouse), select Internet, click Google Chrome, make it your default browser (optional), and then click Start Google Chrome. (If prompted to Choose password for new keyring, click Cancel).


9/07/2012

Setting up Xubuntu


Xubuntu is a community-developed Linux distribution based on Ubuntu core components and the Xfce Linux desktop environment. As I show in Getting started with Xubuntu, it works very well immediately after you install it. However, you can set up (customize, configure) Xubuntu according to your needs or preferences.


After studying and/or trying example set-up procedures for Xubuntu, you can more easily perform its other setup procedures. This document contains the following example procedures:
  • Displaying the Settings window
  • Customizing the date and time display
  • Customizing windows
  • Setting up the mouse
Notes:
  • The example procedures in this document specifically apply to Xubuntu 12.04, and generally apply to all Xubuntu releases.
  • My example settings show only how I have set up my Xubuntu PC. Of course, despite my sophisticated taste, you must set up your PC according to your preferences. :-)
Displaying the Settings window - The Settings window contains icons through which you can set up almost all Xubuntu features. To display your Settings window, do the following:
  1. Move your mouse pointer to the bottom of the screen to display its bottom panel, which contains several application icons.
  2. Place your mouse pointer over the Settings Manager icon to display its name and description.
  3. Click the Settings Manager icon to display the Settings window.


Customizing the date and time display - To customize the date and time display in the top panel on your Xubuntu screen, do the following:
  1. Display the Settings window according to the procedure above, click Panel to display its window, and then select Panel 1 (if not already selected). Note: Panel 1 is at the top of the screen, Panel 2 at the bottom.
  2. In the Measurements section, use the Size (pixels) slider to change the panel size to 35 pixels. Note: Increasing the height of Panel 1 makes your date and time easier to read.
  3. Close the Panel window.
  4. Right-click the current date and time to display the Datetime properties menu.
  5. Click Properties to display its window.
  6. In the Layout section, set Format to Date, then time.
  7. In the Date section, click the current font, set its style to Bold, set the Format to mm/dd/yy, and then click OK.
  8. In the Time section, set the font style to Bold, set the Format to 23:59:59, and then click OK.
 
Customizing windows - To customize all windows that display on your Xubuntu desktop, do the following:
  1. Display the Settings window according to the procedure in the Displaying the Settings window section above.
  2. Click Window Manager to display its window.
  3. In the Theme section, scroll to and select Wallis.
  4. In the Title font section, increase the font size to 11 pt.
  5. In the Button layout section, click and drag buttons to place Close, Maximize, and Hide buttons on the left; and the Menu button on the right.
  6. Close the Window Manager window.
 Setting up the mouse - To set up your mouse (or touchpad), do the following:
  1. Display the Settings window according to the procedure in the Displaying the Settings window section above.
  2. Click Mouse and Touchpad to display its window.
  3. Make adjustments according to your preferences. For example, in the Pointer Speed section, you can increase Acceleration to 5.0.
  4. Close the Mouse and Touchpad window.

9/05/2012

Getting started with Xubuntu


This document introduces the basic features of Xubuntu, which is a lean and fast operating system that runs well on almost all PCs, including those that are old and/or slow. Xubuntu is community-developed Linux distribution based on Ubuntu core components and the Xfce Linux desktop environment.

Every operating system differs from all others. Therefore, Xubuntu does not have the same user interface as Windows, or even Ubuntu. This can be frustrating, especially if you are new to Linux. However, be patient, Xubuntu is only different, not complex.

After you have installed Xubuntu according to Installing Xubuntu, this document can help you learn to use basic Xubuntu components, including:
  • Desktop interfaces
  • Folders and files
  • Applications

Note: The examples in this document specifically apply to Xubuntu 12.04, and generally apply to all Xubuntu releases.

Desktop interfaces
Xubuntu desktop interfaces include a top panel, desktop icons, and a bottom panel.


Top panel - The panel at top of screen contains, from left to right, icons for the following:
  • Applications Menu (the white-mouse icon)
  • Open-window shortcuts (highlighting the active window)
  • Open-application icons
  • Messaging menu
  • Volume-control menu
  • Networking menu
  • Date and time display
  • Workspace switcher (two workspaces)
  • Shutdown menu (with your user name)
Desktop icons - The initial desktop icons (at top left of screen) include Home, File System, and Trash. You can add more desktop icons as you need them. For example, while working on a project, you can place various temporary folders and files on your desktop.

Bottom panel - The panel at the bottom of the screen contains icons through which you can launch primary Xubuntu applications. To display the bottom panel, move your mouse pointer to the bottom of the screen. To add icons, copy them to the bottom panel. For example, after you install a favorite application, you can use drag and drop to copy its icon from the Application Menu to the bottom panel.

Managing Folders and Files
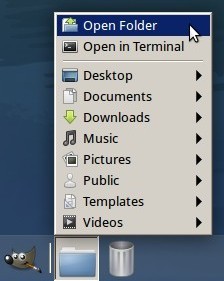
Xubuntu lets you manage your folders, subfolders, and files through its File Manager. To open the File Manager, either double-click the Home desktop icon (top left of screen) or click the blue folder in the bottom panel (at the right) and then click Open Folder.

Note: Each time you start or restart Xubuntu, and first open File Manager, it might open very slowly. This bug has been reported. (Somehow, this problem no longer occurs on my Xubuntu PC.)

Launching Applications
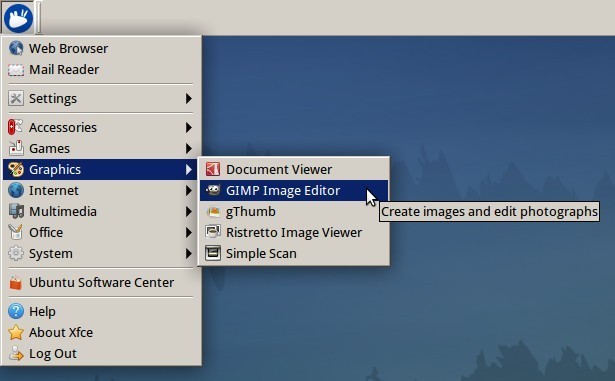
Xubuntu lets you launch applications through the Applications Menu (white-mouse icon) on the top panel, or the application icons or Application Finder icon on the bottom panel. For example, to launch the GIMP image editor, do any of the following:
  • Click the Applications Menu (white mouse) icon in the top panel, select Graphics, and then click GIMP Image Editor.
  • Click the GIMP icon in the bottom panel.
  • Click the Application Finder (magnifying glass) icon in the bottom panel, select Graphics, select GIMP Image Editor, and then click Launch. 

Installing Applications
Xubuntu lets you install new applications through either of two existing applications:
  • Ubuntu Software Center (under Applications Manager)
  • Synaptic Package Manager (under Applications Manager and System)

8/16/2012

Creating and booting a UNetbootin live USB drive

You can use a bootable, live CD to evaluate and/or install any distribution of a Linux operating system. Alternatively, you can use a bootable, live USB drive for testing and installing Linux. This document explains how to create a live USB drive through the UNetbootin utility running under either Windows 7 or Linux, and then boot that live USB drive on almost any PC. While creating your live USB drive, you can either select a Linux distribution through UNetbootin or use an ISO file that you have previously downloaded.
Note: You can use either a live CD or a live USB drive to scan for viruses in a PC that runs Windows 7, or earlier. Please see Using Linux to rescue Windows.
Creating a live USB drive through Windows - If you are running Windows on your PC, you can create a live USB drive for evaluating any Linux distribution. For example, if you are running Windows 7 on your PC, you can do the following:
  1. Connect a USB drive to a USB port on your PC. It should display UDISK in an AutoPlay window.

  2. Go to unetbootin.scourceforge.net, and then click Download (for Windows).

  3. Open your Downloads folder, double-click unetbootin-windows-578.exe, and then click Yes (in the User Account Control window) to display the UNetbootin window.

  4. Select Distribution, select a Linux distribution, such as Puppy Linux, and then click OK to download and install UNetbootin and create a live USB drive. Be patient, this takes time.


  5. After the installation completes, remove your live USB drive, and then click Reboot Now.
Creating a live USB drive through Linux - If you are already running Linux on your PC, you can create a live USB drive for evaluating any other Linux distribution. For example, to select another Linux distribution through an ISO file that you had downloaded previously, and create a live USB drive on your Linux PC, you can do the following:
  1. Connect a USB drive to a USB port on your PC.
  2. Go to unetbootin.scourceforge.net, and then click Download (for Linux).
  3. Open your Downloads folder, right-click unetbootin-linux-578, click Properties, click Permissions, click the Allow executing file as a program checkbox, and then close the Properties window.

  4. Double-click unetbootin-linux-578, type your password, and then click OK to display the UNetbootin window.
  5. Select Diskimage, and then click the Select disk image file box ( ... ) at the right.

  6. Click Computer, double-click the unlabeled folder, double-click Home, double-click your home-folder name (such as Dave), double-click Downloads, select an ISO file to install onto your live USB drive, and then click Open.
  7. On the UNetbootin window, click OK to install UNetbootin and create a live USB drive. Be patient, this takes time.


  8. After the installation completes, remove your live USB drive, and then click Reboot Now.
Booting a UNetbootin live USB drive - After creating a live USB drive according to either procedure above, you can boot that live USB drive to evaluate and/or install your previously-chosen Linux operating system. To boot a live USB drive, do the following:
  1. Connect your live USB drive to a USB port on your PC.
  2. Boot according to the boot sequence on your particular PC. (Here are two possible examples: While your PC starts to boot, press F11 to display a Please select boot device window, and then select USB: UDB DISK. While your PC starts to boot, press F9 to display a Boot Menu window, select Hard Disk, and then select USB-HDDO: UDB DISK 2.0 1.0.) Note: Write down the step-2 boot-sequence for your particular PC; you will need it each time you boot your live USB drive.
  3. Continue according to the Linux distribution that you have booted through your live USB drive.
Note: If you cannot boot your live USB drive, verify that the BIOS on your PC supports booting a live USB drive. Typically, you can access BIOS setup by pressing Delete while your PC starts to boot. Alternatively, you can test your live USB drive by trying to boot it on a separate PC.