11/09/2012

Repairing frozen Dash in Ubuntu 12.10


Ubuntu 12.10 is the newest Ubuntu distribution of the Linux operating system. After you install or upgrade to Ubuntu 12.10, its Dash search window might not work correctly. Intermittently, Dash can freeze (hang up) after you type only a few characters into its search field. This document can probably help you repair Dash by installing a proprietary video driver.
Authors Note: I experienced this problem on my medium-powered (AMD dual-core, 2 GB memory), rebuilt PC, into which I had installed a new motherboard. I use this machine as my standby and experimental PC, on which I ran Ubuntu 12.04 with no Dash problems.
To repair frozen dash by installing a proprietary video driver, do the following:
  1. In the launcher, click System Settings to display its window, click Software Sources to display its window, and then click the Additional Drivers tab to display its page.
  2. Select an appropriate driver, such as the NVIDIA binary Xorg - - (proprietary, tested) driver shown below, and then click Apply Changes.
  3. When prompted, type your password, and then click Authenticate.
  4. Close the Software Sources window.
  5. Reboot your PC.


11/07/2012

Disabling Amazon shopping results in Ubuntu 12.10 Dash


If you use Dash, the internal search tool in Ubuntu 12.10, to find and display a file, folder, or application, Dash also displays Amazon shopping results (as "More suggestions"). For example, as shown in Figure 1 below, if you search for Python in Dash, it displays not only the IDLE (using Python-3.3) application, but also Amazon shopping results. This document can help you easily disable Amazon shopping results, allowing your search to display only what it finds internally, as shown in Figure 2 below.
Figure 1 - Amazon shopping results enabled
Figure 2 - Amazon shopping results disabled
Author's Note: Amazon shopping results in Dash annoy me. If I am searching for something on my computer, I want only that item; I care not whether Amazon (or any other merchant) can sell me related items. I need not be distracted by eye clutter. If I wish to buy something online, I will search for it through a browser.

You can very easily disable Amazon shopping results, as follows:
  1. As shown in Figure 3 below, in the launcher, click System Settings to display its window.
  2. As shown in Figure 4 below, click Privacy to display its window.
  3. As shown in Figure 5 below, find the switch at the right of When searching in the Dash: Include online search results, and then click the switch to toggle it to OFF.
Figure 3 - Selecting system settings
Figure 4 - Selecting privacy
Figure 5 - Disabling Amazon shopping results


11/03/2012

Using Word 2007 ribbons for tables


If you only occasionally use Word 2007 (the word processor in Microsoft Office 2007), you might find its ribbons less intuitive than were the menus in earlier versions of Word. This can be especially frustrating while creating and maintaining tables. This document can help you remember where to find, and how to use, various Word 2007 table tools, including its:
  • Table icon
  • Design ribbon
  • Layout ribbon
  • Borders and Shading window

Creating a new table - The easiest-to-find Word 2007 table tool is the Table icon that lets you create new tables. To create a new Word 2007 table, do the following:
  1. Click the Insert tab to display its ribbon as shown in Figure 1 below.
  2. Double-click the Table icon, and then click Insert Table to display its window as shown in Figure 2 below.
  3. Select your numbers of columns and rows, and then click OK. For example, as shown in Figure 3 below, you might choose four columns and seven rows.
Figure 1 - The Insert ribbon contains this Table icon.
Figure 2 - The Insert Table window lets you choose your numbers of columns and rows.
Figure 3 - This sample new table contains four columns and seven rows.

Accessing table ribbons - The relatively-easy-to-find Word 2007 Design and Layout table ribbons contain table tools. Placing the text-insertion point (flashing cursor) anywhere within a table displays the yellow Table Tools label and the Design and Layout tabs as shown in Figure 4 below. You can then do either of the following:
  • Click the Design tab to display its ribbon as shown in Figure 5 below. The Design ribbon contains tools for formatting the overall table.
  • Click the Layout tab to display its ribbon as shown in Figure 6 below. The Layout ribbon contains tools for manipulating columns, rows, and cells.
Figure 4 -The yellow Table Tools label highlights the table ribbon tabs, Design and Layout.

Figure 5 - The Design table ribbon contains tools for formatting the overall table.
Figure 6 - The Layout table ribbon contains tools for manipulating columns, rows, and  cells.

Note: For another table example table created through ribbons, please see Creating a cumulative status report through MS Word.


Applying borders and shading - The not-so-easy-to-find Word 2007 Borders and Shading window contains traditional, intuitive tools for applying borders, grids, and shading to your selected cells. To access the Borders and Shading window, do the following:
  1. Place the text-insertion point anywhere within the table you wish to edit.
  2. Click the Design tab to display its ribbon.
  3. At the lower-right corner of the Design ribbon, click the small arrow (at the right of Draw Borders) to display the Borders and Shading window as shown in Figure 7 below.
Figure 7 - The Borders and Shading window contains traditional, intuitive tools
for applying borders and shading to your selected cells.

10/29/2012

Dual booting Ubuntu and Linux Mint


Most Linux enthusiasts know how to install both Linux and Windows on the same PC, and then boot either; this is known as dual booting (or multibooting). However, dual booting two Linux distributions is not as easy as dual booting one Linux distribution with Windows.

Ubuntu and Linux Mint are both popular Linux distributions. If you wish to compare them on the same PC (such as an older, spare PC), this document can help you dual boot them.

Creating a boot-repair live CD - Before you can dual boot Ubuntu and Linux Mint, you need to create a boot-repair live CD as follows:
  1. Download the newest boot-repair-disk.iso disc-image file.
  2. Burn (write) the ISO file to a blank, writable CD.
  3. Label your CD as "Boot Repair Disc."
Installing Ubuntu and Linux Mint - To install both Ubuntu and Linux Mint on the same PC, do the following:
  1. Download a 32-bit Ubuntu live-disc ISO file, burn it to a DVD, and then use that DVD to install Ubuntu as the only operating system.
  2. Install all Ubuntu updates, and then reboot your PC.
  3. Download a 32-bit Linux Mint live-disc ISO file, burn it to a DVD, and then use that DVD to install Linux Mint, as a second operating system, alongside Ubuntu.
  4. Install all Linux Mint updates, and then reboot your PC.
Note: Until after you have run your boot-repair CD according to the section below, you can boot only Linux Mint.

Running your boot-repair CD - Your boot-repair CD lets you repair your boot process, which includes the GRand Universal Bootloader (GRUB). To run your boot-repair CD, do the following:
  1. Install both Ubuntu and Linux Mint on the same PC according to the section above.
  2. Place your boot-repair CD into the optical drive, reboot your PC. and then follow the boot-repair prompts.
  3. As explained in the section above, boot your boot-repair disc as a live disc, and then follow its prompts.
  4. When you see the Boot Repair window, click Recommended repair (repairs most frequent problems). Be patient, each boot-repair phase usually requires more than the "several minutes" that it promises.
After you have run your boot-repair CD successfully, you can boot to either Ubuntu or Linux Mint through GRUB.


10/12/2012

Creating daily activity logs through MS Excel


Excel is the spreadsheet application in the Microsoft Office productivity suite. You can use Excel to generate daily activity (task) logs. This document explains how to:
  1. Create your base log, which is a simple Excel spreadsheet that serves as a template for your daily activity logs.
  2. Create and use daily activity logs, each of which starts as a copy of your base log. For each activity or task that you log, you need enter only a category, a brief description and an ending time. The spreadsheet automatically calculates starting time, activity interval, and total daily time.
  3. Create your PDF daily activity log.
  4. Cover your assets (CYA).
Note: Although this document applies specifically to creating daily activity-log spreadsheets through MS Excel, it applies generally to creating activity logs through other spreadsheet applications, such as LibreOffice Calc and Google Drive Spreadsheet.

Creating your base log
To create your base log, you need to format it and then add its formulas.

Formatting your base log - Your base log requires six columns (A through F) and four rows (1 through 4). To format your base log, do the following:
  1. Open a new MS Excel file, rename its worksheet as DailyLog, and then save the spreadsheet as BaseLog.xls.
  2. Select cells A1 through C1, select HOME (in the toolbar) to display its ribbon, and then click the Merge & Center icon (at the right in the Alignment frame).
  3. Adjust the width of column D, making it wider so you can type activity descriptions.
  4. Merge cells E1 and F1.
  5. Select cells A1 through F2 and then format them as Ariel, 12 points and bold.
  6. In rows 1 through 4, type text as shown in Figure 1 below.
  7. Select cells A3 through B4, select HOME, click the arrow at the right of Number, select Time, select 1:30 PM, and then click OK to format cells A3 through B4 for 12-hour time. Note: If you prefer 24-hour time, select 13:30.
  8. Select cells E3 through F4, select HOME, click the arrow at the right of Number, select Time, select 13:30, and then click OK to format cells E3 through F4 for hours and minutes (no AM or PM). 
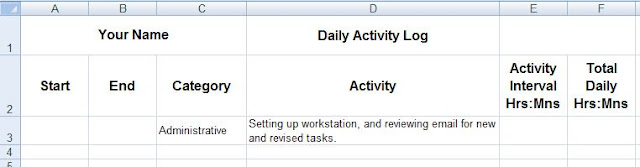
Figure 1 - Formatting your base-log spreadsheet.
Note: Click any image to enlarge it.

Adding base-log formulas - To add formulas to your base log, do the following:
  1. Format you base log according to the procedure above.
  2. Select merged cells E1 and F1, type =today() into the function (fx) bar, and then press Enter.
  3. Select cell A3, type your typical first-activity start time, such as 8:00 am.
  4. Select cell B3, type your typical first-activity end time, such as 8:15 am.
  5. Select cell A4, type =b3 into the function bar, and then press Enter.
  6. Select cell E3, type =b3-a3 into the function bar, and then press Enter.
  7. Select cell F3, type =e3 into the function bar, and then press Enter.
  8. Select cell E3, copy it and paste it into cell E4.
  9. Select cell F4, type =sum($e$3:e4) into the function bar, and then press Enter. Your base log should now display as shown in Figure 2 below.
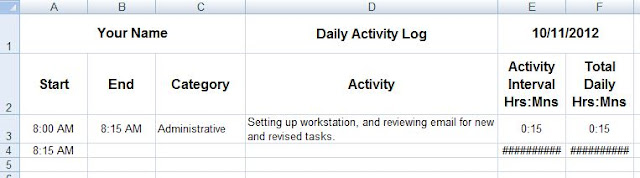
  10. Figure 2 - Adding formulas to your base log.
  11. Save your BaseLog.xls, and make at least one backup copy.

Creating and using your daily logs
To create and use your daily activity logs, you need to create a new log at the start of each day. For an example daily activity log, see Figure 3 below. To create each daily log, do the following:
  1. Open your BaseLog.xls Excel spreadsheet file, and then save it with a file name that includes the current date and your name, such as 2012-10-11_Your_Name_Log.xls.
  2. Modify cells A3 through D3 to log the your first daily activity.
  3. Describe your next activity in cells C4 and D4, and then, when done, record its end time in cell B4.
  4. Copy row 4, paste it into row 5, and then modify cells B5 through D5 to log your next activity. Note: Modify cells only in columns B through D; spreadsheet formulas update other cells automatically.
  5. For each subsequent activity, copy your last row, paste it into the next, and then modify its cells in columns B through D.
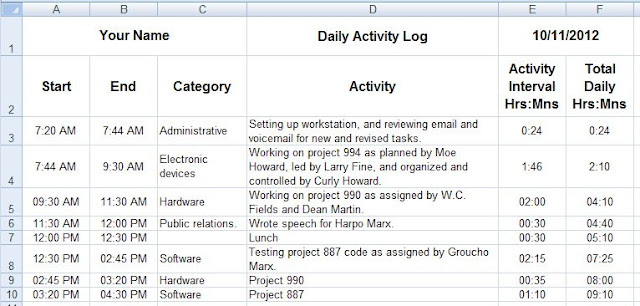
  6. Figure 3 - Example daily activity log.
  7. At the end of the day, make at least one backup copy of your daily activity log.
Creating your PDF daily activity log
To create your PDF daily activity log, do the following:
  1. Open your Excel daily activity log, such as 2012-10-11_Your_Name_Log.xls.
  2. Click the Office Button (at the upper left), to display its menu.
  3. Select Save As, click PDF or XPS, and select the PDF file type.
  4. Click Publish to generate your PDF daily activity log, such as
    2012-10-11_Your_Name_Log.pdf.
Covering your assets (CYA)
Your daily activity logs can help you practice prudent CYA. For example, at the end of each day, you can:
  1. Create a PDF daily activity log according to the section above.
  2. Create a PDF status report according to Creating a cumulative status report through MS Word.
  3. Send an email to all your managers, and attach both PDFs.
  4. Make personal backup copies of both PDFs, and file them in private storage.


10/04/2012

Installing LibreOffice on Xubuntu


Although Xubuntu does not include the LibreOffice productivity suite by default, you can install it easily through the Ubuntu Software Center. After you have installed Xubuntu on any PC, this document can help you install LibreOffice and then configure it according to your preferences.
Intalling LibreOffice - To install LibreOffice on your Xubuntu PC, do the following:
  1. Click the Applications Menu icon (white mouse at the top-left of your screen) to display the Applications Menu.
  2. Click Ubuntu Software Center, type libreoffice into the search field, scroll down to, and click, LibreOffice, and then click Install.
  3. Type your password, click Authenticate, and then wait for the installation to finish. A progress indicator displays immediately above the Install button.
  4. Close the Ubuntu Software Center window.
  5. Click the Applications Menu icon, and then click Office to display its menu, which now includes icons for the LibreOffice suite, and its individual applications: Base, Calc, Draw, Impress and Writer.
Configuring LibreOffice - After you have installed LibreOffice, you can configure it according to your preferences. The following links can help you get started with LIbreOffice:

9/11/2012

Installing Google Chrome on Xubuntu


Firefox is the default web browser on Xubuntu. You can install an additional browser, such as Google Chrome. This document can help you download Chrome and then install it on your Xubuntu PC.

Note: The procedures in this document specifically apply to Xubuntu 12.04, and generally apply to all Xubuntu releases.

Downloading Chrome - To download Chrome for your Xubuntu PC, do the following:
  1. Click the Applications Menu (white mouse), select Internet, and then click Firefox Web Browser to display its Ubuntu Start Page.
  2. In the Google search field, type google chrome, and then press Enter to search for and display links to Google Chrome.
  3. Click Chrome Browser - Google, click Download Chrome, select 32 bit .deb (For Debian/Ubuntu), and then click Accept and Install.
  4. Select Save File, and then click OK to download Chrome.
  5. Close Firefox, and then install Chrome according to procedure below.
     
Installing Chrome - To install Chrome on your Xubuntu PC, do the following:
  1. Download Chrome according to the procedure above.
  2. Double-click your Home folder, click Download, right-click the google-chrome-stable-current file, and then click Open With Ubuntu Software Center.
  3. After the Ubuntu Software Center window displays google-chrome-stable, click Install, type your password, and then click Authenticate.
  4. Close the Ubuntu Software Center window, click Applications Menu (white mouse), select Internet, click Google Chrome, make it your default browser (optional), and then click Start Google Chrome. (If prompted to Choose password for new keyring, click Cancel).